


๐ผ Upgrade your MacBookโs storage game โ because your data deserves a VIP slot!
The ZXUY Hard Drive SATA 2nd HDD Caddy Tray is a precision replacement for the optical drive bay in Unibody MacBook and MacBook Pro models, enabling users to install a 2.5" SATA HDD or SSD up to 9.5mm thick. It supports bootable drives and RAID arrays, effectively doubling your internal storage capacity by adding up to 500GB of high-performance space. Designed for easy installation with included screws and screwdriver, this caddy offers a sleek, power-efficient upgrade that transforms your laptopโs unused CD/DVD slot into a versatile storage powerhouse.
| ASIN | B0058AH2US |
| Brand | ZXUY |
| Color | black |
| Compatible Devices | Laptop |
| Customer Reviews | 4.5 out of 5 stars 2,040 Reviews |
| Global Trade Identification Number | 00847977007980 |
| Hard Disk Form Factor | 2.5 Inches |
| Hardware Interface | SATA 3.0 Gb/s |
| Hardware Platform | Laptop |
| Item Weight | 0.2 Pounds |
| Manufacturer | China |
| Memory Storage Capacity | 500 GB |
| Mfr Part Number | RH16-BT-FBA1 |
| Model Number | RH16-BT-FBA1 |
| Supported Devices Quantity | 1 |
| UPC | 534374017697 847977007980 701304977530 701056958924 |
G**R
Worked well in my MBP '13 mid 2012
So i installed an ssd in the main slot and wanted to remove the useless cd-rom drive and put an extra hd in there. It worked well, let me tell you the installation is pretty difficult. There are so many little screws you have to take apart that the process got a little stressful lol. If however, you keep track of where you got the screws and keep them neatly in place it wouldn't be to hard. Just some notes, most reviews are for older models and i couldn't find anything for my newer macbook. I found something on ifixit finally and will post it below. Only needed the review for the part on removing the speaker assembly as i couldn't tell which screws to remove. With a little patience however, the installation is pretty painless and takes maybe 20 minutes to do. My battery life is about the same or rather i haven't noticed a decrease. The ssd saves some power, and the extra HD just sites idle mostly so it balances out. Tips: You'll need a small screw screw driver (the one the looks like a star (forgot what its called sorry)) to remove the screws off of the HD if you're planning on putting the one that comes with the mac in this caddy. This caddy comes with a screw driver to remove all the screws on your macbook and it works perfectly, fits the screws well and is a small screw driver. Instructions: So i installed an ssd in the main slot and wanted to remove the useless cd-rom drive and put an extra hd in there. It worked well, let me tell you the installation is pretty difficult. There are so many little screws you have to take apart that the process got a little stressful lol. If however, you keep track of where you got the screws and keep them neatly in place it wouldn't be to hard. Just some notes, most reviews are for older models and i couldn't find anything for my newer macbook. I found something on ifixit finally and will post it below. Only needed the review for the part on removing the speaker assembly as i couldn't tell which screws to remove. With a little patience however, the installation is pretty painless and takes maybe 20 minutes to do. My battery life is about the same or rather i haven't noticed a decrease. The ssd saves some power, and the extra HD just sites idle mostly so it balances out. Tips: You'll need a small screw screw driver (the one the looks like a star (forgot what its called sorry)) to remove the screws off of the HD if you're planning on putting the one that comes with the mac in this caddy. This caddy comes with a screw driver to remove all the screws on your macbook and it works perfectly, fits the screws well and is a small screw driver. Instructions: [...]
J**Y
SOOO Happy
If you are looking to replace your optical drive on your 2011 late and early Macbook Pro, this device is for you. hahaha, really, I sound like I should be their salesman but I am very happy with this product. In fact I bought the same one (although I think from a different buyer) for my early macbook pro and because it worked so well I bought this one for my Late 2011 macbook pro. The only difference is that I paid 9 bucks for the express mail on this one because a friend was leaving to Indonesia in a few days and I got her to help me out and bring this for me. The other disk caddy I got took about 2 weeks to get to my other friend's place. But the caddy works well, it fits nicely with the space left by the optical drive, and I only used one of the screws they provided because the macbook pro screws all worked well. I know other places are selling these caddy's for about 60 bucks but I can honestly tell you, NO NEED. I think the difference is that the others give you a plastic sponger .... i used a plastic spoon and was find (to lift up some tabs on your mac) .... hope this helps NEW INFORMATION: Okay, so I went to leave a product review on the first disk caddy I bought and I got a warning label from Amazon that stated "You can not comment on the same product (or set) twice." So I do have something to add .... The first disk caddy i bought was from Sold by: AMZNeTek ( seller profile ) (and because I didn't pay for express it took about 2 weeks to get to my house. The second disk caddy I bouth was Sold by: National tech solutions LLC ( seller profile ) and it took 2 days to get to my house because i paid 9 bucks for express. So, just in case you are confused or worried about buying the right disk caddy, and wondering why these are so darn cheap compared to the 60 dollar kind, I can tell you these are well worth their money. I did my research and saw the caddy's that have extra pieces hanging off of them and these ARE NOT those kind. These work really well.
E**C
Awesome! Cheap and it works.....
I am soooo glad I purchased this caddy over the more expensive MCE Optibay or OWC Data Doubler. I have an Early 2011 13" MacBook Pro and used this caddy to utilize an M225 128GB Crucial SSD in the SuperDrive area (so the SSD is in the caddy). I left my stock HD right where it was as I've read in countless places that the sudden motion sensor for the HD only works there. Plus, that is where it was designed to go. This caddy fits like a glove with no effort or adjusting needed on my part to the caddy. The 4 screws come preinstalled in the caddy so don't freak out if you don't see a little bag with them in it. I was a bit worried at first as the packaging had Chinese all over it so I thought I got a Chinese ripp off imitation. But it works like a champ! Installation was simple and easy. I think anyone could do it, took me 15 minutes roughly. Just watch any youtube video or better yet, watch the installation video on the OWC website for their Data Doubler (that's what I did). They let you choose your model of MBP and the video is in HD. FYI, this caddy comes with no tools or instructions. (I didn't mind) Why spend $50-$60 on the overpriced MCE or OWC stuff when you can do the same for around $10? Great product!
G**D
Get your tools, it's not a quick swap, but worth it.
You'll need a #0 Phillips and a T6 Torx Screwdriver for your MacBook Pro. A few parts from the optical drive will be re-used: the bracket that secures the SATA side of the drive the SATA adapter ribbon cable. all the screws used to hold down the optical drive I moved my SATA hard disk to the optical bay caddy and installed the SSD into the original hdd bay. Please note - you will not be able to boot camp your laptop after this - as it requires an optical drive in the optical drive bay (external optical drives do NOT work, it's a very annoying hardware limitation). MacBooks are hardware limited to boot only from hdd in the first bay and only from optical media in the second. You can put a hdd in the second bay - but you won't be able to boot to it. Which is why I decided I would place the SSD in the hdd bay. One bonus is you will be able to create a FusionDrive - and I'm using my MBP with a 120GB SSD + 750GB HDD together. It works wonderfully. It's almost like having a 900GB SSD, almost. Another bonus I did notice is that my laptop was much quieter when I was using it in a quiet room - the noise a spinning disk makes is audible when it's in the HDD bay, but when tucked into a drive caddy - is silenced. Maybe it's just the 7200 RPM disk I have, but it was a bonus to moving it. The bay itself is average quality - nothing amazing or worthy of note. It includes a pair of screws to hold the hard drive to the bay caddy but I didn't need them as the fit was good. Pros: It's cheap. It gives you another storage option for your MBP. It lets you create a Fusion drive with the addition of a SSD or HDD (which ever you didn't have before). It provides additional sound dampening for spinning disks. It's fast - I get full SATA 3 speeds through the port Cons: You lose the ability to boot camp (MBP limitation) You can't boot to the disk in the caddy (MBP limitation) You have to hack the OS if you want to use a USB DVD/CD drive (MBP limitation) You'll use more battery power (basic physics... you are adding a device that is always on to your laptop...)
D**D
Works for mid 2012 Macbook Pro 13"
I bought this enclosure to allow me to install a solid state drive as my boot drive and replace my dvd drive with my current hard drive in my mid 2012 Macbook Pro laptop. This caddy cost me ~$10 and shipped on time. Installation successful, works well. I went with this one simply because it's a lot cheaper than brand name products and does the exact same thing. Running with no issues for over two months now. Notes about installation- My 2.5" hard drive didn't fit properly in this caddy until I shaved a small tab of plastic down inside the enclosure with an exacto knife. Took under 5 minutes and was quite straight forward. Just shave until the connector pins can line up and the hard drive can plug in. Also, only one screw lined up connecting the HD to the caddy, not both. However, once the installation is done, it is held very snugly in place (due to shaving the plastic tab), so the second screw is superfluous. Here are a few more notes about installing an SSD as your boot drive and moving your current HD to the optical bay. Remember to back everything up! This was my first time, so I was a little nervous, but it ended up being fairly straight forward. You will need: -T6 torx -00 phillips -exacto knife (for plastic tabs) -a few shot glasses or an ice cube tray to keep the different sized screws separate -a second computer to watch the instructional video, I used the OWC video and it helped a lot: [...] (choose your mbp model) -SSD- I got a 256GB Crucial SSD and it's running very well. Remeber to put your SSD in the primary hard drive spot, and your original MBP hard drive in the caddy, so the SSD can run with optimal speed as your boot drive (an issue only with some mbp models, but no reason not to do it this way.) Good luck!
T**N
Easy installation, solid construction
I was somewhat torn between this affordably priced drive caddy (which was getting good reviews, and didn't seem to have the issues of other caddys) and the OWC Drive Doubler which I had heard good things about, but I have to say that this caddy does exactly what you need for a fraction of the price. I installed this in an early 2011 15" MacBook Pro (which i'm using right now to write this review). The process was painless. I now have a 120GB SSD as my primary drive and I've moved the factory 500GB drive into the caddy. Observations: This caddy did not come with any installation instructions short of the ones printed on the face of the frame. You can follow the instructions on iFixit.com for changing out an optical drive to get you thru removing the stock optical drive. From there you will need to know to remove the mounting bracket from the back of the stock optical drive (its held in place by 2 small screws) and attach it to this caddy. The caddy comes with 4 drive screws and 3 smaller screws that you can use in place of the screws that were holding the stock optical drive in place. The caddy has a black plastic bar at the bottom end that seems to be there to hold the hard drive in place. This bar pops out (it has little tabs on either end) and must be removed to slide the drive into place. Judging by the instructions printed on the face of the caddy, I think they expect you to use the provided drive screws as pegs that slide under small tabs on the inside edge of the caddy, and then snap in the black plastic bar behind the drive to hold the drive in place. While this might work, it also has 2 holes in the bottom of the caddy that line up with mount points on the drive that let you attach the drive directly to the caddy with the drive screws, which seems like a much better solution. The caddy fits very snuggly in place once you install it in the body of the macbook. I had a little trouble getting the 2 screws on the outside edge of the caddy to line up with the holes in the MacBook body, which i think is why they provide the smaller mounting screws. The smaller screws have an ever so slightly smaller head and seem to clear the tight space a little better then the stock screws. All said, this is a great product, and if you are considering adding a second hard drive to your macbook you can't beat the price. From start to finish installation probably took me 20 minutes, and as long as you take your time and are careful you'll end up with a perfect installation every time.
K**S
Works great in Mid 2010 MacBook Pro 13"
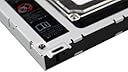
I hardly ever used my CD/DVD drive in my Macbook, but I am constantly filling up my hard drive. I replaced the original hard drive with this one: http://www.amazon.com/gp/product/B004I9J5OG/ref=oh_details_o04_s00_i00 Even with 750 GB, I still needed more for RAW photos, music, videos, and music production. I decided rather than getting an external drive enclosure that I'd need to keep up with and plug in and out all the time, I'd try this enclosure. I received what Amazon shows in the picture, with no instructions on how to remove the existing optical drive, but instructions on how to install your hard drive are printed on the enclosure itself. I don't fault the company for not including optical disc drive removal instructions, because there are too many different laptops this enclosure will fit in. I found a very clear, detailed set of instructions for removing my optical drive on this website: [...] They have instructions for most models of MacBooks, so use the particular instructions for your laptop. You will need a tool called a Spudge, which is basically a plastic blade for lifting plugs on your motherboard. I didn't have one, but a google search suggested using a guitar pick, which I did have several of, and this worked fine. Do not use a metal blade or you risk damaging your motherboard. Everything went great, and I now have 1.5 TB of storage on my MacBook Pro. FYI, the original Apple optical drive is secured with three screws, but this enclosure only has two screw holes. This doesn't seem to be an issue, as the enclosure is snug and tight with just the two screws. For around $12, you can't go wrong with this item. I also highly recommend the Western Digital Scorpio Black series of laptop hard drives. They are fast and dependable, and I had a lot of reliability problems with Seagate drives in the past.
S**T
Works EXACTLY as described
I added a 128GB SSD in place of the existing HDD (which I previously upgraded to 500GB) and never use my optical drive anymore so this is perfect solution to allow for best of both worlds with great speed and plenty of storage. Some people noted the drive not being secure - I read a lot of the reviews first - and have to say - just make sure to secure it with the included screws to the bottom of the tray. It is very secure and won't move that way. I highly recommend following a video on YouTube - just search for OCW Data Doubler. Just take your time, plenty of light and don't yank on things. 1. Remove the back cover of your MacBook. 2. Remove any cables over the optical drive - carefully 3. They recommend disconnecting the battery also 4. Remove the screws holding the drive in - 2 on right side and one towards the middle. 5. Disconnect SATA cable from Mobo - very carefully 6. Pull out optical drive up towards front and out - again don't yank. Be carefull not to catch any cables. 7. Remove the middle bracket (2 small screws) from the old optical drive (the one that attached toward middle) and install that small bracket on the caddy. 8. Remove the SATA connector from old optical drive to hard drive (I skipped the placing the hard drive in caddy part - you can figure that part) 9. Put the caddy in to MacBook in place of optical drive. Again be careful, take time and look out for cables in the way. 10. Attach SATA cable back to MacBook Mobo. 11. Tuck back any cables you had to move and put your back cover back on. You should be good to go. Watch the video though - walks you right though it. I can't say enough about this if you want super fast OS along with storage space. If you can live without the DVD. And OWC even has a video on how to turn that into an external drive when you do need it.
M**L
Works great! Used in my Early 2011 - 15" MacBook Pro
Works great! Used in my Early 2011 - 15" MacBook Pro. I did have to trim a little piece off of one of the screw tabs (the one closest to the HDD's original location) to get it to fit properly. I was still able to fasten it with all screws.
C**R
Ok for the price
Worked with an old SSD. Build quality is poor and it is not machined to a high quality finish, I would have expected better even at this price.
C**N
Works
Works. Easy to install.
S**B
Doesn't stay in place. Loose screws
The screw threads are not precise enough - so there is a certain amount of rattling. Definitely not a good thing since it is supposed to hold the only moving part in the laptop. Not recommended.
A**D
not funktional
not works and no money back
Trustpilot
2 months ago
4 days ago