


Desertcart purchases this item on your behalf and handles shipping, customs, and support to Vanuatu.
💥 Fix it fast, fix it strong, fix it clear — Gorilla Epoxy means business!
Gorilla 2 Part Epoxy is a high-strength, fast-setting adhesive with a 5-minute set time and 3300 psi tensile strength. Its clear-drying, gap-filling formula bonds metal, wood, ceramic, glass, and more, while resisting water and solvents. Packaged in an easy-to-use dual syringe for precise mixing and multiple uses, it’s the go-to epoxy for professional-grade household and automotive repairs.



| ASIN | B001Z3C3AG |
| Best Sellers Rank | #111 in Industrial & Scientific ( See Top 100 in Industrial & Scientific ) #1 in Metal Filled Epoxies |
| Brand | GORILLA |
| Brand Name | GORILLA |
| Color | Clear |
| Compatible Material | Ceramic, Glass, Metal, Wood |
| Container Type | Syringe |
| Customer Reviews | 4.5 out of 5 stars 11,479 Reviews |
| Full Cure Time | 24 hours |
| Global Trade Identification Number | 00052427420015 |
| Included Components | 1 Syringe of Epoxy |
| Item Form | Liquid |
| Item Highlight | Water Resistant, Bonds Uneven or Vertical Surfaces, Easy-to-Use Syringe |
| Item Package Quantity | 1 |
| Item Type Name | Gorilla Epoxy |
| Item Weight | 24.09 g |
| Manufacturer | The Gorilla Glue Company |
| Material | Resin |
| Material Type | Resin |
| Model | 4200101 |
| Number of Packs | 1 |
| Number of Pieces | 1 |
| Other Special Features of the Product | Dries Clear, Gap Filling, No UV Required, Strong, Water Resistant |
| Part Number | 4200101 |
| Special Feature | Dries Clear, Gap Filling, No UV Required, Strong, Water Resistant |
| Specific Uses For Product | Fleet and plant maintenance. |
| Tensile Strength | 3300 psi |
| UPC | 052427420015 |
| Viscosity Level | Medium |
| Volume | 0.02 liters |
| Warranty Description | Warranty |
| Water Resistance Level | Water Resistant |
S**.
Insanely Strong Adhesion
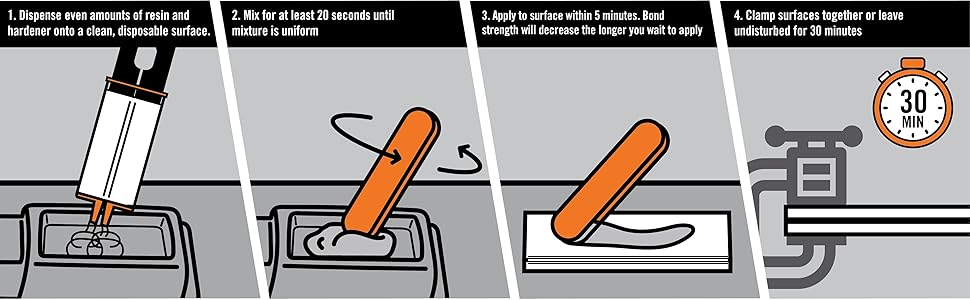
I first acquired this epoxy to repair a custom, cast, resin, wall sculpture of a Great Blue Heron (in flight) that a visitor had removed and dropped, causing it to shatter into four pieces along its four foot wing span. Initially, I also purchased three foot long, aluminum braces to reinforce the sculpture’s wing span. To my amazement, with only a modest amount of this Gorilla-brand epoxy applied to the joints between the broken pieces — and no structural reinforcements — the entire wing span of the sculpture is fused with such strength and rigidity that I can support the entire weight of the sculpture (80 lbs.) at anywhere along the wing span without it flexing or coming apart. This is really astounding. The entire sculpture may actually be materially stronger than before the repair. For safe measure, I added a smear of the epoxy along the back side of the sculpture along all along the fracture joints. It is now so rigid and strongly bound that I can tap the tips of the wings and the entire sculpture resonates like a metal gong, which means it is, for all practical purposes, fused into a uni-body entity. Some tips: 1. There’s a plastic wand wedged between the push-rods of the dual syringe. You need to break this wand out of there to be able to fully depress the syringe. Personally, I found a wooden popsicle stick to make a much better wand for mixing the epoxy and applying it. 2. You’ll know that the epoxy components (resin and hardener) are properly mixed when you can smell a temporary stink like rotten eggs. Soon after, the epoxy will catalyze and generate heat. From that point, you have 5 minutes to apply the epoxy before it starts to thicken and set. Thus, to maximize your work time, you can start applying the epoxy as soon as your smell the pungent stink. The stink goes away as soon as the epoxy starts to set. Full strength and cure, which is when no tackiness can be felt in the epoxy, occurs at around 24 hours, 3. The epoxy has a thick consistency, like honey. It fills small gaps extremely well and will self-level to an extent, removing brush strokes and smoothing over depressions. It is clear with a very slight amber tint. It goes on clear and cures to a clear, tough-as-nails finish. 4. I recommend wearing nitrile gloves as you work with this epoxy, as if it gets on your skin, you’ll need acetone to remove it. Acetone is very effective at breaking down this epoxy before it cures. However, once it cures, the acetone will not soften or dissolve it. 5. If you want to shape or flatten the epoxy — on the back of a sculpture for example — after it sets, you can lay the side of the item with the epoxy against a polyethylene sheet on a level floor or table top. The epoxy sticks like crazy to resin, metals, wood, stone, glass, leather but will not adhere to polyethylene plastic. After the epoxy cures, you can pull away the polyethylene sheet and the epoxy will be hard and smooth like glass. It will bond strongly to 3D printed thermoplastics like PLA. 6. As long as you keep the resin and hardener separate, these components will last a surprisingly long time. Working over several days to join each fractured piece of the sculpture, I left the nozzles of the double syringe uncovered and the epoxy components easily remained viable for several days. For longer term keeping on any open syringe, just stretch a section of duct tape over the nozzles. 7. Where a really clean joint is needed, applying the epoxy to just one side and pressing the parts together will give surprisingly strong adhesion. However, for maximum strength, I recommend applying epoxy to both sides of a joint and letting a “bead” ooze out along the joint. On the cosmetic side of your project, the bead can be smoothed out before the epoxy cures. I recommend leaving the raised bead on the non-cosmetic back side of any such workpiece, and after it cures, coming back with more epoxy to smear over the bead to create a wider seam patch for maximum joint strength. The fresh epoxy adheres well to any old cured epoxy. The stuff is for certain a resin, and will practically weld any resin components into a rigid uni-body. This epoxy lives up to its brand name of being gorilla strong.
L**E
Great product - will bond metal to wood permanently
I used this to glue a cast iron trivet to the bottom of a wooden stand. The instructions were very clear, the dispenser was easy to use, and most important, the bond is permanent. Great product.
L**Z
Perfect for Murphy Bed Repairs!
★★★★★ Excellent epoxy for repairs! I used this Gorilla 2-Part Epoxy to repair my Murphy bed, and it worked exactly as I hoped. The bond is extremely strong, and once it cured, the repaired area felt solid and secure. It was easy to apply with the syringe, and the clear finish looked clean. One important tip: make sure you mix both parts thoroughly before applying. If you don’t mix it well, it won’t cure properly and may stay sticky or fail to bond. Overall, this is a great product for furniture repairs and projects that need a strong, durable hold. I would definitely buy it again.
E**T
Strong bond and easy to use
I’ve used Gorilla 2 Part Epoxy for a few small repairs, and it does exactly what it’s supposed to do. The syringe design makes it easy to dispense equal parts without guessing, which is a big plus if you don’t use epoxy often. It mixes smoothly, applies cleanly, and dries clear, so it looks neat once cured. I used it on a couple of household items and the bond feels very strong once it sets. For the size, a little goes a long way, but keep in mind the syringe is small—perfect for small projects, not large repairs. Overall, it’s reliable, easy to work with, and great to have on hand for quick fixes. I’d definitely buy it again for small jobs around the house.
R**.
Easy to use and ROCK solid
The Gorilla two part epoxy worked beautifully for my application- a broken mounting bracket for a rather heavy refrigerator drawer pull. The pull has an internal plastic "block" that is essentially the bridge between the pull and the mounting post on the drawer face. The block receives the mounting pin on the drawer face as well as the bracket and screw tab for the handle. It was broken into two pieces and useless. A new handle was $145! So, plan B- epoxy. I've used many varieties of two part epoxies in more applications than I can list. Some manufacturers/products are better than others. Some are easy to dispense and work with; some are not. I was extremely satisfied with the Gorilla brand epoxy. The dispenser was simple and effective. As a nice bonus, the blister packaging is designed as a mixing tray. The epoxy was not crystal clear, but nearly devoid of color/tone. I mixed it smoothly and got no air bubbles- which can plaque two-part repairs. The consistency was Goldilocks right- not too thick, not too thin, so the manufacturer's proportions for both compounds was s[pot on. Workability/working time was perfect- about 4-5 minutes before the compound firmed up. I let it rest/cure for 24 hours before re-installing the pull because I applied it thick- basically filling the pull's mounting housing. Once installed, I was thrilled! The drawer takes a reasonable tug to open, and as you can hopefully see in the attached video, the bond is rock solid. I saved $135 and the drawer operates better than factory.
W**W
Great for bottle caps!!
This works great for making bottle cap necklace charms!! My best advice when using it for those is to very slowly add 1-2 drops of each tube simultaneously onto the bottle cap image already glued down (be sure you air dry the glued down image for 24 hours BEFORE adding the epoxy top coat... if not the image will RUN under the top coat after a week or two... trust me!!) & quickly use a tiny disposable paint brush to mix it right over the image (not too aggressively but for about 20 seconds) & then spread it out to the sides of the bottle cap, ensuring the edges are fully sealed (if you find gaps around the edges after the bottle cap is dry, don't be discouraged as you ARE able to go & add a 2nd layer of epoxy over the 1st layer at which time you can fill in any gaps around the edges if you have any gaps like we did when first making the bottle cap charms until we figured out how to do them the best way). ALSO, I found that I had TONS of air bubbles in the charms when I mixed the epoxy stuff in the "tray" w/the stick that came with the epoxy kit after pouring it into the bottle cap... using the small paintbrush to mix the epoxy resin directly in the bottle cap really helped eliminate the tons of bubbles. I found one blog post that said the crafter left the epoxy to dry for several hours & all of the bubbles disappeared after sitting for 24 hours, however, I tried that I there were still tons of tiny bubbles that looked almost like teeny, tiny foamy bubbles (she used a different brand of epoxy though) even after 24 hours. Once I used the paintbrush method I had very few of those bubbles though. I'm not sure if the epoxy brand that blogger used just works differently or what, but w/this epoxy the leaving the bubble alone method does NOT work... trust me & save yourself the loss of time, materials, etc. I also found I could add a tiny bit of very fine glitter into the epoxy & it added a great touch to the images. I would be sure to use really fine glitter though if you try it... and try it on 1 or 2 first to make sure you like the look still once it dries. ** Keep in mind you have about 4-5 minutes to use the paintbrush before you will have to throw it out as it will get gunked up with the epoxy & if you continue to use it the epoxy won't dry smooth if you use the brush on it once it has started to set. I found I could do 5-6 bottle caps in the 4-5 minutes once I got the hang of it & knew how to make sure the edges were COMPLETELY sealed.**
J**.
My go-to when superglue and hot glue can can’t do the trick!
I originally purchased this epoxy because the weather strips on my vehicle kept flying off in the car wash no matter how snug I got them placed. A couple pea sized amounts of this product has kept them in place for months and many, many car washes. I also have a toddler and no matter how careful I try to be things break! I was recently able to resuscitate a ceramic skeleton who lost his head in the battle with my two-year-old. His noggin is now securely in place thanks a small dot of epoxy. A little bit of this stuff goes a very long way and you have to be careful during application because it can easily get messy. My go-to method is to put some on a paper plate and use a toothpick or even Q-tip to apply it. Make sure you have a wet cloth handy in case it gets on your skin. I think everyone should have a bottle of this in their tool kit because you never know when you’ll need.. and when you do you want regret having it handy!
P**L
That cap MUST go!
So so far my item (lamp) is staying together which is good but it is in the early but I left two stars off because the horrible cap at the top which does not go back on after you are done. Same with removing that cap. I had to use a pair of pliers to get it off. But worse was the instructions to put it back on, they are AFTER you glue and hold, and by that point the glue around those holes are all dried up. Honestly it would work better to do that right after you dispense (although you are technically supposed to be mixing) because glue is hardened all around the holes and that cap will no longer fit. Some of us have arthritis and can’t press hard and if I press hard that plunger moves. Well the rest of the glue went all over the place (even on me) and I had to throw it out. So I only got one use out of it. Please provide an easy to put on cap for afterwards and a way to lock that syringe. Next time if I need a product like this I will get one with caps that are easy to put on and off.
A**A
fuerte, resistente y conserva sus propiefdades con el paso del tiempo
pegamneto muy fuerte y resistente, aun a través del tiempo conserva sus propiedades. fácil de preparar. yo le usado para sellar unas conexiones de tubería y me ha funcionado muy bien. solo hay que dejar secar por al menos 12 horas sin contacto con el agua o presion
M**L
اقوى ايبوكسي استخدمته
جربت انواع كتير ، ده أفضل نوع. طبعا أغلى كتير من أي نوعية اشتريتها ، صناعة امريكي.
S**S
Awesome Customer Service
Although there was a problem with the product, the seller has went over and above to resolve the problem. you can't beat that. Thank you!
I**L
ماضبط على قطعتين
جربته بلاستك مع حديد وانتظرت ٢٤ ساعة وانفك بسهولة مع اني اتبعت التعليمات
匿**名
強力接着力
強力な接着力で短編満足しています。
Trustpilot
1 month ago
1 month ago