


Buy anything from 5,000+ international stores. One checkout price. No surprise fees. Join 2M+ shoppers on Desertcart.
Desertcart purchases this item on your behalf and handles shipping, customs, and support to Vanuatu.
๐ Elevate your Jeepโs style and utility with stealthy strength!
BRIGHTLINES Heavy Duty Anti-Theft Premium Aluminum Roof Bars are custom-designed for 2011-2021 Jeep Grand Cherokees with black plastic moldings. Featuring a patented aerodynamic wing shape, these lockable crossbars bolt directly into factory roof holes, supporting up to 165 lbs of cargo. Crafted from durable aluminum with a sleek black finish, they combine style, security, and easy installation backed by U.S.-based support and a one-year warranty.


| ASIN | B08C44RNXN |
| Automotive Fit Type | Vehicle Specific Fit |
| Best Sellers Rank | #65,234 in Automotive ( See Top 100 in Automotive ) #90 in Cargo Bars |
| Brand | BRIGHTLINES |
| Brand Name | BRIGHTLINES |
| Color | BLACK |
| Compatible with Vehicle Type | Jeep Grand Cherokee |
| Customer Reviews | 4.5 out of 5 stars 2,629 Reviews |
| Is Foldable | No |
| Item Dimensions | 48 x 7.75 x 7.75 inches |
| Item Weight | 10 Pounds |
| Item dimensions L x W x H | 48 x 7.75 x 7.75 inches |
| Load Capacity | 165 Pounds |
| Manufacturer | BrightLines |
| Manufacturer Part Number | BL15-1 |
| Material | Aluminum , Metal, Plastic |
| Material Type | Aluminum, Metal, Plastic |
| Model Number | BL15-1-BB |
| Mounting Type | Roof Mount,Bolt Mount,Roof Bars,Rails,Crossbar Mount |
| UPC | 810366030739 |
| Vehicle Service Type | Jeep Grand Cherokee |
J**A
High quality and sturdy roof racks that are relatively easy to install.
The product arrived in very good condition. The quality of the roof racks and associated roof attachment hardware are very good to excellent quality. I put the racks on a 2021 Jeep Grand Cherokee. The installation instructions were relatively easy to follow. The picture in the instructions indicating the preferred location for the front rack was a little confusing since the arrows seemed to point to a different mounting location than the check mark, but I was able to clarify this by reviewing the product photos available and the short installation video available on Amazon.com. I took my time and the installation took about 1.5 hours. The racks are very sturdy and secure. I appreciate that the racks have a key lock. The roof racks look great and will be very useful for carrying a kayak or other items. I have started looking at available carrier systems that attach to the roof rack but haven't purchased any yet.
D**O
Great Product. Highly Recommend. My tips for easy and accurate installation.
Like other reviews, the instructions provided with this product are minimal at best - but this is a very good product and a very good value given the price. I was prepared to spend more - but now seeing the product and comparing it to others there is no need to do so. I am very mechanically inclined but even if I wasn't the installation should take no more than 30mins. My suggestions to make your install correct and easy: โข My bars were clearly marked but if yours should not be, note which bar is the front (longer) and which is the back (shorter). โข The bars themselves are similar in their profile design to an airplane wing meaning the rounded or blunt edge should face forward and the tapered edge should face backward when installed. This is important so as to eliminate air friction and inherent wind noise especially at higher speeds. Both of my bars were clearly marked which edge is to face forward โข There is no need like some reviews suggest to remove entirely the rubber top strip on each bar. Keep the end caps with locks in place and instead simply lift up a 6" strip of the rubber top strip on both ends of each bar so you can see and access the two screws underneath โข The outer-most screw on the end of each bar is used to tighten and snug the 'L' shaped metal bracket ('L' shaped as viewed from its profile) which slots in from the side and under your existing rooftop rail edges. The inner-most screw on the end of each bar is used after the bar is attached to the rail to then tighten and snug the black plastic 'foot' of each bar so that it is properly aligned with the bar itself. This inner-most screw is what you don't want to loosen more than a turn or two in advance as it can come out (I did this and it was easily corrected but took a few more minutes) โข Before loosening any of the screws I suggest laying each bar on the roof rails so each bar 'foot' is laying on top of the rail on each side. Then while watching closely the metal 'L' shaped bracket, begin loosening the outer-most screw and continue loosening it until the 'L' bracket moves outward enough and clears the edges of your roof rail so it can slot in and under the rail edges. This is the best way to know how much to loosen the outer-most screw. Once the 'L' bracket can be slotted in and under the rail edges, begin tightening the outer-most screw until the 'foot' is fully secured to the rail. Do both 'feet' on each end of the bar โข Once the feet of each bar are securely attached to the rail then begin tightening the inner-most screw of each 'foot' and this will tighten and align the 'foot' to the bar itself โข Last step is to push the 6" section of rubber strip on the end of each bar back into their grooves. This is not so difficult and just entails working the rubber strip from the inside to the outside of each bar. Press and fit, press and fit, press and fit. โข Like other reviews, I could find no purposely function of the locking mechanisms. For my installation steps explained above, I tried it with the locks 'opened' and with them 'locked' and it seemed to make no difference
S**S
Great Option for SRT owners
Impressed with the quality of these bars, cost, and ease of installation. Thus far after multiple extended highway trips of over 300 miles as well as daily driving I have yet to hear a single whistle from these, with or without the box in place. We have a Thule cargo box we use relatively frequently and I wanted to have the option of putting it on the Jeep so went looking for options, if you have an SRT and have gone down this road you know that there simply aren't very many without having to replace roof rails, etc. The installation was straightforward though the instructions weren't necessarily the most clear, take your time and you will be fine. The fitment is outstanding and the bases install with a total of four bolts in stock locations and were quite solid once in place. Adjusting the bars was also very straightforward with the provided tools. In regards to the reviews mentioning "whistling noise", I think the key is to make sure you install the plastic tabs to cover the opening on the bottom at the ends of the bars between the locking piece and the end caps before putting the end caps on, this is actually well explained in the instructions, and so far I have yet to experience any whistling or marked wind noise since installing them.
J**Z
As good as Mopar for a lot less
I have a 2019 Jeep Grand Cherokee. It came with factory side rails but there aren't any openings in those rails. I wanted to put a cargo bag on the roof but I didn't have anywhere to secure it. Some bags come with clamps that fit under your front and rear door weather seals but, on the Jeep, the weather seals are glued in place so you can't move them without causing another problem. So, I went searching for cross bars. And, wow, the options are almost endless. The high end cross bars like Thule looked great but for the money they should. I almost went with the Mopar branded cross bars that were on sale for just under $300. But, that seemed like a lot for something that I was probably only going to use once or twice a year. Searching around I found this one and found a lot of videos on youtube to help in my decision. At roughly half the price of the Mopar this is a pretty nice cross bar. It comes with the bars, two keys, replacement screws, and an allen wrench. I've never installed cross bars on a vehicle before so I was a bit apprehensive but, as it turns out, for no reason. The bars are labeled - front and rear and there's even a label telling you which side faces the front. I had to jiggle the bar around a bit on my first try but once I figured out how it worked and attached to the rail it was pretty simple to install. A tip - when you loosen the screw that pulls the clamp up you want to unscrew it so it's flush with the nut that's inside of the clamp so you'll have plenty of clearance for it to get below the rail. Overall, pretty happy with this. It's secure and I beat on the middle a bit to test it and it's very solid. I don't see any problem carrying most anything on the top of my SUV. I haven't noticed any wind noise on the freeway.
G**T
Great look, solid fit.
These bars look nearly identical to the mopar brand. Installation didn't take too long (~40 mins), but the instructions are a bit unclear. Here are some tips from my installation (disclaimer - use at your own risk): 1) Identify the front and rear bar, and the forward edge. My bars were labeled "FRONT" and "REAR". The forward edge of each is the "fatter" part (like a wing). 2) REMOVE CAPS & STRIP - Use keys to unlock and remove the locking caps, followed by the upper rubber strip. I used a flathead screwdriver to pop the cap off from the bar once unlocked. The strip easily slides off. 3) LOOSEN THE NUTS - With the stripping removed, the housing lug nuts will be exposed (one outer, one inner). a) Use the allen wrench to loosen the outer lug nut nearly completely. The bolt on the underside of the clamp will be nearly flush and the locking clamp itself will be exposed, allowing the locking clamp into place so it can grip the roof rack channel. b) loosen up the inner nut 'halfway'. This allows the plastic housing to slide laterally along the crossbar in order to align the housing with the channel depending on how for forward/aft you place to the bar. 4) DROP CLAMP INTO CHANNEL - Solo, or with the help of someone else, place one bar at a time by dropping the housing clamps into the channel. Examine the clamp portion to understand how it locks onto the factory channel. The channel consists of two "walls". When in place, the clamp will straddle the inner most wall, with outer part of the clamp "in" the channel and the other part of the clamp "outside" the channel (towards the center of the vehicle). 5) POSITION BAR FORE AND AFT - With the all nuts loosened, the bar itself should now be able to slide slightly forward or aft depending on where you want to place the bars. I positioned each bar as forward or aft as it could go, respectively. 6) TIGHTEN THE NUTS: a) With the housing positioned, tighten the outer nut. This will tighten the clamp down to the factory channel. DO NOT OVERTIGHTEN as this may strip the nut. If done right, the housing grooves will be flush with the channel walls and you should be able to tell the clamp is firm and gripping the channel. b) Now tighten the inner nut. This will tighten the housing, bringing it flush to the bar. c) When complete with both housings, give a good pull up and down and fore and aft on the crossbar. The bar should stay in place but still flex slightly since it's plastic. 7) Repeat step 6 for remaining bar. If in doubt, call the company. Keep in mind the amount of force these bars will be subjected to if you put something like a canoe or kayak ontop then expose to highway speed winds. Thats a lot of pull and strain so be confident installation is correct. 8) REPLACE STRIP AND CAPS - Slide the strip back on and then lock the caps back into place. Enjoy.
J**M
Best bang for your buck on Jeep GC
I mounted this on a 2019 Jeep Grand Cherokee High Altitude. It only took about 1hr to install for the first time and that was only because I took my time with the process on a hot day. If I ever remove these and need to put them back on, it will probably only take me 10min max to put back on. If you have a Jeep GC with flush rails, this is the solution. I did an embarrassing amount of research thinking I needed to pay a lot more but in the end I took a leap on these and couldnโt be more impressed, especially for the price. I have a Thule Force 3 (Large) mounted on these now. But you could easily mount kayaks, paddle boards, bikes, etc. The mounts are sturdy, well made, and look great. Well worth the reasonable cost.
F**S
Mounted on 2014 Jeep Grand Cherokee Overland and worked perfect with some expected flaws at price point....
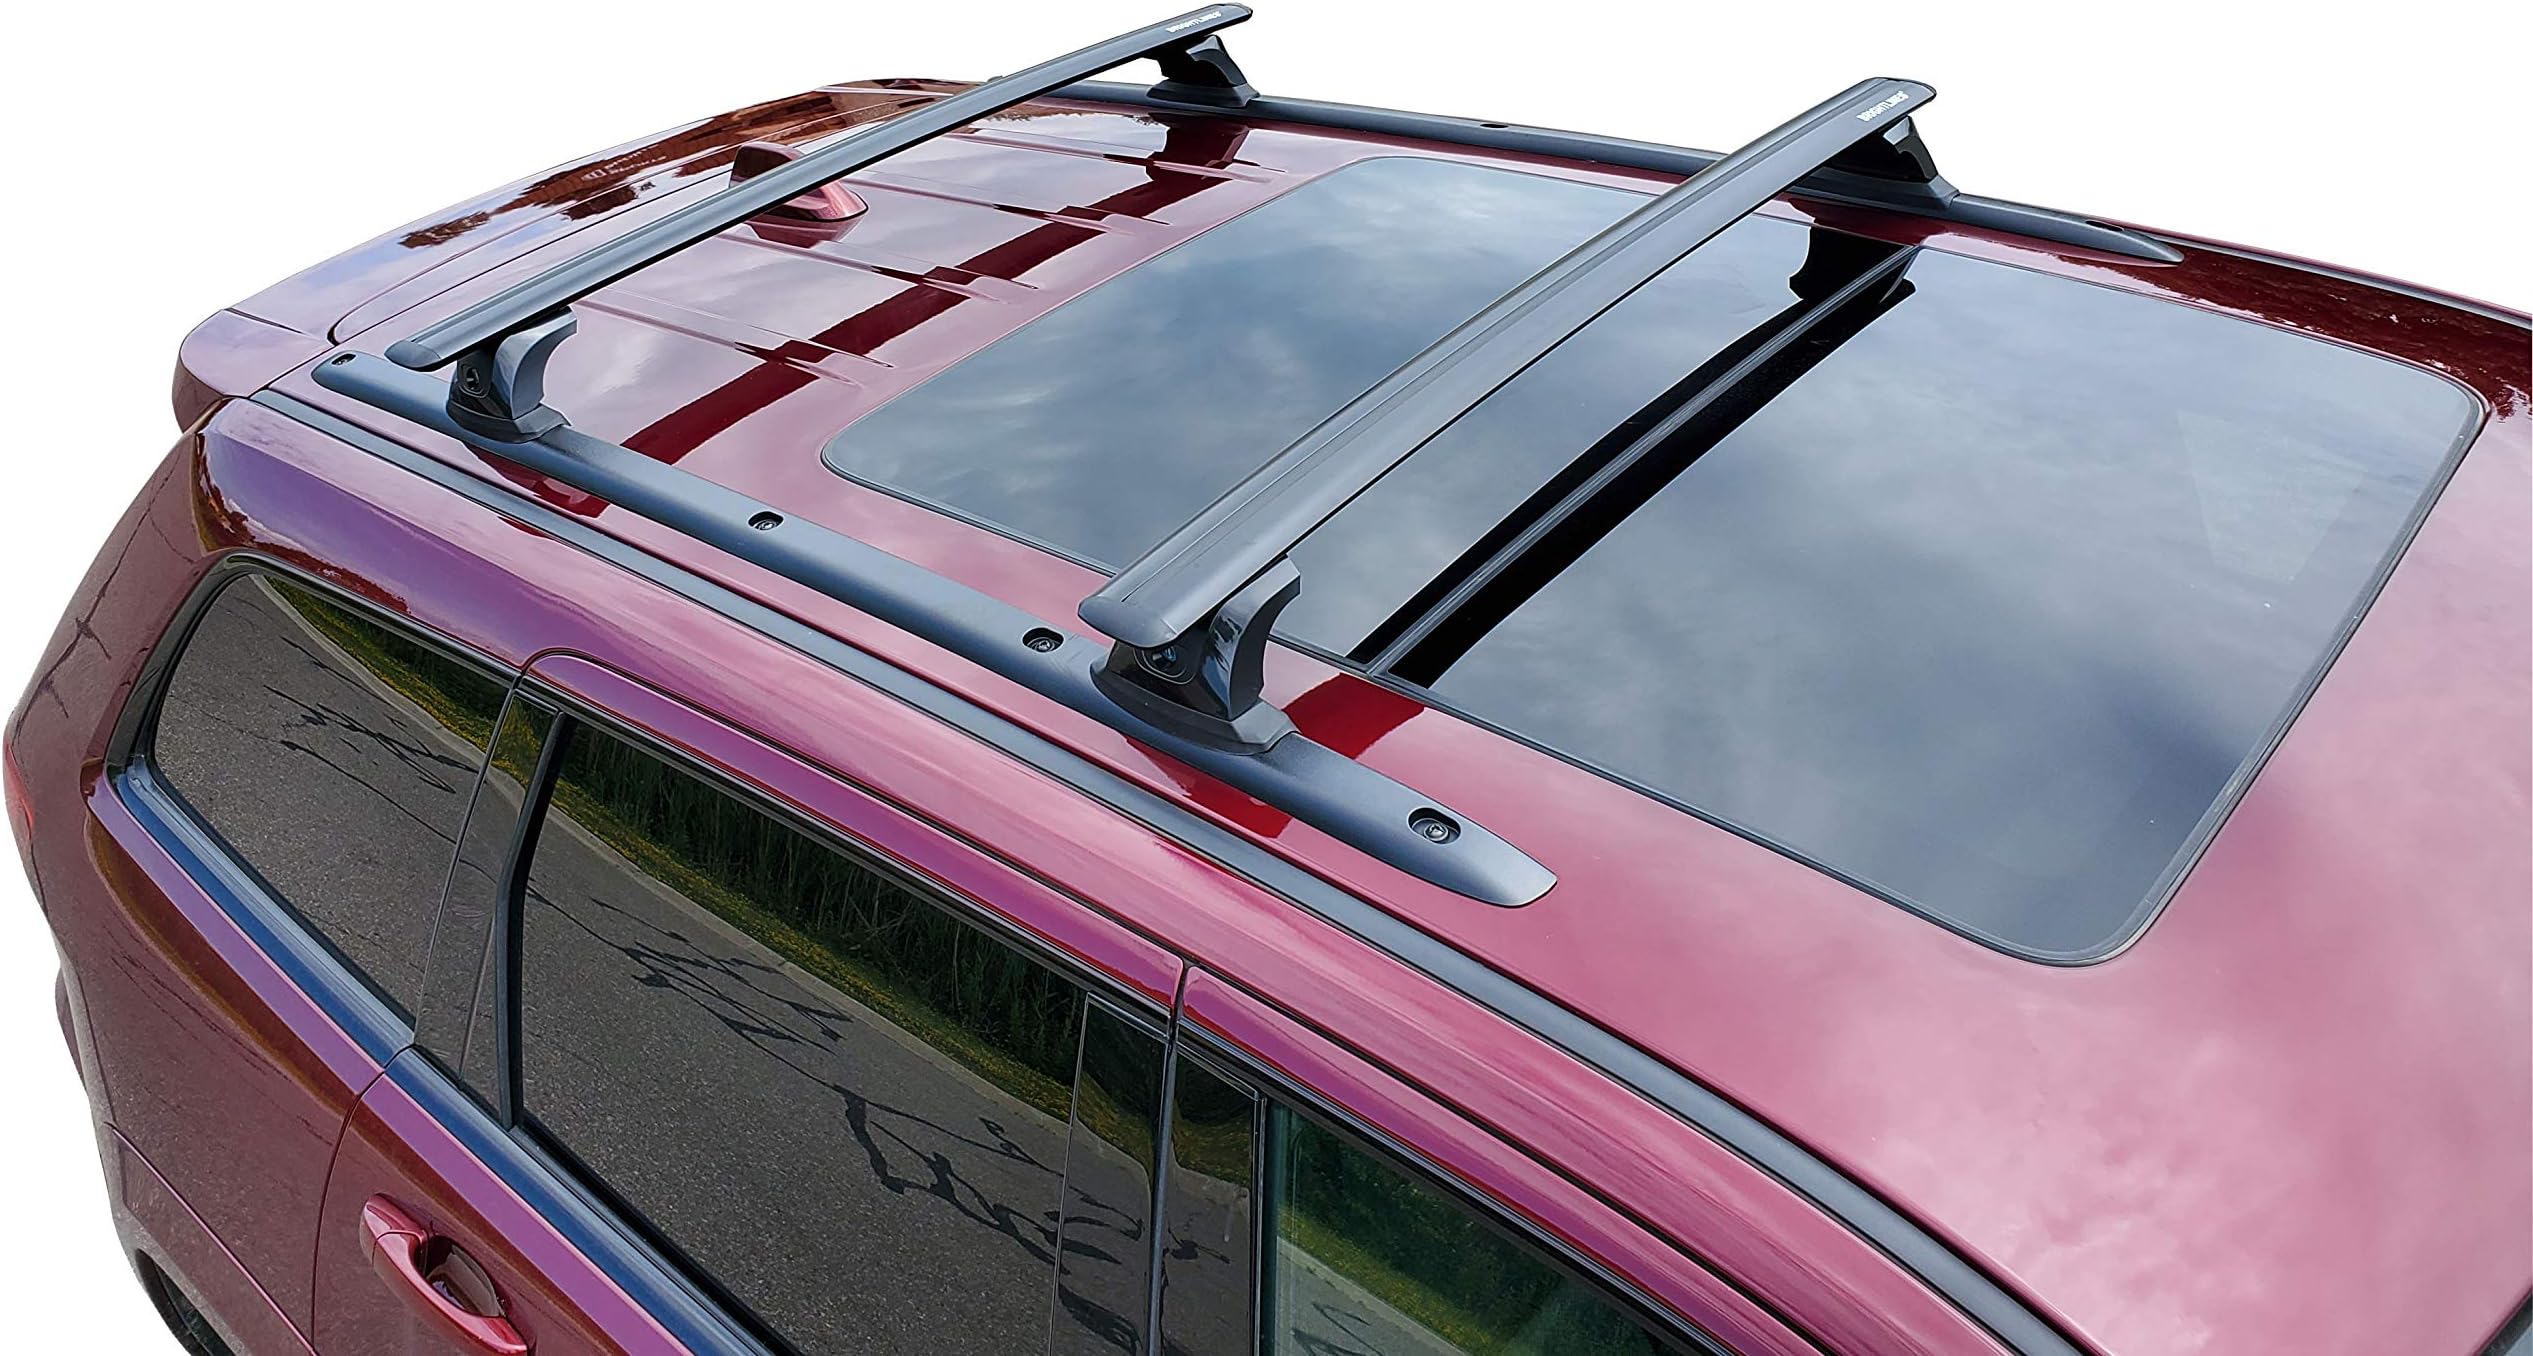
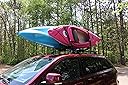
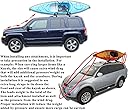
Four star product, but leaving 5 stars because you do accept certain flaws when buying cheaper items then other available items. Unit served us welll on a 600 mile trip with 100lbs strapped to the top moving 80mph most the time. Some have said install was difficult, not sure why. Didn't bother with the directions, just looked at the unit and it was pretty straight forward how to install. unlock side, slide out rubber top, loosen bolts, slide/fit/place in vehicle mount, line up for even placement, and tighten bolts little at a time going to each one like you would wheel lugs so everything tightens perfectly, took maybe 20 minutes moving a ladder around the vehicle. I did an extra step after seeing the rubber top and how it slides in and coated the rail where the rubber slides with Di-electric Grease to help with seal and conditioning of the rubber. I find this grease works well to condition molding, helping repeal water, and figured it might help with limiting whistling. Pros - Looks better then cost would lead you to think installed. - I had very little added noise from it moving at 70mph with the sun roof open listening. The Greasing of the rubber might have helped with that, not sure. But just a slight wind noise maybe...nothing I could really pin point over regular wind noise with sunroof open. Couldn't hear anything different sounding with them installed with sunroof closed. - Works. flexed some with the weight I strapped to it (and I tend to strap tight), but worked great. Cons - Plastic on the ends feel that they won't last the life of the vehicle, but sturdy enough to last many many years maybe. - The rubber on top also will be something to keep an eye on as it flexes when you strap something down tight, so this may also begin to wear faster then other units at a higher price point. At this point this is speculation, but also expected limitations with something a 3rd of the price of factory units. Overall, if you need to save some money, but still get a decent product I would suggest these.
A**E
Better than expected
When I bought my Jeep GC HA I did not realize the roof rails were not functional roof rails, I originally bought the Mopar roof rack and thatโs when I realized I had an issue. Iโm glad I found these and they seem to be the only rack available without making modifications to the existing rails on the Jeep. When I bought this rack the black bars were not in stock so I opted to get the silver instead of waiting, I was worried they might not look as good vs. the black but they donโt look that bad, I think they look pretty good. Install wasnโt too bad, I had a couple hiccups from not following a couple steps in order so took me longer than it should have but wasnโt difficult, I definitely recommend watching the instructional video as it is easier to follow than the paper instructions alone. Once the bars are on, adjusting them so they are centered was the biggest issue for me, I could not get them to move easily and kept overshooting when I did get them to move, not sure what the trick is there but I did make sure I loosened the bolts that hold them in place. Visually my only complaint is the black rubber or plastic part that sits on the black rails of the vehicle does not match, I wish the black was darker so it blended in with the rails better. Noise wise I donโt have any complaints so far, I donโt hear any whistling or other annoying noises from this rack but you can hear a little more wind noise than usual but that is to be expected but itโs not loud. Loving this rack and being able to transport my SUP board!
G**B
Fit my Jeep Cherokee 2018 rails perfectly
Easy to install and solid. Caps are a bit hard to get on but just use mallet to whack them in.
B**K
Easy install, if you READ the instructions...
Easy to install, if you READ the instructions... The rack seems sturdy enough for my purposes, transporting a 12 foot aluminum canoe.
T**R
Love it
Get the exact size for jeep grand Cherokee and the year
J**Y
Satisfait
Trรจs bien facile ร installer et semble robuste
J**R
Tcheap
Tcheap
Trustpilot
1 month ago
2 weeks ago