Desertcart purchases this item on your behalf and handles shipping, customs, and support to Vanuatu.
๐ Light Up Your World with Infinite Possibilities!
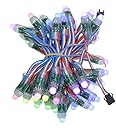
The ALITOVE WS2811 12mm Diffused Digital RGB LED Pixel Light set features 50 individually addressable LEDs with 24-bit color and 256 brightness levels, delivering over 16 million colors. Its IP68 waterproof rating and durable, weather-resistant design make it ideal for long-term outdoor and underwater use. Compatible with a wide range of controllers including Arduino and Bluetooth/Wi-Fi devices, this modular LED strip is perfect for professional-grade lighting projects like billboards, holiday decor, and architectural accents.


| ASIN | B01AG923GI |
| Additional Features | Color Changing , Dimmable , Waterproof |
| Best Sellers Rank | #161,321 in Tools & Home Improvement ( See Top 100 in Tools & Home Improvement ) #1,373 in Outdoor String Lights |
| Brand | ALITOVE |
| Brand Name | ALITOVE |
| Bulb Shape Size | B10 |
| Color | RGB (Red, Green, Blue) |
| Connectivity Protocol | Corded Connection |
| Connectivity Technology | Bluetooth, Wi-Fi |
| Control Method | Touch |
| Controller Type | Button Control |
| Customer Reviews | 4.6 out of 5 stars 519 Reviews |
| Form Factor | Bullet |
| Included Components | 1x 50pcs WS2811 LED pixels light |
| Indoor Outdoor Usage | Outdoor |
| Indoor/Outdoor Usage | Outdoor |
| Ingress Protection Code Rating | IP68 |
| Item Dimensions | 7.6 x 5.71 x 1.89 inches |
| Item Length | 4 meters |
| Item Weight | 9.07 g |
| Light Color | Multicolor |
| Light Source Type | LED |
| Manufacturer | Shenzhen ALITOVE Electronic Technology Co., Ltd |
| Manufacturer Part Number | LED PIXEL |
| Material Type | Plastic |
| Model Number | WS2811-5V |
| Number of Items | 50 |
| Number of Light Sources | 50 |
| Occasion | Christmas |
| Power Source | DC 5V |
| Product Style | Modern |
| Seasons | Christmas |
| Special Feature | Color Changing , Dimmable , Waterproof |
| Theme | Outdoor Decorative Lighting |
| UPC | 678425399193 |
| Unit Count | 50 Count |
| Voltage | 5 volts_of_direct_current |
| Water Resistance Level | Waterproof |
| Wattage | 15 watts |
| Wireless Communication Technology | Bluetooth, Wi-Fi |
| hanging_pattern_layout | Linear |
P**E
Great lights so far. Sparse documentation.
This review is for the ALITOVE WS2811 12mm Diffused Digital RGB LED 50 LED set. I bought these with the idea that I'd use them for Christmas lights or just to play with. I plan to drive them with an Arduino or ESP8266 device. I decided to start figuring it out with an old Aduino Uno. I couldn't find a sample sketch or circuit from the vendor but there are plenty of examples on the internet. Google WS2811 and you'll get plenty of hits. This is a three wire setup and the wires are marked Red: +5V; White: DATA; Blue: GND on the amazon website and the LED's closest to the connector. I hate to admit that I tried every possible wrong combination of wiring before hitting on the right setup. The good news is that I didn't blow the lights up, which is a miracle and testament to the durability of the lights. Once working they are pretty spectacular. Instructions that worked for me: 1) Quadruple check your wiring. The key is to connect the data, power, and ground to the female plug. The female end ( I know some of you are confused by this ) is the end where you have to poke your hook up wire into the hole to make the connection. It doesn't make sense to me why I had to use the female connector but I got zero lights until I moved my connections this end. 2) There is information on the internet that says its a good idea to put a 470 ohm resistor inline on the data connection. I did this. 3) Give it plenty of power. I was not successful running this from the 5v Arduino pin or a 1/2 amp wall wart. I was successful using something that supplied 5v at 2 plus amps. ALITOVE sells a power supply that I wish I had bought at the same time. 4) There is information on the internet that says its a good idea to put a 1000 uf capacitor on the between the power and the LED's to smooth out the power. I did this. 5) Use the FastLED library in your Arduino IDE library. From menus choose sketch->Include Library->Library Manager then search for and install the FastLED library. I tried the Adafruit Neopixel library but have not able to get it to work to date. 6) From the Arduino IDE go to menus->File->Examples->FastLED-> and choose the FirstLight example. These sketches are well documented. You must change the define statement to match the data pin you are using and number of LED's to whatever is correct. Also check to see that the "FastLED.addLeds<WS2811, DATA_PIN, RGB>(leds, NUM_LEDS);" under setup in the sketch is uncommented. Some of the examples are set already and some are not. All other similar lines should be commented out. 7) Compile, upload and you should have flashing lights. There are other example sketches for the FastLED library, plus info on the web. I'm sure there are other or better circuits that could be designed, or ways to get the Adafruit library to work. I just wanted to post a review and outline what worked for me in hopes that someone will find it useful.
T**S
Very Impressed I will be buying more in the future!
These LED's are Bright & Vivid. The construction quality of these LED strings are perfect, the housing of each LED is filled with a waterproof coating of some kind, likely silicone, and a semi soft shell on the outside giving you rigidity, The cables connecting each LED to one another is per the cable itself 20 A W G safe for up to about 11 Amps so it can carry quite a bit power for your projects. Each end has a open power input to re-inject voltage once you get the strings long enough to need this to keep the color consistent with really long runs.This product if you give it the proper power supply will bring your eyes to heaven. When I set all three colors to 255 brightness the soft white is brilliant and really closely matches sunlight through a soft white cloud.... tells me the color accuracy of each LED's (3) colors are being driven spot on. These run perfectly for me with the: Adafruit NeoPixel the RGB library; as the manufacturer says. 800 KHz works for the data pin, so your going to get better color fluidity than if you only had 400 KHz. NEO_RGB bit-stream instead of the pre programmed NEO_GRB in the Adafrut NeoPixel strand test library. I added: colorWipe(strip.Color(255, 255, 255), 50); // White RGB WARNING POWER HOG!!! MAKE SURE YOU HAVE THE AMPS! So I could test out the RGB pixels being turned on full to show its true colors... I was impressed to get a soft white diffused light that didn't lean too much into the blue or other spectrum.
J**B
Heavy-duty WS2811 RGB strand perfect for holiday lighting, Ambilight clone or other LED projects
ALITOVE WS2811 12mm Diffused Digital RGB LED Pixel Light Individually Addressable Round LED Pixels Module IP68 Waterproof DC 5V 50pcs/set (sold by Alitove) -- Purchased the strand to test out for either holiday lighting or a television Ambilight clone set-up. Strand is heavy duty with what appears to be quite a good job at sealing the LED itself. These are WS2811 5v which is driven by a single signal wire connected to your processor of choice. I paired these with an Elegoo Arduino Uno clone and utilized the FASTled LED library along with the TwinkleFox sketch to create a fancy, glowy strand of colour. The wiring, as depicted in the seller photos, is colored so you may wish to paint these to allow them to blend a bit better if the strands will be showing. Each LED on the strand worked as described with no issues at all. Basic setup example for the 50 led strand would be: power to a separate power supply (I chose a 5v/10a regulated brick), connect data (white) to the appropriate pin on an Arduino Uno, connect GND (blue) to Arduino GND and (optional) connect Red to VIN on Arduino to power from the same source. Pop the Arduino in a project case, secure the connections and you're good to go with the FASTled library and the TwinkleFox sketch customized to your preference. JST connectors are on both ends allowing you to add more strands. Overall quality is seemingly pretty darn good so I'll be purchasing more in the near future from the same seller. Future projects: Ambilight clone for my TV, permanent outdoor holiday/accent lighting for my tree (will need about 1500-2000 LEDs for that project) and room accent lighting. Highly recommended - both the product and the seller.
N**S
Arduino Beginner Instructions
I subtracted one star because it comes with absolutely no documentation. The lights otherwise function as I expect them to. I am a beginner and used an Arduino Uno via usb power to drive them. I had to follow these steps to make these work properly: 1: Find the side of the cable to connect to. The answer is the female side, I did this first, so I got lucky. 2: I wired it to a breadboard powered by the arduino. Red is 5v power. Blue is ground, the extra red/blue wires that are stripped are for power injection for multiple strings. 3: I wired in a 220 ohm resistor to the data cable to lower the voltage a bit, without it, it seemed unstable. I chose data pin 3, must be a pwm pin. 4: I wired in a diode to the 5v line because my usb would disconnect itself from the computer when the leds were connected. The diode insures that the voltage will not go back to the arduino. 5: I downloaded the FastLED library (Adafruit Neopixel didn't work for me). I did some brief research and wrote a couple pieces of code based on the "blink" example. Here's the example code to blink LED 0(1st) in red. I have also added the commands at the bottom of the code for changing the LED with RGB values. I had a looping version of it working with a standard "for" loop, but in interest of this review, I kept the code simple. //include relevant library #include "FastLED.h" // How many leds in your strip? #define NUM_LEDS 50 //define pwm data pin #define DATA_PIN 3 // Define the array of leds CRGB leds[NUM_LEDS]; void setup() { FastLED.addLeds<WS2811, DATA_PIN, RGB>(leds, NUM_LEDS); } void loop() { // Turn the LED on, then pause leds[0] = CRGB::Red; FastLED.show(); delay(1000); // turn off the LED, then pause leds[0] = CRGB::Black; FastLED.show(); delay(1000); } //Instead of "leds[0] = CRGB::Red;" you can use the RGB values like so //leds[0].red = 255; //leds[0].green = 0; //leds[0].blue = 0; I hope this helps!
T**K
Now I need more of them!
I bought a single 50 light segment to see how it would work with my Arduino uno. The experiment was a success! The quality of these lights was good, and I like how each light is encapsulated in a clear weather-proof plastic guard. Important notes: 1) I was using an external (wall wart: 2amp, 5volt) power supply - I couldn't get all of the pixels to work correctly together until I ran a wire from ground on the arduino to the ground from my power supply. 2) I added a small resister (220) between my data pin on the arduino and the data pin on the light string. 3) In the arduino code, using Adafruit_NeoPixel, I chose NEO_RGB + NEO_KHZ800 4) I did not have the capacitor that some tutorials recommend and things are working fine. 5) these lights do require a controller. If you are using the arduino, you will have to write your own code, though there are lots of tutorials on-line for that. You can also purchase a separate controller from Alitove if you don't wish to write code. I have never put lights up outside the house, but I am now very tempted. However, I will need a few more strands... I will also need to work out weather-safe power and arduino enclosure. If I get more strands and connect them, I will update this review.
H**E
I love them
Amazing - very bright, and they just work as they should. I'm using them with the Adafruit_NeoPixel library for the arduino IDE on ESP32 and they JUST WORK! I will now use ONE of these any time I need an RGB LED. Only need one GPIO rather than the old 3
S**.
Worked great for my "evil" pumpkin patch. Yes, you read that right.
I used these to make a DMX controlled "matrix" of light up pumpkins for halloween. First time I've used WS2811 lights, so there was a small learning curve. I clipped all the wires so I could add extensions. After wiring the first couple I realized that the wires on each light are directional. There is a set of wires that are the "input" and the other set is the "output" such that they form a daisy chain. Using the ALITOVE WS2811 DMX to SPI controller, the position of each bulb in the "chain" determines its DMX channel, starting at 1. To keep from having one continuous chain, I made splitters so that I had 3 parallel "chains" of 6 lights, thus 6 dmx channels, with each channel controlling 3 lights. So, several hours of soldering later, viola! A programmable pumpkin patch.
A**R
GREAT FUN! TERRIFIC hobbyist toy at a good price... some extra work on power for > 2 strands, but I'm using 8.
Thus far I've bought 16 (now 20) of these, a few at a time, to use and to give away. It's a Most marvelous toy, and I'm having a lot of fun playing with them. (Updated) Right now there are 8 strings tied together wrapped around my Christmas tree, driven by a raspberry pi... I have to feed power from a separate 18ga wire every-other strand to keep the brightness up (from resistive voltage drop, shows most when light all on on full white), but that's easy to do. The 2.1 mm jack to screw works great for feeding power at the ends and where two strand connect (you'll want about 1 per two strings, plus an extra). I could wish for a recommended connector for daisy chaining power, including a variant to allow disconnect between strands (I'd pay more for strands that had good daisy-chain / mid feed power connectors in place). Right now I'm using wire nuts and electrical tape between strings, which still works. The pre-stripped wire made this easy, but you really have to strip it back more to get a good connection. I also added an in-line fuse for safety. 7.5A for 8 strings works OK. All said, though, that's the difference between a commercial product and hobbyist parts. If you're comfortable with some wire nuts and electrical tape... this is a really marvelous an inexpensive toy! If you're comfortable with some wire nuts Anyway- thanks guys. I'm setting up a really cool light show on the Christmas tree!
D**O
Pixel led super funzionali e duraturi.
Pixel led fantastici, sono tre anni che illuminano una insegna e sono impeccabili, abbinati a un ottimo controller e un ottimo alimentatore vanno che รจ uno spettacolo.
G**T
Easy to work with
Good quality. As described. Does the job. Easy to work with, easy to operate.
P**S
Really Like These Compared to Simple Lights
Great if you want to experience the new standard for decorative lighting. Follow some basic directions to Connect up to an Arduino micro controller, and download some of the available pre-coded lightshows. You can easily modify the Arduino "library example" programs without knowing anything about programming.
R**T
not happy not work with controler
not happy waste of money
A**R
Good enough for the girls I go out with
They work just fine. Single string powers from Arduino works. I wouldn't set all the lights to white and full brightness and expect the board not to fry, but for quick testing the power from the board was enough. No dead pixels, brightness is good enough, voltage drop is meh. /Thumbs up
Trustpilot
1 week ago
3 weeks ago