Desertcart purchases this item on your behalf and handles shipping, customs, and support to Vanuatu.
⚡ Elevate your deck game with pro-grade cable railing hardware that lasts a lifetime!
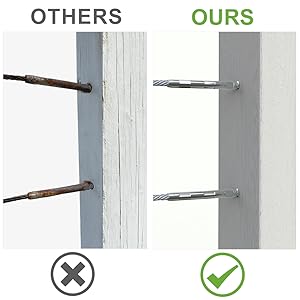
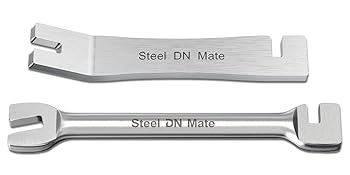
The Steel DN Mate DM50 1/8" Swage Lag Screws are premium marine-grade T316 stainless steel fasteners designed for wood post cable railing systems. Featuring reinforced right and left hand threads, they provide up to 590kg pull-out strength and reduce cable twisting during tensioning. This 100-pack includes balanced left and right screws, reinforced wrenches, drill bits, and a user guide, delivering a complete, corrosion-resistant, and easy-to-install solution ideal for indoor and outdoor decks, stairs, balconies, and fences.


| Asin | B08WX6YC68 |
| Best Sellers Rank | #15,288 in Tools & Home Improvement (See Top 100 in Tools & Home Improvement) #5 in Decking Railings |
| Brand | Steel DN Mate |
| Color | Silver |
| Compatible Groove Diameter | 0.13 inches |
| Customer Reviews | 4.7 4.7 out of 5 stars (1,202) 4.7 out of 5 stars |
| Drive System | Internal Square |
| Exterior Finish | PVD Black Finish |
| Fastener Size | 1/8" |
| Fastener Type | Deck Screws |
| Finish Types | stainless steel |
| Grade Rating | Premium |
| Head Type | Rod |
| Item Diameter | 0.25 inches |
| Item Weight | 3.2 pounds |
| Manufacturer | Steel DN Mate |
| Material Type | T316 Stainless Steel |
| Metal Type | T316 Stainless Steel |
| Model | DM50 |
| Number Of Items | 100 |
| Number Of Pieces | 100 |
| Outside Diameter | 0.13 inches |
| Part Number | DM50 |
| Screw Head Style | Headless |
| Screw Point Style | Type A Point |
| Set Name | Steel DN Mate 100 Pack T316 Stainless Steel Right&Left Handed Thread Swage Lag Screws for Wood Post |
| Set Screw Thread Type | Right Hand |
| Size Name | 1/8" |
| Thread Class | Standard |
| Thread Coverage | Partially Threaded |
| Thread Size | 1/4"-20 |
| Thread Style | Right Hand and Left Hand |
| Thread Type | Unc |
| Unit Count | 1 Count |
User
Simple and fun project, but many steps so be patient
Very happy with these cable "lags", worked well and fairly easy for my project. Here are a few suggestions for use.Prior to beginning, buy high quality drill bits and a hydraulic crimping tool ($45) Carefully measure and determine how many lags, guides and cable you will need.First, create a pre-drilled "template" and drill all holes, I even suggest counter-sinking the holes slightly for looksThen prime/paint all the woodInsert the lag into a drill, use the drill to drive it into the wood post all the way - then back it out so you can see 3 groovesInsert the cable and use the hydraulic tool to crimp it into the lagPull the cable taunt to the other lag and pinch it between your thumb and fore-finger then cut. No need to measure.Insert the cable and crimp, use the tools to slightly tighten, wait until all cables are installed to "piano" tighten as you can over tighten a cable and actually "bow" a support if not careful.Some of your lags will be crooked because the hole was drilled at an angle or you were too rough with crimping, however as the cables get tightened most of these will straighten out quite a bit.Stairs are tougher, I used an angled "guide", however it was limited to 30 degrees and I actually needed 32 but honestly think I could do it by eye just as well.Code in Mass is no cable run over 4' without an addl support, cables need to be no more than 4" apart but pros usually go 3"My project that you can see in the pics cost me roughly $600 including paint and accessories.
User
Slick look for the cost
The product looks great after install. But if you want to save time you’ll have to experiment.1. You can measure post to post and subtract the 1.5” for the wire. This will work on a level surface. Except if you did not shoot the drill completely level or straight - the 1.5” will likely be taking “too much”. Always do 1.6” just in case.2. If you cut the wire a bit too long and can’t manually turn the hand tool, grip your hydraulic crimping on the wire screw and manually turn it this way. You could just start over but who would wanna do that?3. When doing the wire cutting, have someone hold the other end of the wire you just cut - to line it up with the second wire you needed for the same posts and cut until you have the needed amount.4. Use a drill to drill the wire screw into the post to get it started. Attempt to get the screw into the post the same depth - do a thread count and get a rough guess/count on proceeding screws.5. Use a cobalt, not supplied, 3/16th drill bit for tapping the wire screw holes.6. On stairs, throw away the directions they gave you on 2” between posts. It would depend on the depth of your stairs for that to make sense anyway. You’ll be in for a rough few hours on one section if you don’t listen to this advice. You need to set the wire screws to a COUNTABLE thread count on each side. You then place the wire into the hole of one wire screw until the wire hits the bottom of the wire screw. Drag some wire to the opposing post’s leading edge and line it up with where the wire would go. Cut the wire approximately 0.25” shorter than the leading edge of the post. If this is too long/short then you will eventually get a feel for where this cut needs to go. Once you get this down it’ll be cake.
User
Simple & effective
Very cost-effective and easy product to install great quality
User
Easy to install and look nice
Worked as expected and easy to install. Very happy with my purchase.
User
Excellent deck railing solution - DO NOT use the included drill bits
Color me impressed. I couldn't believe how cost effective these were compared to buying eyes, turnbuckles and ferrules. These offer a much cleaner look and are very easy to install. I had one of the included bits snap off deep inside one of my deck posts, and it is pretty much impossible to remove. DO NOT USE THE INCLUDED DRILL BITS. Make sure you use a template when drilling holes in your posts and do your best to keep them straight, otherwise these screws will stick out at weird angles and won't look uniform.Pros:- Not expensive- Low profile- Allows you to easily tackle corner posts- Very easy to install with a few quick tips (see below)Cons:- Cheap hardware. The drill bits are trash and the mouth of the wrench slowly starts to open up and lose its grip- A bit finnicky to get each screw perfectly straight- Need to spend an additional $40-$50 on crimpersTips:- Use a quality 3/16" drill bit, which is a tad smaller than the included 5mm bit and provides a tighter grip when the screws are driven into the post. Take your time and get them as straight as possible.- Remember that a 100-pack of these screws means you're only getting enough to run 50 cables.- You should always tighten both screws the same amount (quarter turn, half turn, etc) to prevent the cable from being twisted, because that might cause one of the screws to slowly back out of the post which will make the cable lose its tension.- Make sure you have at least part of the railing framed out before you start, otherwise the cables are going to pull your posts in different directions as you go.Overall this is an excellent solution and I am glad I made the purchase.
User
Cable Rail
High Quality/Great Price/Easy to Use
User
Substantial and lifelong
Used these end hardware fittings to complete a stainless steel cable railing system around our deck. They are left handed and right handed and worked wonderfully. A little bit of work to measure, cut and crimp all the fittings but I tell you what…they look great and will last well beyond my lifetime.
User
Great product with over the top customer service!
I used this product to replace wood slats on my handrail for my deck. I found the wood slats really hurt the visibility. Problem solved with Steel DN Mate. I replaced my 1 by 1 wood slats with the stainless steel cable system and I could not be happier. Extremely cost effective and easy for a "do it yourself project". Ordered through Amazon. When I first screwed up by not predrilling 2" for the screws I texted the company saying the wrenches provided broke. I had new wrenches ordered on a Saturday night and delivered by 8am the next day. After predrilling the required 2" I had no more problems and that was on me. I used a template made from a 1 by 4 board that had holes drilled vertically every 3" that I clamped to the 4by4 post that allowed me to score where to predrill the holes. Then removed the template, predrilled the 2 inches into the post, installed the the swage screws so 1" of thread still showing on each side, cut the wires 1.5" shorter than the distance between posts, crimped the wire using a hydraulic crimping tool and then started on one side using the wrench and turned equal amounts on one side and then the same to the other side. I started out 10 quarter turns on one side then same on the other side. When the cable slack was taken up I switched to 5 turns then 3 and 2 turns on each side so as not to twist the cable. Photo shows the end result. We are thrilled with the results.
User
v good
v good
User
Great quality
I recently bought 4 products from Steel DN Mate:-The Stainless Steel Lag Screws for Wood Post of 1/8": Works really well with the tool provided. Because there are Left and Right screw, it prevents the cable from twisting. Good quality, really solid!-The 1/8" Stainless Steel Cable for Deck Cable Railing System: Great quality again! It comes with a cutter that works perfectly.-The Stainless Steel Protector Sleeves for 1/8" Wire Rope: Nice look for a finish on a wood post. I really like the way the sleeve can hide a hole that isn`t perfectly drilled.-And the Hydraulic Crimping Tool: Works perfectly for the Stainless Steel Lag Screws. I crimped the screws at two different places. It seems really strong, even with a lot of tension on the cables and the finish look is great.I am really satisfied with all of the products above. As you can see on the pictures, the finish look is awesome. It was super easy to install. Honestly it took me about 4 hours to install everything. I didn’t waste any screws or cable and no defaults were found on the tools provided. I would strongly recommend this company for your deck project. Overall, it gives a great look at a low cost!
User
La clé est solide et aide vraiment lors de l’installation
J’ai refait les rampes de mon deck.j’ai acheté les vis , les câbles noir et le kit de crimping sur amazon.Il y a plusieurs petite étapes à faire avant d’installer un câble: 1-mesurer le câble, le couper à 1,5 pouces de moins que la longeur entre les 4x42- enlever environ 3-4 cm de revêtement noir de chaque côté du cable3- installer les vis avec Léa pince à crimperNous avons fait deux crimp par vis4- viser les vis un peu à droite et un peu à gauche en même temps donc si la distance est longue, vaut mieux être deuxCa donne une rampe moderne et jolieJe suis très heureuse du résultat
User
Great system
Worked grea
User
Great product easy to use.
Combined it with the cable and the crimping tool. Must of installed 50 pieces with 3 crimps each. Held up all summer. We will see what winter brings. Happy with the look and finish. A little time consuming to turn in a half turn at a time and I did both ends myself. 5 rotations on the right then 5 on the left repeat. But did the job .
Trustpilot
2 weeks ago
1 week ago