


📸 Elevate Your Photography Game!
The Manfrotto 190XPRO Aluminum 3-Section Camera Tripod (MT190XPRO3) is designed for photographers seeking a robust and versatile support system. Featuring a Quick Power Lock System for swift setup, an Easy Link plug for accessory connections, a built-in rotating bubble level for precision, and a Q90 Column for flexible positioning, this tripod is the perfect companion for capturing stunning shots in any environment.
K**L
A solid tripod with a few caveats
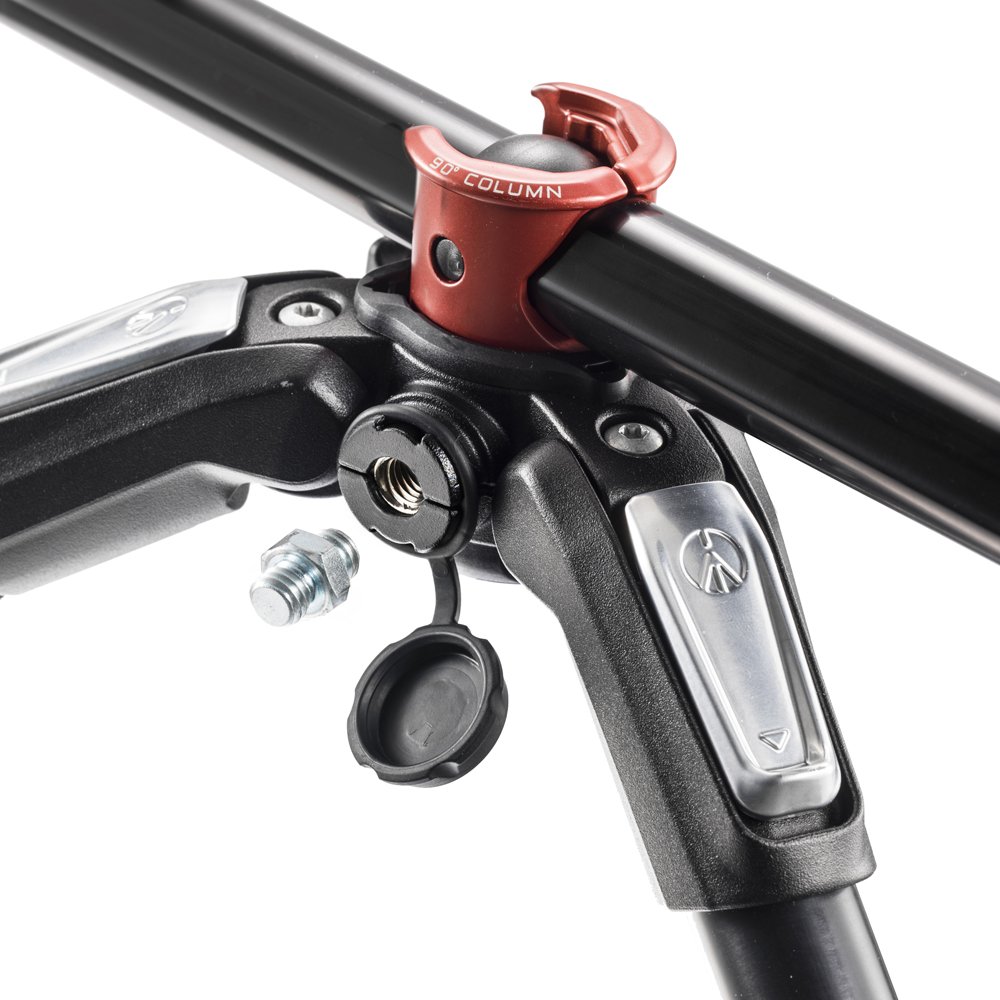
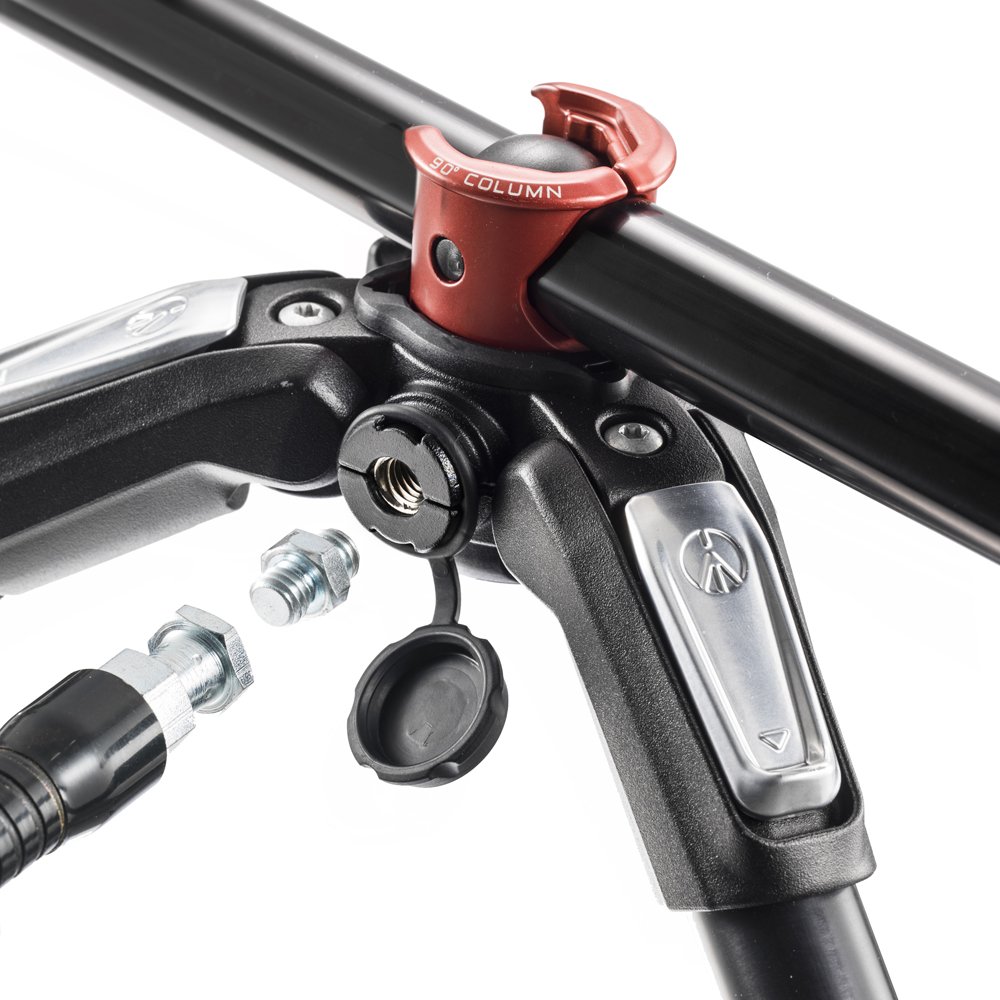
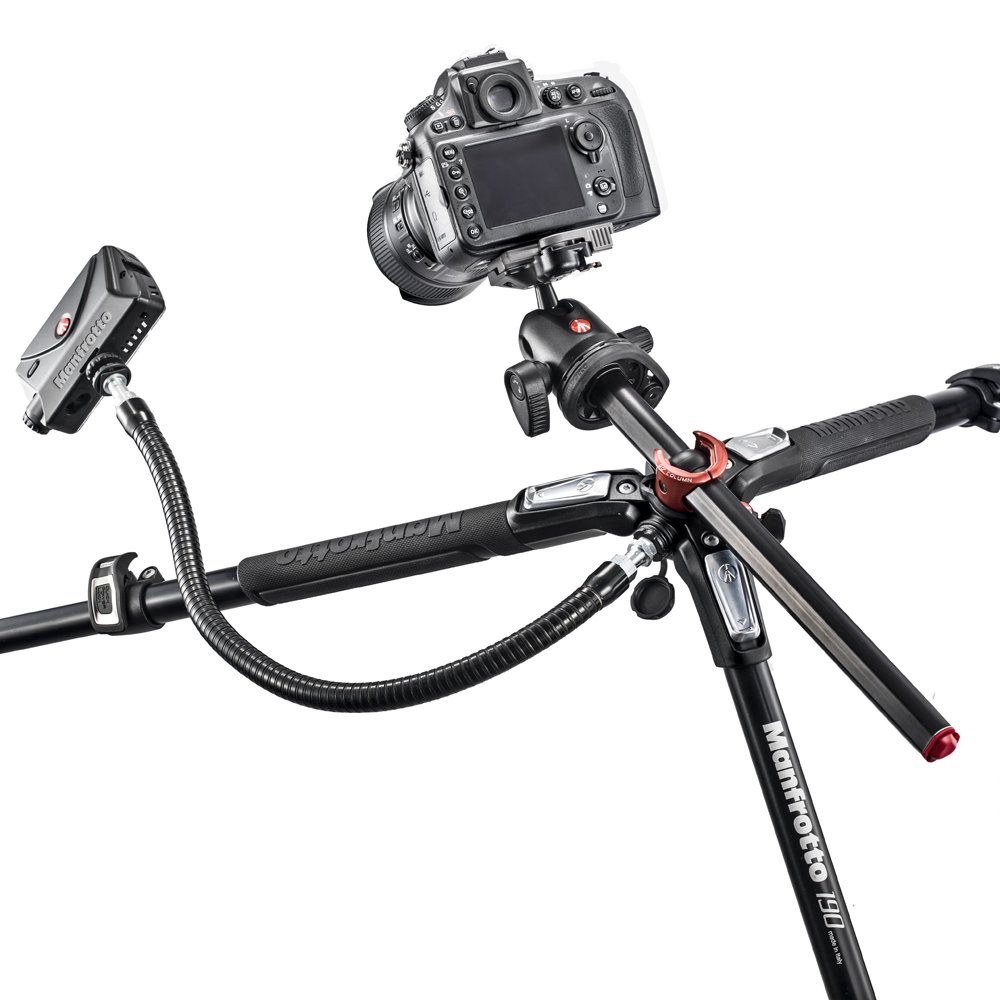
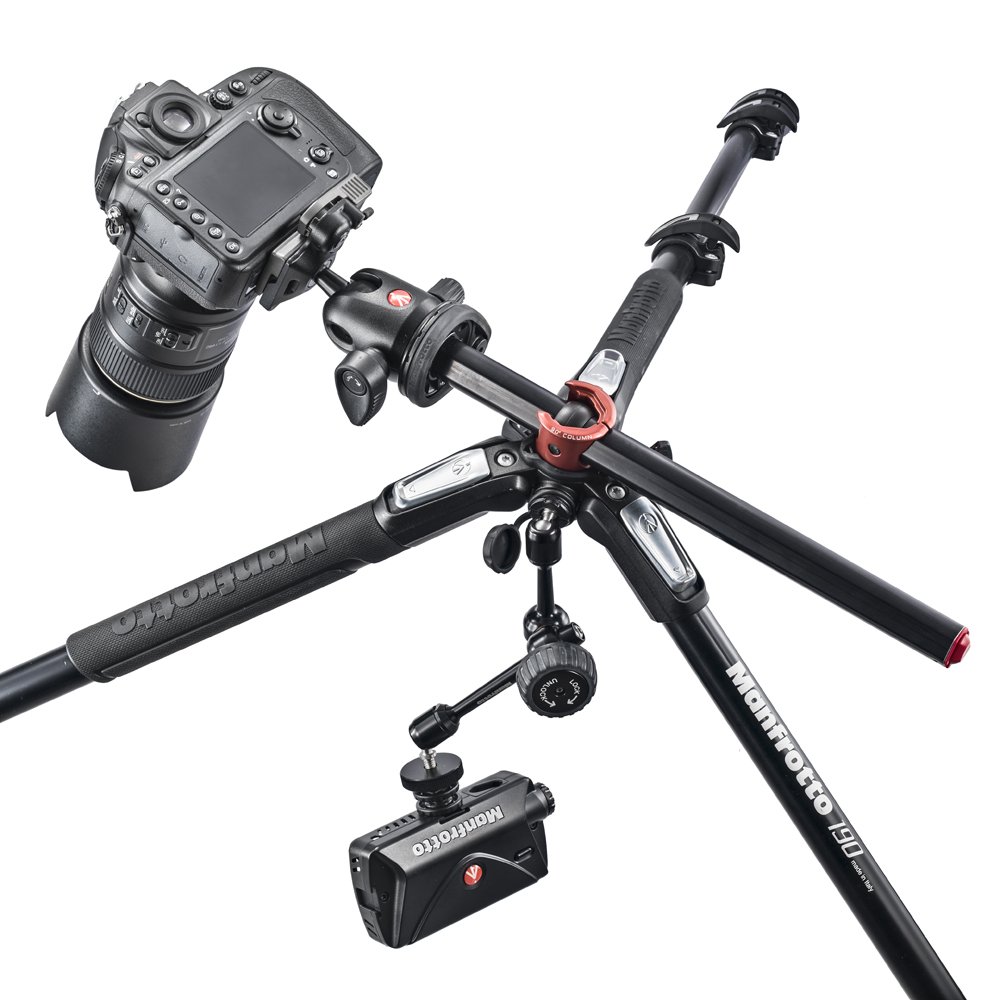
So I’m looking at my new MT190XPRO3. It is the newest aluminum model in the Manfrotto 190 Pro series, which is a compact version of the Manfrotto 055 Pro series, which started its life as a knock-off of the old 70’s British Benbo tripod (which I have owned). I wanted something compact with a lateral column and thought I would give this tripod a shot. It’s my first tripod purchase in a long time, so I’m a bit critical. Also I should tell you up front that I’m an opinionative S.O.B., so like any review, take what I say with a grain of salt.This tripod folds down to just over 23 inches, which is lovely, but too large to fit in a carry-on airline luggage. Still, the ability to fold down below 2 feet means that you can sling it horizontally on your back or affix to the side of your backpack comfortably. It weighs around 4.5 pounds, so it’s not something you’ll want to carry if you plan on hiking through a jungle or snowcapped mountain for 10 hours to get that perfect shot… But for most of us who are willing to trade stability for weight, then this tripod is worth carrying around. If weight over stability is of paramount importance, then you might want to consider another make or model.First let’s start with the 90 Degree legs. Ever since my first Berlebach, I’ve always loved this feature on travel tripods. It comes in handy more often than you would think if you’re shooting outside. The most common utilization is shooting in a shallow stream where you need to be close to the water. Pulling all the legs out 90 degrees will allow you to shoot 4 inches from the ground. If you usually carry a beanbag to shoot on the ground, you can leave it at home now and remove some weight from your kit.To pull the legs 90 degrees out, you have to fold the leg toward the column, as if you are putting the tripod away. Then you push on the metal latch and lift the leg out. It should be simple, but the metal latch is very uncomfortable and hurts my finger to use. There’s also no feedback from the latch - you don’t feel as if you’ve moved it. The result is you will probably pull on it harder than you need to. This latch system is in desperate need of a redesign. Maybe a hard textured rubber dome that you can easily push/pull down would be better. The way it is now, I dread using it.The legs have a hard textured rubber grip instead of the high density foam found on some other tripods. The upshot is that they will last longer and provide a better grip. The downside is they weigh a little more than foam. I don’t know the real world difference - it could be negligible, but I thought I would point it out. Personally, I prefer the hard rubber. Foam is disgusting when it starts to deteriorate.The big selling point of this tripod is the cross section tube that Manfrotto named Q90 (short for Quick 90 degrees). It replaces the need for carrying a lateral arm attachment that costs extra money and weighs anywhere from 1 - 3 lbs. Other / older models of similar Benbo type tripods required complete disassembly of the column and reassembly to switch between the vertical and horizontal column positions. With this Manfrotto model, you pull the column up, press a button at the bottom of the column shaft and push upward. The column doesn’t pop out of the tripod like you would expect, but it does pivot 90 degrees, which is wonderfully easy.I have one major complaint and that’s the notation on the column and column mechanism (the red collar at the top of the tripod). It’s not easy to put the column back in to a vertical position. There are small triangles pointing to where you should align the column with the column mechanism, but they don’t stand out because they are the same color as the background. They should be a different color like the dots on a camera lens and body. Can you imagine how hard it would be to put your lens on without that dot easily identifiable? Seriously, this is design 101 and Manfrotto should know better. It makes putting the column back very frustrating. Save yourself a lot of grief and use white paint to mark the alignment points as soon as you buy this tripod. Once you do, you’ll experience the “quick” column the way it was meant to be.That reminds me, the 90 degree column should be placed OVER a leg. If you swing it out between two legs, the weight of the column and your camera will cause the tripod to tip over. With your lens facing down at the ground - it doesn’t bode well for a happy ending. I highly suggest taking an empty burlap sack with you. Fill it with rocks and wrap it around the front leg for additional support. This is a lot like bagging your c-stand in the studio. You don’t want to screw around when it comes to things like this. Frankly, I don’t care if you break your gear from negligence, but if you have a model underneath your lateral arm then you need to make sure he/she is safe.The new Quick Power Lock (QPL) legs are awesome! My previous tripod was a Neotec that has lockless legs, you just pull them out and they lock automatically. I loved the speed of setting my Neotec up and after a few tries - I think these set up just as fast! I hope Manfrotto makes these leg locks standard on all their tripods (if they haven’t already). It’s probably the feature that has me most excited. If I have one complaint - it’s that it is hard to know which way you should flip the locks. They are sleek and futuristic looking -- kind of like a car where you don’t know which is the front and which is the back. I found it much easier to open if I *didn’t look* at the locks and let my mind go on autopilot. I guess years of handling a tripod have put this action in my muscle memory.A new addition is the 3/8” female receptacle. Manfrotto calls it an “Easy Link” as if they invented some kind of new and better connector system. I can only surmise someone in their marketing department thinks we’re idiots. I think this is the dumbest design decision I’ve ever seen. The problem with using a screw system to attach anything horizontally is that the attachment will unscrew and rotate to the bottom when any weight is added to it. Fighting gravity with a screw like this is… beyond stupidity. I’m sorry if I sound harsh or silly for going on about this, but I can’t wrap my brain around how anybody could allow this to go in to production. Somebody at Manfrotto needs to get fired. It’s a disaster waiting to happen. You’re better off using a mafer clamp or gaffer grip on a leg. I know it’s an extra 1lb to carry around, but at least your attachment will be safe and secure.One thing I’d like to point out is that the center column is a hexagon shape and not a circular tube shape. The upside is that your column won’t spin around accidentally. The downside is… you can’t spin your center column around. This means, if you have a non-panoramic head (like a tilt head, etc.), then your lens is stuck facing whatever direction the result of a tightened screw will be. This isn’t a problem when vertical but in the horizontal position your lens could be facing up instead of down and you’d have no way of rotating it. I’m not complaining - I think using hexagon tubing is a smart idea and only a small portion of photographers will need to buy a panoramic rotator base to compensate. I just thought I would mention it for those of you who choose alternatives to ballheads, 3-way heads or gimbals.The true strength of your ball head will be tested when using the lateral column. The ball head you *thought* was the bee’s knees might suddenly turn to wobbly fradey cats in the face of gravity. Don’t be surprised if your current ballhead creeps down when placed in the horizontal position. You might find that you have to buy a more expensive ball head or switch to a 3-way head. If you already own a tripod / ballhead combo then lay your tripod on a table so your ballhead hangs over the edge. Mount your camera and the biggest lens you own on the head and see if gravity triumphs. Don’t forget to hold your tripod down, by the way -- you don’t want it to crash to the floor!I will wrap this up. I am sure I missed a few things, but I've written enough and I'd be surprised if anybody makes it this far.So in summary, if you are looking for a compact travel tripod with a horizontal column that is (relatively) stable in the field, I think this is worth serious consideration. If you don’t plan on using the horizontal column or traveling with it, then I think you are wasting your money. I realize some of my complaints were rather harsh but keep in mind that they weren’t critical to primary functionality. I'm taking a star off for the 3/8" Easy Link, which as I described earlier, is a disaster waiting to happen if you choose to use it. The other complaints can be overcome with some work by the user and don't merit another star being docked. That leaves this review at 4/5 stars. Hope this was helpful.
B**A
Not great / not bad
Done
M**O
Versatile e solido
Usato in diverse situazioni, continua ad essere adatto in qualunque contesto. Dimensioni abbastanza contenute nel trasporto. Stabilissimo, anche con pesi rilevanti, è pratico anche per le diverse posizioni. Utilissima anche quella totalmente a terra. Ottimo anche lo snodo centrale che permette di ruotare in verticale. Con un po' di manutenzione ogni tanto potrebbe avere vita illimitata
M**N
Lightweight, but only moderately stable
Well made and well designed, but just a little shaky. When touched, it “rings” a bit, and the vibrations last a second or two. Try before you buy if you plan to use for high magnification/long range outdoors in wind.
W**F
Habe mir das Stativ mit 4 Segmenten gekauft.
HalloAufbau: Dolly mit Räder, Manfrotto MT190XPro4 Stativ, Manfrotto MvH502Ah Videokopf, Sony Ax 53 Videokamera mit Zubehör (WIFI Monitor, Microfon, Schulterstativ, Käfig e.t.c). Manchmal steht auf dem Stativ ein Gimbal für 360 Grad schwenks drauf.Anwendung in der Praxis: (mit Fernbedienung)Ich bin 1.86 groß und das Stativ, mit Dolly, mit Stativkopf und Kamera überragt bei ausgefahrener Mittelsäule meinen Kopf. Wenn man dann auch noch zusätzlich einen Gimpal montiert, überragt man jedes Publikum. Selbst die großen 2 meter Männer werden überragt. Somit rennt mir niemand mehr ins Bild hinein. Ich sehe somit alles, und kriege damit super Aufnahmen hin. Durch den Dolly lässt sich das Stativ super hin und herschieben.Das Stativ.Material Alu. Sehr hochwertige Bauweise. Das Stativ hat Gummifüße. Keine Spikes vorhanden. (Bei Manfrotto gibt es Spikes zum Nachrüsten preis ca 40 Euro.) Die kaufe ich mir erst dann, wenn die Gummifüße kaputt sind. Die Libelle (Luftblase) ist so montiert das sie, auf der Baseplatte, im Kreis gedreht werden kann. Das Stativ hat keine Kurbel und deswegen wird die Mittelsäule nur von einem Schrauben in der höheren Position gehalten. Innen hab ich gesehen das beim Zudrehen der Schraube die Mittelkonsole von einer metallenen Platte gehalten wird. (Bei anderen Stativen von anderen Herstellern ist das aus Plastik. Dieses Plastik bricht sehr gerne)Packmaß: Höhe 47 cm ,Breite 9 cm (falls das wer im Rucksack transportieren will)Verstellen der Beine:Ein unbeabsichtiges verstellen (nach außen) der Füße ist nicht möglich, weil die Füsse zuerst ein wenig (nach innen) eingeklappt werden müssen und erst dann können die silbernen Schieber nach unten gezogen werden. Ohne einklappen sind die Schieber arretiert und können nicht bewegt werden.Die neun Schnallen der Segmente sind sehr hochwertig verbaut und halten sehr gut. Sie geben überhaupt nicht nach. Sollten sie sich mal irgendwelche Schrauben lockern, dann kann man die Schnallen und auch alle Teile des Stativs mit dem beiliegenden Werkzeug wieder fixieren.Negatives:1.) Die Libelle (Luftblase) wird von einem großen Videokopf (meinem) komplett verdeckt und kann nicht mehr gelesen werden. Deswegen ist es wichtig, dass wenn ihr euch einen großen Kugel(video)kopf oder Adapterplatte dazukauft, darauf achtet das einer von beiden (oder beide) ebenfalls eine Libelle (Luftblase) besitzt.2.) Beim Filmen mit kleinem zusammengeklappten Stativ (ohne Dolly) ist mir aufgefallen, das man unbedingt ein schweres Gewicht ans Stativ anhängen muß, weil sonst das Stativ kippt. Dafür gibt es seitlich eine Aufhängung.3.) Diese Aufhängung wackelt, und das ist auch auf manchen Youtubevideos zu sehen. Das dürfte also normal sein.TIPPS:Ich habe bei den Fragen gelesen, daß man die Mittelsäule nicht herrausnehmen kann, und man sie dann nicht mit der Platte nach unten montieren kann. Das stimmt nicht es geht. Die mittlere Säulebefestigung besteht aus vier Teilen, welche dann wenn man den Halbring unter dem Stativ öffnet und herrauszieht auseinnander fallen. (3 Teile plus Ring)Demontage Tipp: (falls es wer machen will)Nehmt vorsichtig den Mittelteil herraus und seht euch genau an wie der Dreieckige Plastikteil beim zusammenbau wieder montiert gehört. Seht euch bitte auch vorher an wie die Mittelsäule in der Mittelsäulebefestigung drinnen steckt. Wenn ihr euch das gemerkt habt könnt ihr die Mittelsäulengbefestigung zerlegen und andersrum wieder einbauen. Es geht also, ich habe es ausprobiert.Nur wozu brauchst du das ? Die Mittelsäule lässt sich zur Seite neigen und das Stativ auf eine Höhe von 6 cm absenken. (laut meinem Lineal) Somit sind ganz niedrige Aufnahmen immer möglich. Mit diesem Stativ ist ein Filmen mit 1 cm oder weniger Abstand zum Objekt am Boden (Macro) möglich.Fazit: Entscheide selbst.Liebe Grüße Walter Wolf
Trustpilot
1 month ago
5 days ago