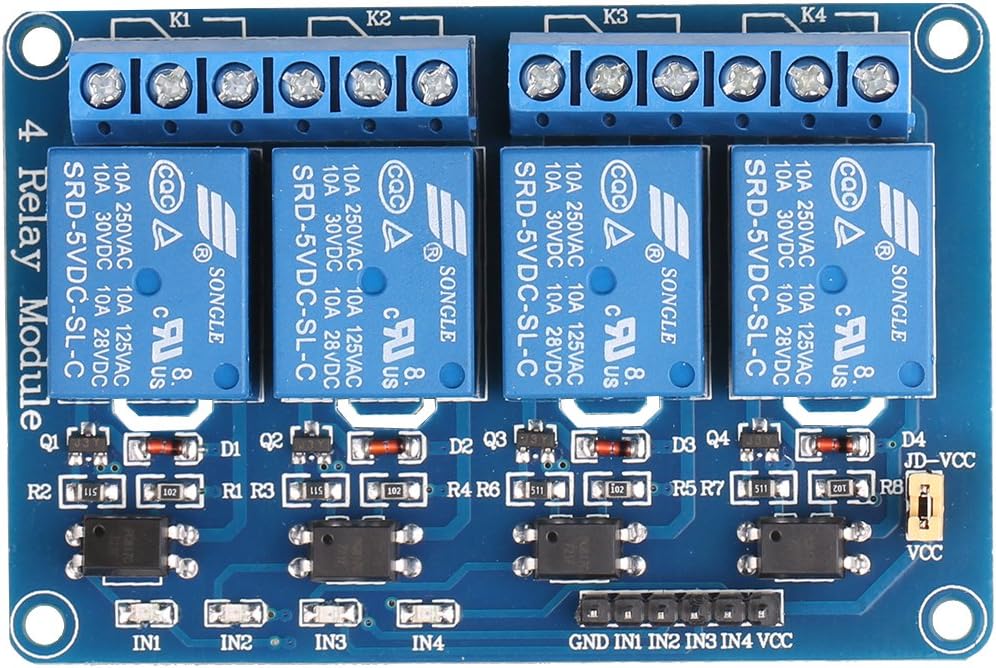
Excellent board for Raspberry Pi. Assuming you have a solid power supply, you can run this board off the +5v provided on the pin header (Pin #2). The relay board is fully buffered, meaning that the relay coils are not directly driven from the GPIO pins which protects the Pi and means that this board is plug and play. If you're going to be doing a lot of work with the RasPi, I highly recommend a USB voltmeter/ammeter combo so you can monitor your power usage. At full load, you want to ensure that your voltage on your USB port is as close to 5.0VDC as possible, anything less than 4.65VDC will cause problems with the Pi and stability. Your amperage should never exceed the USB power supply's capability. I use a 2A (2000mA) power supply and with full load (all relays on), the board + Raspberry Pi B+ only gets to .56A (560mA) so I'm well with spec. With all relays off, I pull about .24A (240mA) HOW TO HOOK IT UP: The board has a six pin header labeled GND, IN1, IN2, IN3, IN4, VCC and a two pin jumpered header labelled VCC/JD-VCC. Leave the jumper installed. For GND, you can connect to any of the GND pins on the Pi's header (Pins 6,9,14,20,25,30,34,39). For VCC, connect to pin 2 (+5V). Connect each of the IN pins to a GPIO pin (I used GPIO 8,9,10,11 which are pins 24,19,21,23 respectively). HOW TO CONTROL IT: Use Python (should be available in your RasPi distro) along with the RPI.GPIO library. You'll need to run your scripts with sudo as manipulating the GPIO pins requires root access. You can set the GPIO pin using GPIO.output(PIN, True) to turn off the relay, and GPIO.output(PIN, False) to turn it on. My only nitpick is that the logic is backwards. Driving a GPIO pin high (TRUE), should turn on the relay while driving the GPIO pin low (FALSE) should turn it off, but it's easily fixed in software. Pros: Plug and play, just works. Will be getting more of these. You don't have to worry about building interface circuits, transistors, load calculations down to the mA or anything overly complicated. Basic research into the GPIO library for Python, a couple of GPIO pinouts for the RasPi and I was up and running within minutes. Cons: Logic is backwards, you have to send a GPIO pin LOW to turn on the relay but this is a very minor thing and can be easily fixed in software. Verdict: If you are looking to be able to control equipment using a Raspberry Pi, this is the board to use.