Desertcart purchases this item on your behalf and handles shipping, customs, and support to Vanuatu.
🔧 Shift Smoothly, Save Big – Repair Like a Pro!
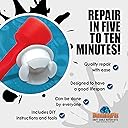
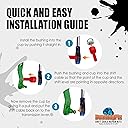
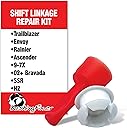
The BushingFix TB1Kit is a patented, high-quality automatic transmission shift cable bushing repair kit compatible with over 15 major vehicle brands including Chevrolet, Jeep, and Ford. Designed for quick, tool-assisted installation, it offers a cost-effective alternative to full cable replacement. Backed by a lifetime warranty and trusted by thousands, this kit ensures smooth shifting and long-term durability.
| ASIN | B013188HW0 |
| Best Sellers Rank | #9,149 in Automotive ( See Top 100 in Automotive ) #1 in Automotive Replacement Shifter Bushings & Components |
| Brand | BushingFix.com |
| Customer Reviews | 4.4 4.4 out of 5 stars (2,928) |
| Date First Available | July 30, 2015 |
| Item Weight | 0.09 ounces |
| Item model number | TB1KIT |
| Manufacturer | Ascension Engineering |
| Manufacturer Part Number | TB1KIT |
| Model | TB1Kit |
| OEM Part Number | 22856120, 7B071326SF, 4880207AL |
| Product Dimensions | 5 x 3 x 1 inches |
T**S
Fits 2013 Dodge Dart SXT 2.0
I'm not a gearhead, but I'm not afraid to dick around with things, if they don't appear overly complicated. Once I identified my Dart's problem. I researched it, found a couple YouTube how to's that pointed me in this direction. When I got here, this page couldn't guarantee a fit for a 2013 Dodge Dart SXT 2.0. I trusted the video that sent me here & a couple other reviews. I can attest, this absolutely DOES fit. This part is easy to replace. However, I will state, the cable you need to access, is buried under your battery tray & not very friendly to the installer. Also, avoid the tutorials that want you to tear apart your entire car. This should only require pulling 2 bolts, then replacing & reattaching the bushing, & replacing the bolts. "Les Robison" "How to change a dodge dart 2013-16 shift linkage bushing- the easy way." on YouTube is what you're looking for. Other tips from this dingus's (me being the dingus) noob heads ups.... 1)Make sure to remove the old bits of the previous bushing, from the cable ring. AND any bits that may have stuck to the pin. I failed to do the latter, just assumed they all crumbled & fell off. During the install, I had issues getting the bushing to seat correctly on the pin...... Don't be this dingus! 2)Make sure you have a ratchet set with a bit extension that's at least 10 inches long(if you have deep socket bits). Longer if you do not. I used a 1/2 inch bit for the 2 bolts. 3)You'll most likely need a pair of needle-nose pliers, to pull the retainer off. This part's kind of tough. Just be careful you don't break the stick off the retainer. I noticed a little fatigue in the plastic, while I was trying to remove it. Nothing broke, but there was definite whitening around where the cup & stem meet. 4)Other than the bushing kit & the tools I mentioned above, You only need a couple wirey hands & some patience. Anything more & you're doing something wrong.
A**.
Excellent result, but needs a bit of fiddling.
It was suggested on YT that this works on a 2006 Tundra shift linkage cable. With a bit of fiddling it worked great. The red hickey was no help at all. The material is not hard plastic. It’s soft and pliable, but can’t be cut with a blade, more like sniped like a rubber band. This makes it difficult to push on the mounting pin. So I carefully used a drill bit to spin inside the bushing to warm it up. This took longer than expected. Once it was warmed up it could be pressed onto the mounting pin and then the cable linkage slipped on easily. It was a tight fit and fixed the issue to about 90% like new. Works good now, but needs a handy person. I’m so glad I fixed it.
R**.
Installation tool makes this a easy install
Ordered this a few days ago , received it on time , ( usually always on time with Amazon or prime), very small package with the white bushing and red install tool. If you haven't done this before, READ the instructions, if not you might end up having the bushing and the install tool up- side down. Don't know if you could get bushing back out with significant damage to the bushing, would probably have to order another one. Use some kind of lubricant to help get bushing into install tool, takes a little muscle , push the bushing all the way down until it is completely seated,( the top lip of bushing needs to be seated flat on the install tool. I have a '08 Sebring, just took me less than fifteen mins to take the air box out for easy access to the shifting cable. Make sure and check your cable, check your adjustment nut on plastic part and make sure it is snug up tight, or you can take it completely off and do a simple re-adjustment when re- installing. So now take the bushing and install tool and take your shifting cable, make sure all of the old bushing is out of the grommet hole, then I cleaned mine wit a small SS wire brush, then I used some silicone grease both on The grommet holder and The grommet itself. Take install tool making sure red part is oriented in the right direction, facing down, insert long side of install tool into shifting grommet, and then pull the long part down ward, this can take a little muscle, I ended up using some small lock grips and pulled the install through the bottom, make sure you get it completely seated, with top lip flat on top of shifting cable grommet. Make sure you use your favorite lube on the bushing and on the tit for the shifting lever. Take the bushing notched side down, and press on to the shifting lever tit. Make sure it is seated completely seated on shifting lever and it will rotate and won't pull off. Then have someone get in the car , run through park, reverse, neutral, drive, one and two. Then run back through gears back to park, all why watching the shifting cable under the hood. Your shifting cable and bushing should slide easily from park to low and back. Before I put air box in, I opened up the air box and examined the air filter, a little dirty so I cleaned it and put it back into the air box, re-installed. the air box, checked everything, started the motor, went through all the gears, down then up, worked perfectly, put it in drive drove around a few blocks, parked, opened hood to check bushing and everything is in tact. So I know this was a long drawn out review, but wanted everyone to know what you might want to do to install your bushing correctly. So I am by no means much of a mechanic, but this is super easy, and I would say 30 mins total, that's taking air box out , cleaning air filter, re-installing air box, and doing check on car was probably about 30 mins. Very easy install!!
M**D
Great idea, good value, but not the best
If you're reading this, it's because the bushing on your shifter cable is worn or broken, and you can't buy that. The dealer quoted me a price of close to $1,000 to replace the entire cable. (4.5 hours + $80 for the cable). I couldn't find these at any of the local parts stores, so I ordered it from Amazon. Installing it didn't go well, I couldn't get the black part all the way into the orange part, and I ended up losing it under the hood and had to go find another solution, because I couldn't wait another week for another one. I found that the Dorman 14057 $15 at O'Reilly worked well on my 2015 Ford Fusion, and it was very easy to install. The reason I didn't give it 5 stars is it costs more than twice as much as the Dorman 14057 and it was more difficult to install. The Dorman is available for $10 on amazon Dorman 14057 Replacement Transmission Shift Cable Bushing .
D**B
Save a Fortune!
So, you go to your car after work, the same car you drove in that morning without incident. You’re tired and ready to go home. You start said car, put your foot on the brake pedal, and pull the shifter into reverse, but the transmission doesn’t engage. You first thought: oh, no, money. But then you see that the gearbox is still in park. You shift up and down “the column” a few times. Still no joy. But you notice that the resistance on the shifter is lower than normal, and you realize it has to be the linkage, not the transmission. Plus, there is no trouble light; good sign. So, you wonder whether the shift cable might have broken. Probably not, because you felt no snap, and cables don’t break that often. You realize that the problem is probably a connection that has come loose, either to the shifter, itself, or to the transmission shift lever (a small “L” that protrudes from the transmission). It’s probably the latter, but you’re in the car, so you pull up the shifter housing and watch the cable while shifting. It moves with the shifter, so the problem must be at the transmission. You pop the hood, and look behind and under the air intake (fed), and sure enough, the shift cable end has popped off of the transmission shift lever. You slide it back on enough to get home, and once you get home, you slide it on again (engine now off) long enough to put the car in park. This is a simple repair, maybe $100 at your local shop, right? Wrong. Because most car companies don’t produce replacement bearings for these assemblies. The bearing is all that is worn out, just the little plastic bit that holds the cable on the transmission shifter and turns in the cable-end housing to allow the transmission shifter to move in an arc. As it turns out, your beloved car company and dealership probably want to replace the entire cable assembly, a $500 to $600 job. There’s got to be a better way, and thanks to a little company called bearingfix, there is (as I discovered). With this little part, this is an easy 5-minute repair you can make yourself. It’s even simpler than most YouTube videos present, because you do not need to remove the air intake/cleaner to do this (at least on my car). This was so simple on my 2008 Chrysler that I couldn’t believe it. Granted, $30 (including shipping) is a bit much for a little piece of plastic and a plastic installer, and it will take a few days to get this thing shipped to you, but it beats the heck out of a tow and a $600 repair bill. Recommended! By the way, those writing poor reviews on this thing seem to have installed the piece backward and broken it. The installation instructions are simple and clear!
G**D
Easy installation
Very good quality product
C**N
Works for an Escape
Fits perfect on my 2015 ford escape
J**S
Get the Dorman instead
Son’s 2015 Chrysler T&C van wouldn’t shift out of gear. Searched online for a solution. Based on another person’s review, that this was better than the Dorman option, I bought this. When you are actually holding this in your hand, it seems absurd to pay $20 for a plastic pc that can’t cost more than .50 to make. At most, $2 to make the entire thing. Anyways.. there are no directions telling you which way to insert it. Whether split side up or down. Took a guess and put it in and it didn’t seem like a firm hold on the shift post. So, I removed it and tried installing the other way. That didn’t work, so I had to remove it and put back the first way. All the while, this thing is so tiny, that you risk dropping it and losing it. Be sure you don’t do this parked on grass. We were able to shift the van but I don’t feel confident that the cable will not randomly pop off. See the third pic. You can tell it’s not fully grasping the post. All that said.. Now that I know what I know, I wish I would have just bought the Dorman part 14104. It comes with a retainer clip that is needed to replace the plastic retainer that holds the cable end in place. It’s susceptible to break when removing it. The Dorman also comes with two bushings that can only go one way and snap more firmly into place.
S**S
Excelente
Muy boludean adquisición, me ahorre una reparación muy costosa en un taller tan solo cambiando esta pequeña pieza. Es necesario desquitar ciertas piezas del motor pero lo hice yo sola!
K**H
Excellent
It helped and it is not difficult to install
S**O
It works and is a great way to save money!
The bushing fits the transmission end of the shifter cable perfectly. It’s a lot easier to replace it than replacing the whole cable. Also it’s a lot less money. Getting the remains of the old bushing out of the cable took a while. Bit awkward to get at because of shields, exhaust pipe etc. I put the bushing in the wrong way on my first try but it didn’t damage it. Just make sure to double check. Also found it easier to put white lube on it and squeeze it in than using the insertion tool. Shifter works great👍
A**J
سيء جدا وغير مطابق للوصف
سيء جدا وغير مطابق للوصف ولا يركب ع السياره يطلع له حواف ولا يشبك صح واتوقع انه لو ركب مع الحراره رح يطيح يعني عندك رانجلر لا تاخذ هذا المنتج لانه ما يتطابق مع السياره وجودته سيئه خسارة فلوس بس مو اكثر
D**E
So far so good! Replacement for failed Fiat 500 Bushing
Great fix for Fiat 500 2012 and 2013 that have a recall on their shifter cable. The bushing fails and the cable pops off. Unfortunately we didn't know this when we bought this new-to-us used Fiat. Right after we purchased the cable popped off, and the dealership said it would be months before we could get the recalled cable replaced. Luckily we found someone online who used one of these bushings to fix the issue and so far it's been holding on! Highly reccommend!
Trustpilot
1 month ago
2 weeks ago