Description
🔧 Lock it down with power and precision—because your walls deserve the best!
- TRUSTED BY PROS - Rated 4.6 stars with 626 reviews—join thousands who rely on GeeFix for secure mounting.
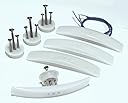
- COMPACT DURABLE - Sleek 0.5" metal design that blends modern style with heavy-duty performance.
- UNMATCHED STRENGTH - Handles up to 595 lbs shear load—built for the toughest mounts.
- PRECISION LOAD SUPPORT - Supports 224 lbs cantilever load at 12 inches for versatile applications.
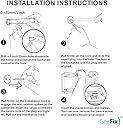
- PRO GRADE INSTALLATION - Designed for easy use with a 1" spade bit or hole saw—perfect for drywall & plaster.
The GeeFix Heavy Duty Wall Anchor set of 4 offers industry-leading strength with a maximum shear load of 595 lbs and a cantilever load of 224 lbs at 12 inches. Crafted from durable metal and designed for easy installation using a 1" spade bit or hole saw, these anchors ensure secure mounting on drywall and plaster walls. Compact and modern, they meet professional safety standards and come highly rated by users for reliability and performance.