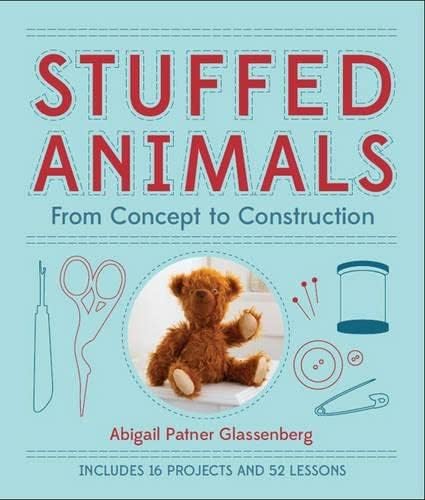

Stuffed Animals: From Concept to Construction Paperback – May 7, 2013
Product ID: 3645109
Full description not available
G**T
Must Have for Softie Designers!
I enjoy making plush animals using existing patterns, and recently I have become interested in making my own patterns - especially for usual creatures that patterns are not available for. I read through this book last night and I am happy to say it is full of sewing revelations. I would say this book will most benefit the crafter that has some previous sewing experience, but beginners should not have any problems if they follow the lesson plan.The book begins by reviewing basic tools and materials that are used in softie construction. The Introduction covers the fundamentals of stuffed animal design - sketching, pattern making basics, prototyping, fabric marking and fabric selection. The author uses freezer paper when making her patterns, and explains why this is the perfect material for her to use for several reasons. The Introduction concludes with physical construction basics - pinning, sewing machine setup, seams, clipping, basting, turning, stuffing and finishing. Reading through this introduction I either learned / or was reminded of several important things regarding softies including: matching the grain when cutting mirror images, reinforcing important seams with frequent backstitching, and the importance of drafting prototype patterns.The lessons are set up to progress in difficulty from basic to advances techniques. Lesson 1 is Creating a Simple Outline Toy - in this case a fanciful Fish. The author is very good at explaining both the design process and the construction. For every Lesson she includes many helpful notes both to help with design but also to help visualize your design. For instance, when describing an outline toy that basically has two sides she recommends you think of the completed toy as "an embellished pillow". I love these kinds of tips and find them very helpful.This book covers some of the things I am most interested in regarding softie design. Early in the book you learn to make spheres and many different kinds of eye treatments. Later in the book you learn to make cupped ears and darted cheeks, parts of classic softies. The thing I most appreciate about this book is that it covers what I think is most important when making softies - the gusset - both the body gusset and the head gusset. I am very glad to have this book to help with designing head gussets, I think the sculptural and dimensional effect that comes with using a head gusset are what can really give any creature a familiar or lifelike appearance. Also - do not miss page 102 - The author has given us a photo of 6 prototype heads that shows the profile of the heads with different muzzles, snouts and beaks.Each lesson begins with a photo of the competed animal and a tools and materials list. The instructions are step by step, complete and easy to follow. There are detailed photos of important construction steps and additional notes and recommendations (ideas for faux taxidermy, sewing thick fabrics, pattern adaption, making a toy from a child's drawing, making a finger puppet). Since you can't peek inside the book, here is what you will learn:FishLesson 1: Creating a Simple Outline ToyLesson 2: Attaching DetailsLesson 3: Button Eyes and Felt EyesBumblebeeLesson 4: Sewing a SphereLesson 5: Felted-Ball EyesLesson 6: Ladder Stitching One Shape to AnotherLesson 7: Other Shapes - Cube, Cylinder and TriangleElephantLesson 8: Underbody GussetsLesson 9: Setting the Legs on Darts (note: this is crucial!)Lesson 10: Cutting a Slit to Insert a DetailLesson 11: EyelidsRamLesson 12: Head GussetsLesson 13: Safety EyesLesson 14: Increasing Your Success with Long, Narrow PartsLesson 15: Embroidering a Nose and Mouth with Long Straight StitchesBunnyLesson 16: Inserting Big Parts in a SeamLesson 17: Footpads and ShoesLesson 18: WhiskersLesson 19: Dressing and Accessorizing Your SoftiePuppyLesson 20: Fabrics with Nap or PileLesson 21: Creating a Softie with a Turned HeadLesson 22: Darted Cheeks and Gathered CheeksLesson 23: Eyes with Looped BacksLionLesson 24: Making and Animal in MotionLesson 25: Turned AppliqueLesson 26: Cupped EarsLesson 27: Outlining a ManeCatLesson 28: Making a Sitting AnimalLesson 29: Muzzles, Snouts and BeaksLesson 30: Making a Satin-Stitched Nose with a Felt Pad Underlay and Smiling MouthCamelLesson 31: How to Design a Jointed AnimalLesson 32: Thread Joints and Exposed Button JointsLesson 33: Invisible Button JointsLesson 34: Cleft HoofsMonsterLesson 35: Putting in a Growler, Music Box or Music ButtonLesson 36: Using Heavier StuffingLesson 37: Raw Edge Applique and Reverse AppliqueCrabLesson 38: Tab JointsLesson 39: Turning and Stuffing a Long, Skinny PartTeddy BearLesson 40: Plastic Disk JointsLesson 41: Working with Mohair, Alpaca, and Woven-Back FurLesson 42: Ear PlacementKangarooLesson 43: Putting in a PocketLesson 44: Cutting a Hole to Attach LimbsMonkeyLesson 45: Designing an Incorporated MuzzleLesson 46: Making Feet at a Right Angle to the LegsLesson 47: Topstitching for Dimension and JointingHippoLesson 48: Creating an Open MouthLesson 49: Needle SculptingLesson 50: Darted Ear SlitsDinosaurLesson 51: Creating a Zippered MouthLesson 52: Compensating for Top-Heavy DesignPatterns for all the softies are in the back of the book and are full size except for the dinosaur. The patterns can also on the publishers website and can be downloaded and printed. Some of the patterns in the book overlap, but are printed in different colored ink. A ¼" seam allowance needs to be added to the patterns. (My tip is to trace patterns onto transparent, light weight quilters plastic to make a template - this works great for me and I have a reusable pattern.)Regardless of sewing experience, if you are interested in making softies this is a must have book. I love it, and I am so happy to have it to help me create some new creatures. I can't wait to get started! Lesson 34: Cleft Hoofs - here comes the Unicorn!
B**E
Eh, okay for beginners
The book is okay, I guess. Some simple techniques for beginners. It breaks down some terminology and fabric types.But if you're looking to grab the patterns and join along with the writer then you're going to have some issues. You'll have to either trace or cut up this book to get the patterns as they are part of the book. In other books I've had there were sleeves that contained the patterns for easy use. In the book they say you can grab the patterns from their site and print them out. That site doesn't exist anymore and is nothing more than a dead link.There are better sources to obtain this info from such as YouTube, dedicated craft sites, or even other books. I'd skip this book and go elsewhere.
S**M
Great projects---very cute soft toys
I was thrilled when I got my first look at this book and decided to try the easiest toy--the fish--first. The instructions and illustrations were great for the first steps, but the most difficult part, attaching the head to the body, was neither illustrated nor explained adequately for someone without sewing experience. In addition, the head pattern includes the 1/4 inch seam allowance, which must be an error, because all other pieces need to have the allowance added. Once I cut off the seam allowance that I had added to the head, I was able to sew the head to the body---not something someone without sewing experience would have had an easy time with. I first sewed along the the edge of both the head and body where they join (between C and D) at 1/4 inch in from the edges--(stay stiching). Then I clipped the curves and pinned the head and body, right sides together and sewed them together just beyond the stay stitching. The fish turned out cute. I haven't stuffed him yet, but will do so tomorrow since the curved hemostat that I ordered from Amazon just arrived in today's mail I shall try the elephant next and hope that there are no mistakes in his pattern. You definitely need a hemostat to turn small pieces like the fish fin. Would have given the book 5 stars if there hadn't been a mistake in the pattern and better instructions. I shall write another review after I finish the elephant.
K**Y
Great for beginners OR experienced sewers, amazing lessons and detail, SUPER cute projects!
This book is incredible... I'm more of a knitter who has dabbled in sewing, and this book is so inspirational it gives me courage to start doing some more sewing and design some of my own stuffed animals! I love it so much I just bought a copy for my Mom.The book is brilliantly laid out to include lessons and then projects that incorporate the design / sewing lessons so you can read about a design feature and then have an opportunity to use it (or see how it would be used) in a real pattern.Everything is explained so you understand the importance of different shaping techniques, which parts of the sewing instructions are responsible for making the legs or arms or whatever look a certain way.You really could use this book and design your own stuffed animal, even if you're a beginning sewer, it's that well explained! But even if you're more interested in learning to sew stuffed animals than in designing your own, this book is fantastic because the sixteen projects in it are ridiculously cute and a great variety. It's got an elephant, a monster, a teddy bear, even a camel and a crab! Something in it for every kid.I love this and can't wait to use it to create my own pattern (maybe a dragon?!) to give to one of my kids.
C**M
First stuffed toy adventure...
Stuffed Toys is a nice, in - depth book that's good to simply sit and read. It is really inspiring because as well as very detailed descriptions about things like joints, whiskers, footpads and clothing, it talks about drafting your own patterns and incorporating features into your own designs. It makes the design process seem really accessible - even to a complete beginner like me!I've made the bunny for my two year old daughter. It isn't the first project and the stitching is small scale and fiddly but it's not too bad. It is really my first proper soft toy (I've made a couple of softies that weren't as complex) so I followed the directions diligently and they were excellent.As well as the bunny, who can be dressed, there's a stylish elephant and a zip mouthed Dino to try. I think this book is a complete resource if you're starting to make toys and I am hoping to enjoy making more from it!
J**L
Plenty of useful tips
My own attempts at soft animals have been either rather 2-D or with basic bottom gussets. I now have a much better idea of how to be more adventurous.I consider myself to be a reasonably well experienced sewer but have already come across a number of small tips which have made a difference to my work, such as how to quickly, neatly and securely finish off hand sewn seams and facial features using a pin, and how to turn narrow pieces quickly and without ruining them..I will be making quite a few of the animal patterns given in the book for two reasons. 1) to improve my understanding of the construction techniques and pattern making and 2) because they are so cute! I'm on my third rabbit now.
P**T
Very muddled, I am experienced and didnt like it, but if I was a learner would find it disappointing
This is OK but rather muddled. I was disappointed.I have not found any book in this category that would beat, "Fleece Animals"Full size patterns, very clear instructions and many different animals.I particularly like the walrus. He looks difficult , but isntI have made every animal from this book so many times, I wanted something different, but " Stuffed Animals" isnt it.
C**C
Load of useful tips
This is a really good book. Lots of lovely patterns in it. And loads of tips which are so simply you wondered why you didn't think to do them that way before, lol. A nice internet link for free patterns which is useful. Very pleased with this book. Its great for beginners as well as the more knowledgeable toy maker. Highly recommended.
J**N
crazy animals
Past reviews said how brilliant this book was but not for me some rather odd looking animals. However I think there are some great techniques given for the various aspects of the different toys
Trustpilot
1 month ago
2 months ago