Desertcart purchases this item on your behalf and handles shipping, customs, and support to Vanuatu.
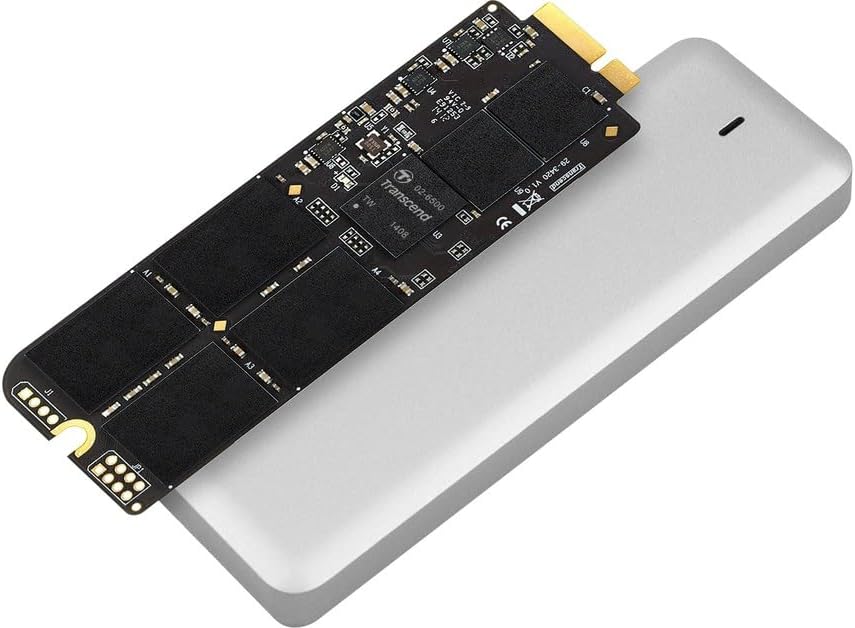
🚀 Upgrade your MacBook Pro’s soul with Transcend JetDrive 725 — speed, space, and style in one sleek kit!
The Transcend 480GB JetDrive 725 is a high-performance SATA III 6Gb/s SSD upgrade kit designed exclusively for MacBook Pro Retina 15" models from Mid 2012 to Early 2013. It delivers up to 570 MB/s read speeds, includes a USB 3.0 external enclosure to repurpose your original SSD, and comes with JetDrive Toolbox software for drive monitoring. This kit offers a seamless, future-proof storage boost with a five-year warranty, perfect for professionals seeking reliable, fast, and easy Mac storage expansion.


| ASIN | B00LJO86NY |
| Additional Features | Portable |
| Best Sellers Rank | #3,485 in Internal Solid State Drives #67,048 in Computer Internal Components |
| Brand | Transcend |
| Built-In Media | Full unit |
| Cache Memory Installed Size | 480 |
| Color | Black |
| Compatible Devices | Laptop |
| Connectivity Technology | SATA, USB |
| Customer Reviews | 4.2 out of 5 stars 428 Reviews |
| Digital Storage Capacity | 480 GB |
| Form Factor | 2.5-inch |
| Global Trade Identification Number | 00760557830078, 04054843760528 |
| Hard Disk Description | Solid State Drive |
| Hard Disk Form Factor | 2.5 inches |
| Hard Disk Interface | USB 1.1 |
| Hard-Drive Size | 480 GB |
| Hardware Connectivity | SATA 3.0 Gb/s |
| Hardware Platform | Mac |
| Installation Type | External Hard Drive |
| Item Part Number | TS480GJDM725 |
| Item Weight | 2.24 ounces |
| Manufacturer | Transcend |
| Media Speed | 460 megabytes_per_second |
| Mfr Part Number | TS480GJDM725 |
| Model Name | JetDrive 725 |
| Model Number | TS480GJDM725 |
| Number of Items | 1 |
| Read Speed | 570 megabytes_per_second |
| Special Feature | Portable |
| Specific Uses For Product | Personal |
| UPC | 760557830078 012304674443 014444857434 |
| Warranty Description | Five-year Limited Warranty |
P**N
Excellent Value & Performance. Simple to Install. Complete Kit. Possibly Wise to Upgrade Sooner. TRIM can now be Enabled.
Mar 2015. This is a wonderful product and if you need the space, I highly recommend it along with the other reviewers who thoroughly cover it's excellent performance, value, simplicity of installation - watch the video - and well thought out features including a nice case for your old SSD drive. Transcend has really focused on the MacBookPro market and done a fantastic job. Unfortunately, when you first investigate this drive and try to decide if it is a good choice, you will immediately read that Yosemite does not support something called TRIM on third party SSD drives like the Transcend JetDrive. This is confusing and caused me to do a lot of research. <Update Note: as of July 2015, Oskar Groth was able resolve the TRIM issue with third party drives as he explains on his website. https://www.cindori.org/safely-enable-trim-on-yosemite-and-el-capitan/ Oskar explains that new functionality from Apple made this possible. and I have downloaded his Disk Sensei application and can verify that Trim now works with no complications. Disk Sensei is also a nice application with other useful features. The text below is interesting, so even though the TRIM issue is now resolved I'm leaving it as it describes the issue and may help someone in the future if the TRIM issue returns with future Apple updates.> Top Level Summary: if you need the space, I think the TRIM issue shouldn't be a factor in your decision. TRIM is desirable, but I think you can safely buy this drive and not worry about TRIM. If you are interested in the benefits of TRIM, the rest of this note explains how to safely and simply enable TRIM periodically. The best news is that even if you want the benefits of TRIM, there is no urgency as you can always run TRIM later whenever you want to. Two quick notes that I think add to the discussion: 1) Availability - it is probably wise to buy sooner rather than later because in it's most recent products, Apple is moving from SSD's with the SATA III interface to SSD's with the PCIe interface. The very specific nature of Transcend JetDrive means that it addresses a limited market: a SATA III interface SSD that will fit in a MacBookPro. The newest MacBookPro Retina now uses an SSD with a PCIe interface. As a result, if you are interested in upgrading the size of your MacBookPro SSD, it might be wise to buy this sooner rather than later, in case availability of a SATA III SSD that will fit in the MacBookPro becomes an issue as the PCIe SSD's become dominant in Apple's product line. 2) As others have pointed out, TRIM is important but not critical. You can buy this drive and not worry about TRIM. However, if you want to have the benefits of TRIM, a small amount of effort makes it possible. Unfortunately, Transcend can't supply this directly, but you can do it yourself quite easily. Long discussion on TRIM below: A1. Apple uses TRIM Mavericks and Yosemite continuously run TRIM on Apple supplied SSD's. However, for obvious but unwise business reasons, Apple will not run TRIM on third party SSD's. Hence to run TRIM on the JetDrive 725 will take you some additional steps. However, it is only necessary to run TRIM when you notice your SSD performance seems slow. This would likely happen only after a few months of normal use or when the drive starts to become full. In that case, with a small amount of effort, TRIM can be run as a batch process that TRIM's the entire disk. If you don't mind an occasional inconvenience, you can easily run it periodically as part of your normal usage patterns (once a month? twice a year?). A2. 960GB of Laptop Space is Great In my opinion, TRIM is probably not a reason to hesitate on purchasing this drive if you want the additional space. For example, if you use your MacBookPro for digital photography, a 960GB drive is extremely nice. With a Nikon D800 a "typical" photo shoot event runs me about 10 - 20 GB of raw photos before I can select out the photos that seem best. Also, I use Google Nik software filters, and because they use the lossless but horribly inefficient TIFF format, they create a 100MB copy of every one of the photos they touch. B1. TRIM is Important, Not Critical TRIM is important but it isn't critical. Even though Mavericks and Yosemite run TRIM continuously on Apple supplied SSD's, because of the nature of the kind of problem that TRIM is designed to solve, it doesn't have to run continuously. TRIM is only necessary if you notice your SSD performance isn't as good as when you first installed it. B2. TRIM using an Alternate Boot Disk - booting off of an SDHC or SDXC Flash drive Once TRIM is enabled, as Allan Marcus pointed out in his Mac OS X Hints post, it can be run in batch mode by Apple Disk Utility under the Repair Volume command. Note: Disk Utility cannot run TRIM without first enabling TRIM, so you have two tasks: create an alternate boot disk and then enabling TRIM on that boot disk. With a TRIM enabled Yosemite running on an inexpensive SDHC or SDXC Flash Drive, it is simple to use the normal Mac interface to occasionally (once a month? Twice a year?) run TRIM. Running TRIM periodically with Disk Utility requires an alternate boot drive, because Disk Utility unmounts the disk it is working on. It is possible to use the Apple Recovery Partition and "single user mode" to try to work around this, but it's not worth it. Keeping an inexpensive SDXC backup copy of your OS and Applications is probably a good practice anyway. B3. Copying Your OS and Applications to a Flash Drive One way to have the benefits of TRIM is to copy your Yosemite OS and Applications to an SD card flash drive. For that purpose, I used a 128 GB flash drive and Carbon Copy Cloner. My OS and Applications would easily fit within 64GB, but I used a 128GB card because I wanted the extra space and I liked the JetDriveLite form factor. B4. Once you have a bootable flash drive - Sequence to run a batch TRIM operation 0) backup your entire JetDrive. This is always a good idea because SSD's do fail. Make sure your MacBookPro is plugged into working AC power and your battery is already fully charged in case of a power outage. The steps you will follow are very benign, but backing up is always a good practice whenever you "touch" a disk. 1) set your startup volume to be the MacOS you copied onto a SDHC or SDXC flash drive and reboot 2) download (cindori.org Trim Enabler $10) and install ( this will install on your flash drive) 3) enable TRIM using the convenient TRIM Enabler control panel, 4) run Disk Utility to TRIM your drive - Open Disk Utility. Select your drive on the left pane, Click "Repair Disk." -- Is it dangerous to run Repair Disk on a healthy disk? No. Not unless you have a power interruption, so use AC power and run repair disk when your battery is fully charged. -- There are two philosophies: "don't fix what's not broken," and preventative care. Because filesystems are entirely deterministic, I think preventative care is the better choice. In principle, a Repair Disk operation can only discover inconsistencies, it cannot cause them. My experience from rotating platter HDD's includes filesystem inconsistencies ("B-trees" or mismatches in the numbers of allocated blocks) which were repaired. In at least two cases on old HDD's I needed Drive Genius to rebuild the directory table. In those cases I only lost one or two files, not the entire data set. My experience with SSD's is limited, but I have not seen those kind of errors on any SSD's I've used. I've had an Apple supplied SSD fail completely in my MacBookPro 15" Retina Early 2013, but luckily, I had a backup. -- So, unless a power interruption occurs (working AC power is important), repairing a healthy disk filesystem is a benign process. -- If you are unlucky enough to have major problems, the Repair operation may abort. If that happens, you need to switch your efforts from trying to get TRIM to run, to fixing the filesystem data on your SSD. Drive Genius is very useful in this case if you want to fix it yourself, but if not, take everything in to an Apple store or other experienced computer professional. If even Drive Genius is unsuccessful, you can always reformat your laptop SSD and restore from your backup, however in this case you may have an unreliable SSD and you might want to replace it. 5) toward the end of Repair Disk processing, you will see in the log the line "Trimming unused blocks" -- if you don't see that, then TRIM wasn't enabled and you need to check the TRIM Enabler control panel again to be sure you enabled TRIM. -- also, you can check "About This Mac" / "System Report" / "SATA/SATA Express" and look for "TRIM Support" -- If you install the Transcend utility, JetDriveToolbox, be aware that it is unintentionally misleading. Even when TRIM is not enabled in the MacOS, under "DRIVE" it says "Trim Command Supported" but that refers to the SSD controller in the JetDrive - not the full OS - so you can't use that to judge the status of TRIM on your computer. 6) when Repair Disk is completed, disable TRIM, -- this last step is important. you need to disable TRIM using the convenient TRIM Enabler control panel -- if you forget, it's not terrible, but you are leaving your system a little more vulnerable -- also, other users have reported in the forums a subtle result from "turning off" the Apple "signed kernel" protection. If you haven't used a clean install to put Yosemite on your computer ( I almost never use clean install), you might have old and incompatible MacOS extensions in your System folder. When Trim Enabler has enabled TRIM, it also changes a setting in the laptop nvram that tells Yosemite to ignore the "signed kernel" requirement. If you forget to disable TRIM, those old extensions will load and may cause subtle problems in other programs (like Airplay shows video but not audio). This is unlikely, but it did show up in some of the forums. 7) set your JetDrive 725 as the startup volume and reboot You are done. You can perform this sequence every now and then as a preventative measure or just wait until you think you are getting poor write performance out of your SSD. Finally, you don't have to run TRIM if you never notice your SSD performance isn't as good as when you bought it. Technically TRIM does help SSD "wear," but SSD manufacturers do not rely on TRIM for their longevity. In any event, it is absolutely not critical to run TRIM frequently, so you truly don't have to worry about TRIM unless you notice a performance problem . B5. Enabling TRIM for Third Party SSD's - Reference As cited by Rich in the Amazon Q&A section, the issues surrounding third party SSD's, Yosemite, and TRIM are explained in detail on http://www.cindori.org/trim-enabler-and-yosemite/ by Oskar Groth. This is well worth reading if you are interested. B6. Enabling TRIM for Third Party SSD's - What is TRIM and its importance? TRIM is an important capability and I wish Apple's policy on third party SSD solutions did not make this a concern. However, for anyone considering the wonderful Transcend JetDrive product and concerned about the question of TRIM, as I explained above, I am convinced that it is possible to run TRIM without a major inconvenience or risk. TRIM is "not required," but because an SSD write operation requires an earlier erase, it means that over time an SSD with normal activity will start to have lots of blocks of data that have been "deleted" in the MacOS, but not erased on the SSD by the SSD controller. SSD's aren't designed around a specific filesystem, so the SSD controller isn't built to understand any of the specifics of the MacOS filesystem. Even though the allocation tables the MacOS uses to assign and de-assign (or "delete") the blocks used by a particular file are stored on the SSD, the controller itself can't read or understand the allocation tables and does not know which SSD blocks the OS has marked as "deleted" and hence, are ready to erase. That is why finding which blocks toTRIM must be an Operating System function, not an SSD controller function. Eventually, as the number of "un-erased but deleted" blocks increase, the MacOS will start to have a significant number of writes that occur on blocks that require an erase cycle first, and write performance will suffer significantly on those writes. There are interesting details in how an SSD works, and to some extent the SSD moves data around on its own for longevity purposes (http://en.wikipedia.org/wiki/Write_amplification). As a consequence of moving the data, the likelihood of having lots of "un-erased but deleted" blocks is reduced. For this reason, TRIM may not be as necessary, however, it is factually true that any system capable of running TRIM does - including Apple's MacBookPro implementation of SSD's in Mavericks and Yosemite. The trick is that Apple has made it "more difficult" to run TRIM on third party SSD drives in Yosemite because of a new security feature. Yosemite's default is to only boot from a "kernel" that is "signed." A "signed kernel" means that Apple can guarantee that it is more difficult for malware to corrupt the basic operating system. Whether this is a good feature or not can be debated, but it seems desirable to me as one more small step at fighting off potential attacks on your computer. It seems clear that TRIM is very useful for most people over time, and one important point is that because it is a filesystem function, it can be invoked as a batch operation using Apple's Disk Utility. B7. Example Disk Utility Log (command line - you can use the GUI) Specifically, if you enable TRIM (Trim Enabler from cindori.org is one method) and run the Apple Disk Utility and select Repair Volume, the Disk Utility will trim the unused/deleted blocks by commanding the SSD controller to erase the list of blocks it sends. Transcript of a Trim session The command line below runs diskutil on the JetDrive volume labeled "myDrive" and mounted in my alternate boot Flash OS as /Volumes/myDrive. My setup is slightly more complicated as I split my jetDrive into two partitions. diskutil repairvolume /Volumes/myDrive Started file system repair on disk0s4 myDrive Repairing file system Checking Journaled HFS Plus volume Checking extents overflow file Checking catalog file Checking multi-linked files Checking catalog hierarchy Checking extended attributes file Checking volume bitmap Checking volume information Trimming unused blocks <---- this line shows that the MacOS TRIM operation has been run to tell the SSD which blocks on the volume are unused and need to be "erased" The volume Users appears to be OK File system check exit code is 0 Updating boot support partitions for the volume as required Finished file system repair on disk0s4 myDrive
N**S
At first failure, then success, My experience
It is a 5 Stars for now, since the JetDrive is working fine. But I am writing this because of the initial booting of this hard drive was a disaster. The installation went seamless, after I discovered that the directions are incorrect. To get to the Disk Utility you need to use the Command-R keys, not the option key went restarting. When I first started the Macbook with the Transcend JetDrive, it booted quickly and Safari opened. Then it quickly went dead. I rebooted and the MacBooks fans started roaring at top speed and then again when dead. I rebooted a couple of more times, and it never even when though the booting procedure before going dead. So my heart sank and felt like I had just wasted $500 and maybe more if my Macbook was been destroyed in the process. I decided to trying rebooting but with the old ssd drive which I had installed in the Transcend external drive casing. The Macbook booted up fine from the old drive. So at that point I was about ready to uninstall the Transcend card and install the old card. But ever hopeful I tried rebooting again with the Transcend and to my utter surprise, it booted up fine. It is now two days later and the Transcend has operated perfectly. I am getting great speeds on both the Transcend and the old ssd drive now installed in the Transcend casing. I am writing this because others might have similar experience. Why did the Transcend fail to work initially and then started working. I have no idea. The only thing I did after the initial failures of the Transcend to stay booted was the rebooting with the old ssd card from the USB drive. But it might be worth a try should you have problems like I did. I am hoping my luck continues with the Transcend. It really nice to have the extra hard drive space with such speed as well.
E**E
Great alternative to the OWC to increase storage in MacBook Pro Retina at a very good price.
This is one of the few options to upgrade the SSD hard drive capacity of the Retina Macbook Pro (OWC is the other alternative). I chose this over OWC because it comes with the external case to house your current/old SSD plus the tools at the same price as the OWC one without. I've had this for about a month now, and overall it's a solid replacement and works well. I can't comment on speed/benchmarks, but I'm sure you can find plenty of those on professional tech websites and magazines. The actual swapping of the drive is really simple: unscrew the pentalobe screws on the Macbook Pro with the provided tool (keeping track of which screws came out of where, since there are 3 different sizes). Open the computer, then remove the black torx (or hex?) screw with the other tool. Slide out the old SSD, put in the new SSD, screw it back on. Screw the case screws back on. Put the old one into the included case and screw that close. Done. I tried to move my old Windows partition (was using Bootcamp) to the new drive, but it doesn't work that well, not with the stock Disk Utility. You probably need to buy an actual software that does this. Even when I copied the partition, it wouldn't boot to Windows (the contents are there), and I couldn't change the partition size (the Windows partition was 100GB I believe-- I couldn't make it 200). It has to do with the way the boot partion works on Windows. There were some ways to fix it I found on the web, but seems like a lot of trouble, especially considering that I don't have much data saved on the Windows partition (cloud storage FTW!). So I just repartitioned the new JetDrive SSD the way I wanted it (Windows/MacOS) and reinstalled MacOS and Windows in their respective partitions. Your situation and mileage may differ. I will say that if you have a 100% MacOS drive without any Windows partition, then moving your old data/program/files to the new drive will work easily via the instructions they provide to copy the drive via Disk Utility. The universe never intended Macbooks to run Windows, hehe... In conclusion, for the price, this is a great way to upgrade your SSD hard drive capacity in your MacBook Pro Retina. I wish they had one for my MacBook Air; hopefully soon. I think about 500GB SSD is ideal for me because I have a lot of files in the cloud, but also a lot of local files too.
Y**N
can't tell this is good experience, the product is good and the reviews ...
Hi, this is my first time purchased item at Amazon, can't tell this is good experience, the product is good and the reviews help me a lot to decide buying this stuff. I own a MBP retina 15" mid 2012, 256GB version. I was wondering to buy the JetDrive 720 but found that some of the model of 15" MBPr are incompatible. As a result I waited two month until I found that there is rumour of the JetDrive 725 will be released soon at the end of July or first of August. And I can't wait to buy one. The 960GB version is not cheap but I need it to extend my MBPr's capacity. The product is easy to use and install, but the instruction is not clear enough, the reviews here guided me to clone the partition and the rest of the installing is just a snap. For the transfer speed, its slightly improved by testing app(I use Blackmagic Disk Speed Test), very fast. In the reality, I can't distinguish the difference on the speed of the original one with the JetDrive 725 one. Both are fast enough for most of the work. Appreciate the faster speed offered. I enjoy the high capacity on my laptop as I do not need to worry running out of space soon. It also helped me improve the efficiency on transferring photo or video captured into the MBP and I spend less time to manage my storage. Less time connecting to my external drives mean less power consumed by these devices. Will continue support Transcend developing high capacity SSD for the Mac series. Most of the Mac users wants to upgrade the capacity but the choice of an upgrade is very limited. We can buy a new Mac for a replacement but the fact is the current machine is just fine except the capacity. Hope there are 1.5TB, 2TB Jetdrive in the future.
S**T
Fits Mid 2012 MBP and the performance is better than stock.
I have been waiting to buy this, because the JetDrive 720 that I purchased would not fit my Mid 2012 15" Retina MBP. I have been corresponding with someone at transcend and although they would not provide any measurements, they assured me this unit would fit my machine. It's disappointing that the same capacity drive, that will fit my computer, is priced $100 more. It does not appear that there is any difference in the SSD between this unit and the 720 of equal capacity. Update Jul 19, 2014 The 725 fits even better than stock and I am pleased to announce that when it is installed in my computer, it performs better than the SSD drive that was shipped with my Mid 2012 MBP Retina. It is also priced the same as the 720, therefore my earlier comment no longer applies. For these reasons, I have modified my rating of the product. My primary reason for purchasing this product was because my stock 256 SSD did not have sufficient space for both a bootcamp and osx partition. After juggling apps on my 60GB boot camp partition one too many times, I decided to upgrade the SSD drive. I wanted to store a few VMs that I commonly run, on the internal drive. When flying, I sometimes access an external drive and worry that the external drive will fall or the port will be damaged if my computer is bumped. With almost a TB of space, I can now store VMs and other files that would require me to connect an external drive while traveling. Since I frequently run more than one VM, it is imperative that the drive have good performance. To determine the performance of the drive, I ran several benchmarks using the Black Magic performance tool. I ran the test against all of the drives that I frequently have connected to my MBP. To reduce the chance of incompatibility issues among different hardware and port speeds, I rebooted my computer between tests, and had only one drive connected at a time. While I was testing, I made an observation related to the speed of the spinning drives. Although It's not directly related to this product, I though some of you may find it interesting. The issue only seems to present itself when connecting spinning drives, which require more power than SSD drives. When connected to an external, powered, USB 3 hub, the spinning drive performance improved by about 10% when compared to their performance while connected directly to the MBP. I enabled trim on the 725 using Trim Enabler. It is unclear if this is necessary anymore, and unclear if the changes made by the tool work. When I check the trim status using Chameleon SSD Optimizer, after enabling trip support with Trim Enabler, it does not report that trip is enabled. Each of the 3 SSD drives perform very well, with the transcend having the best performance followed closely by the stock SSD and the Samsung 840. The Samsung 840 performance is dependent on the connection, and given the fact it is connected via the GoFlex, the performance of the SSD cannot be fairly compared to the Stock and 725 drives which were installed in the same machine. Below are the test results I observed while using BlackMagic. The numbers are the first recorded read and write speed test (PAL) and not an average of all of the video codecs. Disk, Read MB/Sec., Write MB/Sec. Transcend 725 installed in MBP, 465, 440 Stock 256GB SSD installed in MBP, 446, 329 Transcend 725 SSD installed in External USB enclosure. 398, 387 Stock 256GB SSD installed in Transcend Adapter connected directly to MBP, 386, 316 Other drives for comparison Seagate GoFlex Thunderbolt adapter with bare Samsung 840 SSD installed, 373, 318 Seagate Backup Plus USB3 connected to powered 7 port Anker USB3 Hub, 82, 66 Seagate Backup Plus USB3 connected directly to MBP (same Drive as above) , 72, 61 WD My Passport USB3 connected to powered 7 port Anker USB3 Hub, 93, 91 WD My Passport USB3 connected directly to MBP (same Drive as above), 83, 78 Transcend SDXC Class 10 SD Card connected to MBP SD slot, 48, 18
R**B
Failed once.... corrupt data so I had to restore. Not 100% confident in this product.
Not sure what to think. I've been using this for a month with maybe 10 hrs cumulative use. Installation was easy but turned on my MacBook Pro 15" Retina one day and it would not boot. Did some diagnostics and the SSD had become corrupt. Repartitioned the drive to basically delete everything and start from scratch. Restored using Time Machine and it seems to be working fine now but I've lost all confidence in this product. No moving parts and it's corrupt? If it happened once, it will probably happen again. @ nearly 1TB of storage space and roughly 1/2 used.... it takes HOURS to restore! Not happy.
H**Y
Great Upgrade and AWESOME customer service!
I have had the 960GB JetDrive 725 in my mid 2012 retina MacBook Pro since September of last year. My AppleCare warranty was about to run out and my MacBook had some loose display ports which caused my Cinema Display to blink or disconnect if I just moved my Mac a little. The Genius agreed to send it in for service under AppleCare and they installed an new motherboard and corrected a couple other minor things. Its like a new machine. Before sending it for repairs, I put in my original Apple OEM SSD to avoid any warranty problems and found that it would not boot. I called Transcend to see if the adapter for using my OEM SSD in the enclosure could be the source of the problem. Transcend's customer service was AWESOME! We communicated back and forth, and their engineers were consulted too. We determined that the problem was not with the Transcend parts and my old Transcend worked fine when I got my Mac back. Transcend also told me that, based on the serial number of my SSD, it was one of the early production batch and they had since updated the SSD's firmware. They offered to exchange my SSD for a new one with the updated firmware at no charge. They even agreed to give me time to migrate from my old Transcend to the new one since my bootcamp Windows would probably not be a simple transfer. (No surprise, it was complicated and frustrating as I expected.) I couldn't be more pleased with the performance of the Transcent SSD. It is very fast and holds all my files with room to spare. Since I bought mine, the price has dropped $100 so its an even better investment now. Also, the quality of their products is impressive. Even their packaging resembles Apple packaging. They are a very classy company to deal with!
S**H
Good performance and great value for money
I had Early 2013 Macbook Pro Retina 15 inch with 256 GB SSD and 8GB RAM. I was using bootcamp and it one day gave a partition error in the mac partition. Could not fix it by myself or at service centre. Imagine store (apple retailer/service partner) in India quoted 59,500 rupees (approx 960 dollar) for replacement 256 GB ssd. Bought transcend Jetdrive 725 480 GB. I shipped it to India (bangalore) and even with customs clearance it took only 5-6 days to reach india (Awesome shipping by Amazon/DHL Express). The cost of shipping and customs duty was very reasonable Item(s) Subtotal: $299.00 Shipping & Handling: $27.10 Total before tax: $326.10 Estimated tax to be collected: $0.00 Import Fees Deposit $42.97 For about half the price quoted by Apple India I got almost double size ssd. Was well packed. I easily used the provided screwdriver to put the ssd in the given enclosure (was confused which screwdriver needed to be used as no clear documentation was present). As i could not boot my original mac, I used internet based recovery to download the install OS onto the drive. Once installed it rebooted and worked beautifully. I then removed the screws at back of my mac and replaced the SSD. Put my original ssd in the enclosure. The ssd now only shows 90 GB (partition I had given for my windows boot). I still can't format rest but the enclosure can be used to access the 90GB easily as a USB drive (worked in mac but windows did not even recognise the drive). I had read a lot of reviews on lower performance compared to original ssd. I have not run any benchmarks but as a normal user (who does development work) I have not seen any deterioration in performance or boot time. I am very happy with it for now. Hope it works consistently at this quality. I now use Parallels instead of bootcamp as I have enough ssd space and don't want to risk another partition issue.
C**N
La capacidad ideal para el MBP Mid 2012.
Facilidad de montaje insuperable, calidad de embalado y materiales de primera clase. Le ha dado una segunda vida a mi MacbookPro Retina Mid 2012. Muy recomendable.
M**N
Works no problem. No software issue. Perfect!!
My 256gb hard drive was driving me mad. No space at all so I turned to this HD but it took months of research etc. didn't want any problems with software and third party HD. Anyway purchased it and it was so easy to install and no software issues regarding TRIM. Just purchase it! Make sure you get the right model for your laptop.
G**X
Sono soddisfazioni!
Comprato, arrivato in un attimo (il giorno dopo), montato con poca difficoltà (grazie ai tutorial in rete) e il mio MacBook è ripartito di slancio come se niente fosse. Sono soddisfazioni! Il poter riutilizzare poi la vecchia scheda nel ben fatto chassie alluminio è un valore aggiunto non indifferente. Unica anomalia a parte un riavvio un po più lento del normale (ma io riavvierò una volta ogni 2 mesi) è la funzione TRIM da impostare nell'applicazione dedicata che consigliano di scaricare. Ecco, io l'ho fatto ma quella funzione non compare proprio nella schermata (come invece compare nei tutorial) (vedi foto). Immagino che non compaia nell'ultima versione dell'applicazione perché questa problematica sia stata risolta in altro modo, senza che l'utente ci debba mettere mano. A questo punto però mi domando il perché si debba scaricare quella applicazione. Se qualcuno ne sa di più... ci faccia sapere ;-)
S**M
Super
Très facile à installer et fonctionne nickel ! Mon mac est reparti pour quelques belles années de fonctionnement. Je recommande
J**Z
Easy and Fast
Buen producto, super sencillo de instalar y con las herramientas e instrucciones necesarias. Compatible con mi mac y todo bien.
Trustpilot
2 weeks ago
2 weeks ago