


🔐 Elevate your door game with style and security!
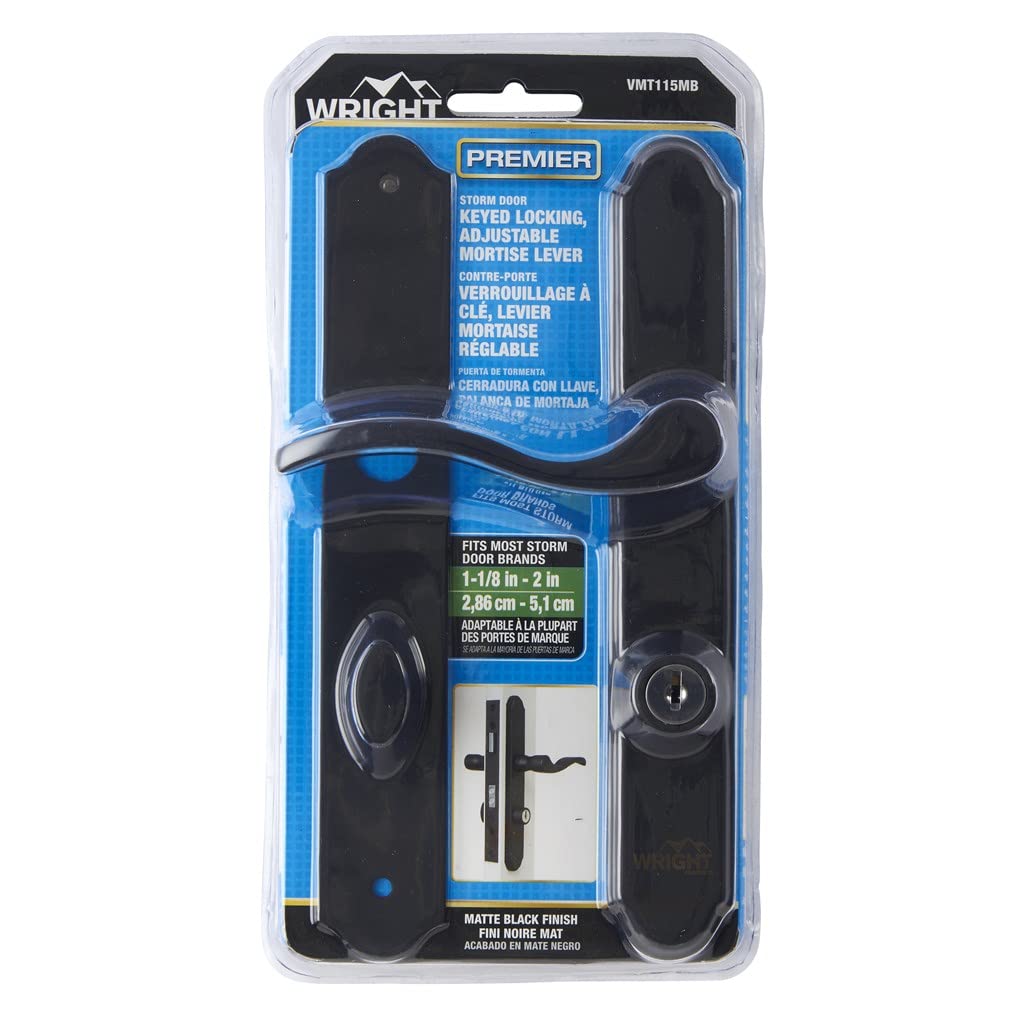
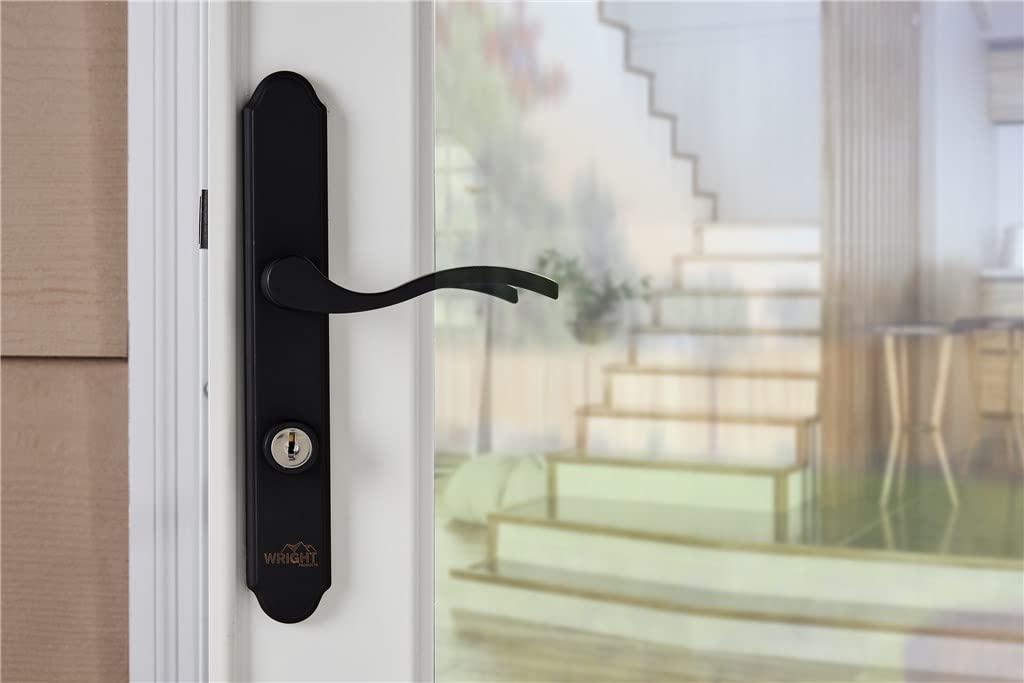
The Wright Products Serenade Mortise Keyed Lever Mount Latch with Deadbolt is a stylish and durable locking solution for out-swinging metal and wood doors, featuring a keyed deadbolt for enhanced security, easy installation, and a sleek matte black finish that complements any decor.
| Material | Wood, Metal |
| Brand | Wright Products |
| Color | Matte Black |
| Product Dimensions | 8.5"L x 1.31"W |
| Exterior Finish | Wood |
| Handle Type | Lever |
| Specific Uses For Product | Exterior door, Bathroom, Bedroom |
| Shape | L Shaped |
| Special Feature | Easy to Install, Durable |
| Included Components | Wright Products VMT115SN, Serenade Mortise, Satin Nickel |
| Lock Type | Key Lock |
| Item Weight | 1.27 Kilograms |
| Finish Type | Matte |
| Handle Material | Wood |
| Hand Orientation | both |
| Unit Count | 1 Count |
| Number of Items | 1 |
| Manufacturer | Hampton Products |
| Part Number | VMT115MB |
| Item Weight | 2.79 pounds |
| Item model number | VMT115MB |
| Finish | Matte |
| Item Package Quantity | 1 |
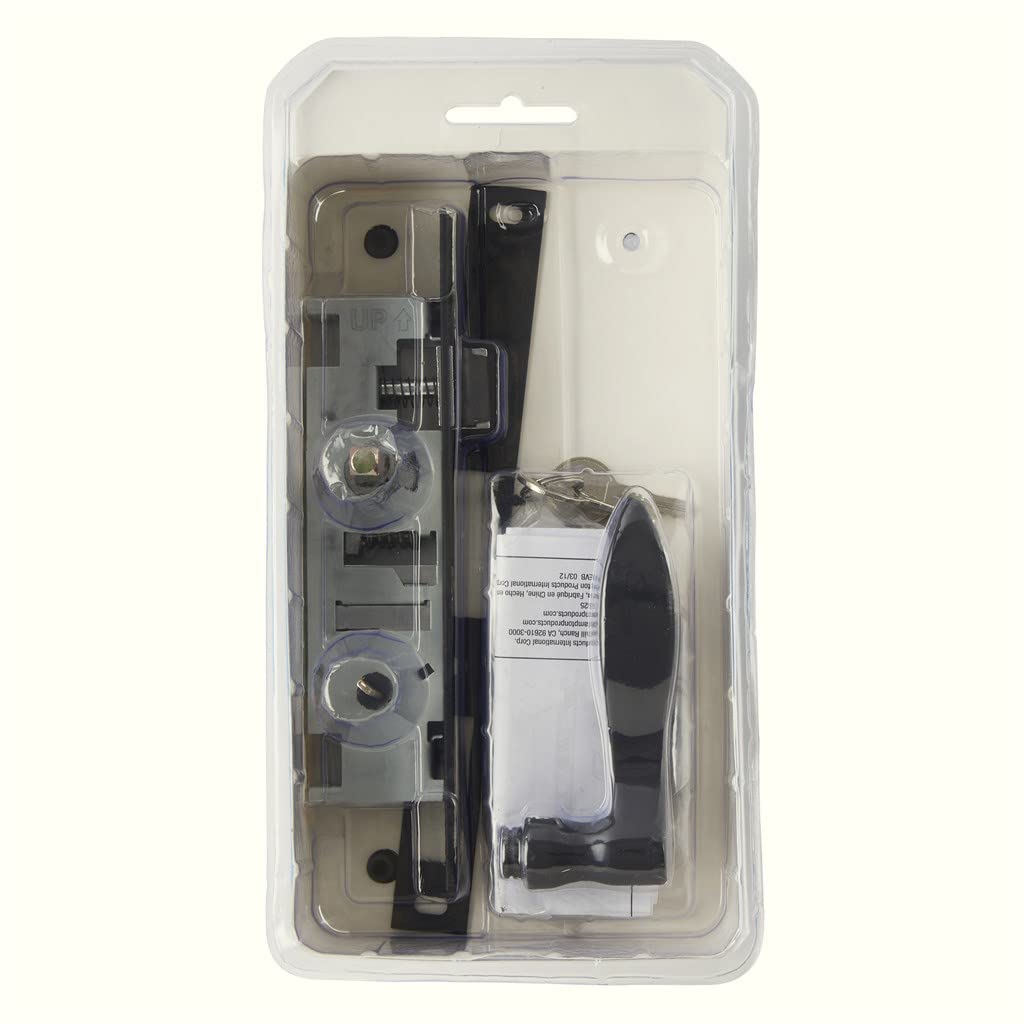
| Number Of Pieces | 2 |
| Special Features | Easy to Install, Durable |
| Batteries Included? | No |
| Batteries Required? | No |
S**B
Save your old EMCO "the Forever view" door from the salvage heap by refurbishing it with this great Wright hardware!
After reading another purchaser's comments on looking for a replacement handle for an EMCO door (now Andersen), I decided to take a chance and purchase this Wright replacement door hardware package.I had great success. My door is an EMCO "the Forever view". It has a silver sticker with red writing on it that says US Patent 5039246. My serial number is A 858197. It's a full view door that has a full length glass panel that is removable/swappable with a screen panel.When I tried to find the Andersen replacement handle set for my door, it appears to be discontinued on the Andersen site. The door itself still functions well. It's just that the original EMCO handle/latch/lock hardware is garbage. The latch mechanism wears out after a couple of years of use and doesn't close properly; it seems to stick and the door stays slightly ajar which defeats the purpose of a storm door! I replaced the handle/latch/lock hardware kit once before, ordering it from EMCO and it cost a lot back then (10 years ago); close to $80 dollars with shipping if I remember correctly.You will need to do some minor modifications to get this kit to work with the EMCO "the Forever view" door, but it's not difficult. If you're willing to invest about an hour of your time and have the right tools (a drill, an assortment of metal drill bits, a metal file or dremel, some pliers and a Phillips screwdriver), it's rather easy if you're a handyman or motivated to take on the challenge.Here are the detailed instructions for the modifications I made to my EMCO "the Forever door" so that the Wright hardware fit properly:1) The Wright outside handle plate is longer than the EMCO original. The plate also has bolt stems that insert into the door, which is good because that improves the integrity of the latch system in the door; making it stronger. To adapt the door to the external plate I did the following: a) Enlarged the upper hole from the original EMCO door outside plate so that the new Wright plate upper bolt stem would fit snugly into the door. b) Put some ink on the lower bolt stem for the new Wright plate hardware and then lined up the upper screen stem with the upper hole and making sure that the plate was properly vertically aligned and parallel with the door, pressed the lower stem against the door frame so that the ink left a mark on the door frame indicating an accurate location to drill a new hole. As mentioned, the new Wright plate is longer, so the bottom plate bolt stem requires a new hole to be drilled. Note: For the bottom hole, since it's a new hole, you'll need to drill the hole all the way through the door so the internal plate bolt can pass through the door and be secured to the external plate.2) Once I had modified the door so the Wright external door plate fit properly, I needed to make some adjustments to the opening in the side of the door that internal latch system fits into: a) If you follow the instructions above for installing the Wright external handle/latch/lock plate, when you go to insert the internal latch/lock mechanism into the door it will sit just slightly too high to align properly with the the external/internal plate bolt holes/bolts. To adjust it so it sits a little lower down in the door frame, I filed the bottom of the opening of the hole where it is inserted. The top and bottom edges of the cut-out in the side of the door are rounded. I filed the bottom rounded corners so that they were square. After doing that, the internal latch mechanism fit into the door so that it properly aligned with the external door plate bolt screw holes. Takes no more than a minute or two to file this out by hand. A dremel would probably do it in seconds. b) Once you have the internal latch mechanism fit and aligned properly, test it by temporarily installing the external and internal plates and bolts with the internal latch mechanism installed in the door. For my door I had to use pliers to break off the last two of the tabs of the dead-bolt/key shaft that runs from the external plate into the internal plate before the internal handle/latch plate would sit flush against the door. Use the medium length bolts to attach the internal and external plates together. Once you have the plates and internal latch mechanism installed, attach one of the door handles to the handle post (tighten the Allen screw with the included Allen key) and insert it into the external door plate hole. Test the latch mechanism to make sure that when you move the handle it moves freely. c) With the internal and external plates temporarily installed, and the partially assembled handle post holding the internal latch mechanism in the correct positioning, mark and drill the new holes needed to attach the internal latch mechanism plate to the opening in the side of the door. Ensure you adjust the internal latch mechanism in the door so that it is centered in the door. Then mark the centre of the two holes in the internal latch mechanism plate. I used a metal punch to make a small indentation at the centre of the hole so that my drill bit would sit dead center and not drift when drilling the holes. Tip: Always start with a drill bit that is much smaller than the threads of the screw that you will be installing. You can test the screw and if it's too tight, you can always enlarge the whole with the next drill bit size up. The screw should fit very snugly when you screw it into the hole so the latch mechanism is properly secured. d) Once you have the internal latch mechanism plate holes drilled and the plate secured attached to the door with the screws, you'll need to remove the internal and external plates and the external handle and handle bar and refer back to the Wright instructions that come with the kit to properly install the door handle external and internal teflon washers and secure it to the plate. You can then continue following the Wright instructions to complete assembling and attaching the internal/external door plates and door handles to the door.3) I was able to reuse the original EMCO striker plate on the door frame. It was nicer than the one that comes with the Wright kit. Because I reused the upper hole of the old EMCO external door plate, I didn't need to move the old EMCO striker plate. Hopefully if you've followed the instructions above, it'll work out the same way for you. The new Wright door latch mechanism and dead-bolt line up with the slots in the old EMCO door striker plate. However, there isn't a lot of play and it's a bit tight, so to be safe I took off the old EMCO door striker plate and filed the bottom of the top latch opening so that it was about 1/16" bigger and lower. That gave me enough additional room that the latch mechanism and dead bolt move freely into and out of the door frame striker plate without any friction. It also gave me a little breathing room in case my new internal latch mechanism was slightly higher or lower once it was installed in the door. Once you've filed the striker plate install it back into the door frame and test the door latch and dead-bolt lock to make sure they move into the striker plate easily without any friction.Hopefully the above instructions work for you. Be sure to read these instructions through completely before attempting your door customization. Your set-up could be slightly different than mine so I would recommend you review the instructions and do an assessment of your own situation before doing any door customization. A dress rehearsal that assesses things before you actually start to do the modifications to your door will avoid unwanted surprises later on. Take your time and adjust as necessary and you should be fine.The new Wright handle/latch/lock hardware looks great and I agree with the other reviewer's comments that it is much sturdier than the original EMCO hardware. Hopefully, this hardware will out-live my old EMCO door. But, if it doesn't, now that my door has been modified to take the Wright hardware, replacing it next time should be a snap.After putting in the new hardware, I used a Mr Clean magic sponge to buff up the old EMCO door. It looks brand new now. Saved me over $700 for a new door (which I had been considering), Very happy I took the gamble and did the "Wright" thing :-)Hopefully the above instructions will encourage others to save their old EMCO door from salvage yard!
A**R
Perfect fit for Pella storm door
My old Pella storm door latch was worn out and faded from direct sun exposure. The door wouldn't latch and the wind would catch the door and send it flying, almost breaking the glass. To add insult to injury, our indoor cat discovered that she could push the door open and escape. This led to leading silly neighborhood pursuits anytime we were forgetful and left the inside door open, usually when bringing in groceries.I researched getting a factory replacement but it was way too much $$$. Almost $150 for a storm door latch? Nnnnope. Looked at my local home improvement stores but nobody stocked anything that fit this door. I saw the latch here and it looked like it would fit the bill. Checked reviews and a poster said they needed to drill the door to get it to fit but I'm pretty handy so that didn't stop me. Looked good for the price too.It came quickly and it appeared as solid and heavy as the original with a quality latch. I was pleasantly surprised when it fit the predrilled holes and slot PERFECTLY. Even lined up with the strike plate. What's not to like?! 15 mins later and I was done, no drilling required. Shiny new, quality handle with a latch that closed and catches every time. It also passed the cat test!If you need a quality replacement for your older Pella storm door then this is what you are looking for. Less than 1/2 the price with function, fit and finish that rivals the original.
W**M
Might not match up on all doors
Nicely constructed. Looks great. Instructions not easiest to follow, need to imagine some steps. Did not align with previously placed handle sets as stated. Needed to drill new alignment holes, but otherwise happy it worked and looks nice.
A**R
Excellent product
Excellent product, easy installation, it will work for right or left hand doors. Kind of pricey but works great.
C**Y
Very high quality door handle set!
I was pleasantly surprised by the quality of this door handle. The installation was a bit tedious and a little confusing but it ended up coming together very nicely. It’s got a nice weight to it, the finish definitely looks of great; more expensive quality.
D**N
First time replacing one of these…
Purchased to replace one that was missing the outdoor handle, so you’d get locked out going out the main entrance to the house. Perhaps a little more complicated to replace than I thought it would be, but not overly difficult. Bunch of little washers and fittings to put in place, but this is a good thing, insuring a good fit, without loosening up so easily over time with heavy use. Main things are measuring the depth of the door, choosing the right screws, cutting to length as required along with the latch/key bar. And lastly making sure you have it right side up, left or right orientation, etc in the door before installing. The instructions are pretty good, a little hard to follow for us first timers. Overall once you do this once, it’s a snap to replace them all (my house has three points of entry all with storm door latches that are aging). Beyond this, they look great, solid brass, confidence inspiring, heavy duty feeling. They close easily and latch well.
A**A
Great
It worked very great and was easy to put on
W**E
good quality...
This is a well built, sturdy replacement handle. I replaced a twenty year old handle with this one. Fit perfectly. Easy to change. Fit the old door perfectly. Took about ren minutes to change out.
G**.
Good match.
Good quality product.Easy fit to Aluminart storm door.
T**M
Excellent Quality, Fit & Finish!
I was looking to replace a Larson storm door handle that was destroyed by abuse. This product was a perfect fit replacement. Excellent Quality, Fit and Finish. Easy to install and has all the hardware/adapters that you could possibly need for your door size. A pleasure to have a different brand product be so well built, packaged and install so well. Would definitely recommend!
G**H
Good quality
It would be nice to have a guide for the main bolts.
J**M
Perfect replacement!
Very pleased with this purchased. I went to a local Home Depot and other home hardware stores to look for our storm door replacement and I ended up returning them. I'm glad I stumbled upon this item amd read the reviews and it arrived so quickly and it was perfect replacement of the Larson brand.
P**G
Door latgh
The product was just what we wanted and works great.
Trustpilot
2 days ago
3 days ago