
🚀 Upgrade Your Mac, Elevate Your Life!
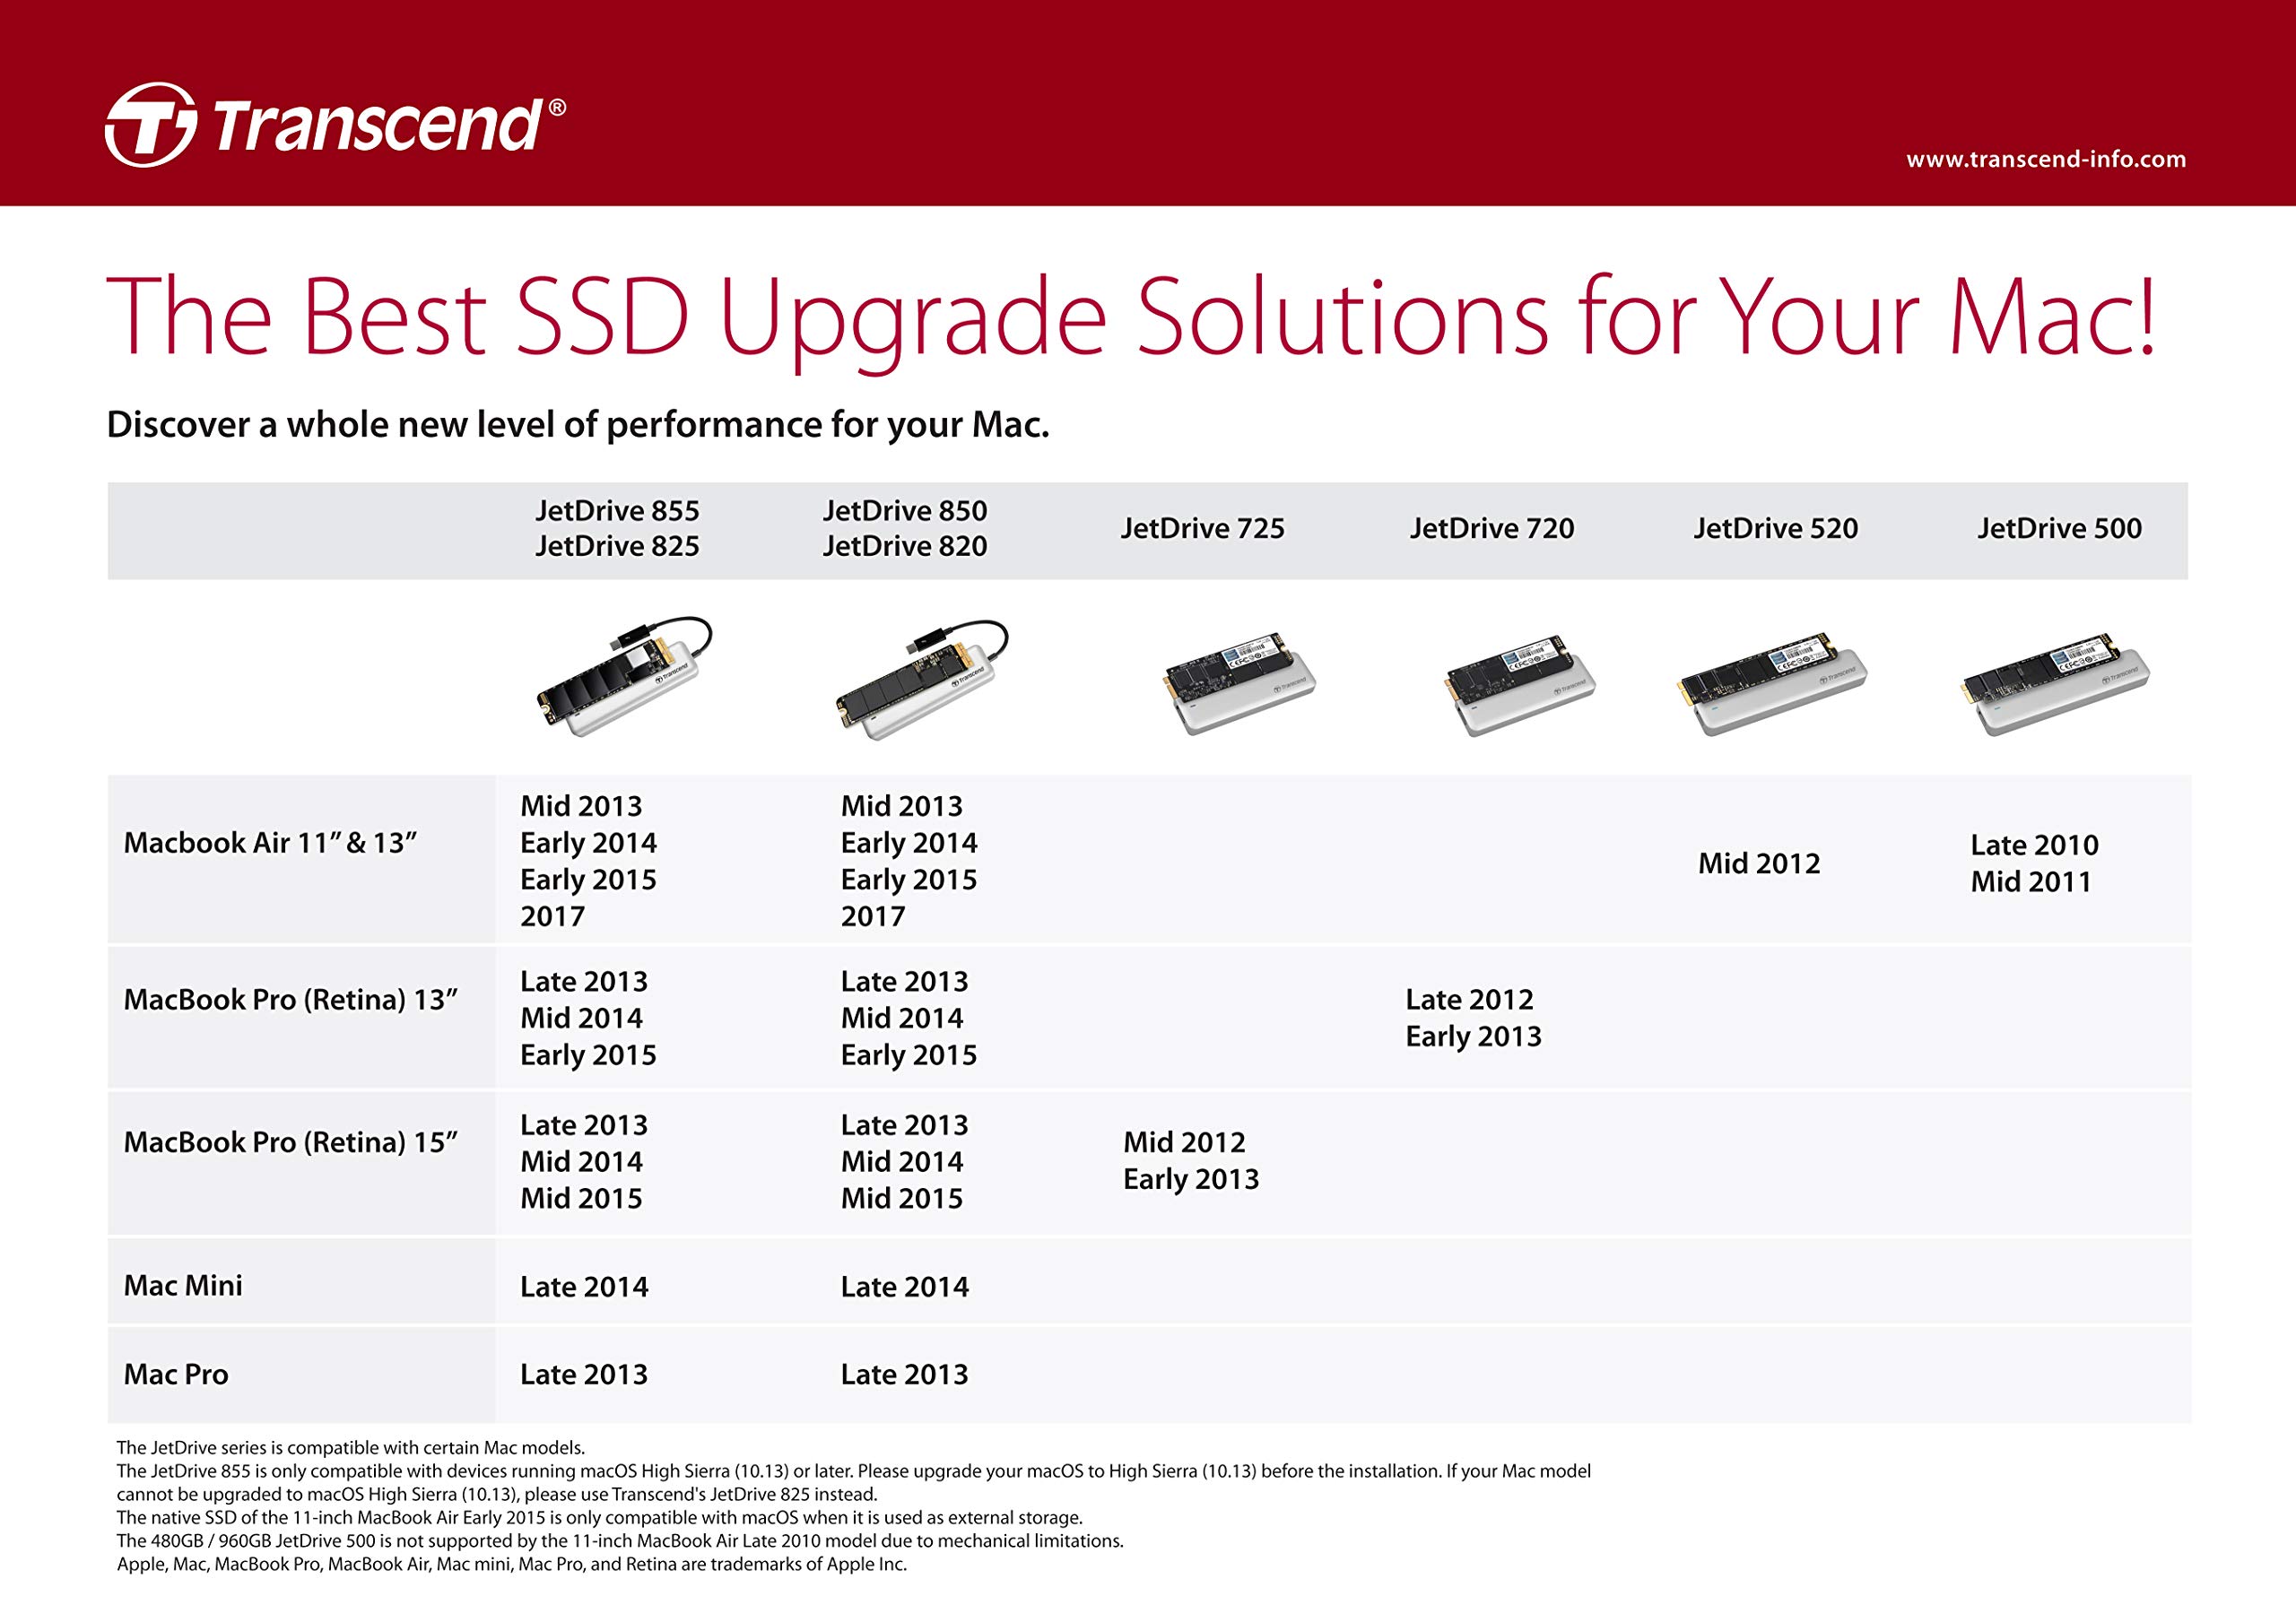
The Transcend 240GB JetDrive 500 SSD is a high-performance storage solution designed for Late 2010 - Mid 2011 MacBook Air models, offering impressive read speeds of up to 570MB/s and write speeds of 460MB/s. This SSD comes with a durable enclosure, making it a perfect upgrade for users looking to enhance their device's performance and longevity.
P**H
Well put together package
I bought this drive as an upgrade to the 256GB Samsung SSD that came with by 2012 15" rMBP.The package contains everything you need. It includes 2x screw drivers with the relevant heads. I particularly like how the screwdrivers are magnetic which helps in removing the old screws.The drive is very easy to install and it took me about 10 minutes to do it all. It took far longer to restore everything from Time Machine.The drive seems to work well and doesn't suffer any slowdown when dealing with incompressible data, e.g. when FileVault is enabled.Running the BlackMagic disk test, the old Samsung scored 326MB/s write, 340MB/s read. This Transcend JetDrive scored 424MB/s write and 507MB/s read, so this is a pleasant surprise.This is an excellent upgrade as it's improved both capacity and speed, though I don't actually notice any difference in speed as the old drive was fast enough for my needs.edit:After 4 months of daily use (loads of VM work, building software, etc) I can say that my feelings about this drive is mixed. I ran into problems when I upgraded to Yosemite and enabled "TRIM" using Transcend's JetDrive toolbox. I had to wait initially for Transcend to update the JetDrive toolbox to support Yosemite. Then once it did and TRIM was enabled, I noticed a lot of instability and a number of times when the drive would fail to boot. Wiping the drive and restoring images from Time Machine did not help.Reinstalling everything manually and re-enabling TRIM also seemed to cause problems. However, fully reinstalling everything and not re-enabling TRIM appears to have solved my problems. I suspect that the changes to drivers in Yosemite (look up kext signing on the Internet) is at the root of this and the Transcend have not properly tested their drivers. So for now, I've not bothered with TRIM and have had no issues.I'm knocking off one star off the review for this, and I would have been a lot happier if Transcend had bothered to get their drivers approved and signed by Apple.
S**H
Cannot be easier to install!
Could not be easier!All you have to do is attach the 960GB SSD to the supplied USB 3 connector and put it in the enclosure (don't both putting the screws on at this stage, just slip the clear plastic sleeve back over to hold the enclosure together). Reboot the Macbook with option key pressed and follow the supplied instructions to clone your internal SSD onto the 960GB one. Then power off your Mac, remove the power lead, unscrew the screws using the supplied screwdriver (make sure you know exactly which screw came from which hole. List off the back. Lift off the plastic cover covering the battery connection, then lift off the connector. (It's just above the third battery pack from the right). Unscrew the screw securing the internal SSD with the supplied screwdriver and replace it with the 960GB SSD. Replace the battery connector and the connection cover. Replace the back, reboot and hey presto! Your machine is exactly the same but has oodles more space!
J**F
Easily fitted and very fast
Readers of reviews of this product will want to know whether the disk really improves performance significantly, and whether it is easy to fit. In my experience, the answer is yes to both.Firstly, performance. Once this SSD was in use, I noticed a significant improvement to the overall performance of my 2012 MacBook Pro. Booting was much faster, as was application launching.Second, ease of fitting. The secret here is to look on Transcend's web site for the video demonstration of how to do the fitting. Although for some reason there is no audio commentary, the step by step overview (with captions) helps a lot in showing you what to do. If you are not familiar with this kind of DIY computer work, watch a couple of times first, and if possible have the video playing on another device when you are doing the work. (As there is no pause option on the Transcend site video, the identical video on YouTube is a better choice.)A couple more hints. (1) Be sure to keep the MacBook case screws in the correct order, as they are not all the same size. (2) A head torch (the kind you strap on) may be useful in directing extra light on the scene of operations.Finally, as other reviewers have noted, the SSD enclosure (which you put your old disk in) looks smart in its silver and black finish, and complements the look of a MacBook nicely.Highly recommended.
D**E
Great way to breath new life into a MacBook Air 2012 and transcend impending obsolescence!
This is a terrific hardware product with everything you need in the box. It solved my problem of Apple's OS getting too big for the 60GB drive that came with the original MacBook Air 2012 and made a MacBook Air Upgrade unnecessary....not bad for the price of the Transcend JetDrive 520 240GB SSD.Where I dock a star is that my MacBook wouldn't restore to the JetDrive in the Apple's Disk Utility as shown in Transcend's how to video and documentation. Basically the operation failed and the error message wasn't helpful - "Could not recognise /dev/null as an image file" " Could not get source volume name"I did contract Transcend Customer Service by email who basically repeated the instructions in the box/on the web but in fairness asked for screenshots to investigate further (I had put the error message in the email so not sure what more a screenshot would reveal)I solved myself by downloading Carbon Copy Cloner App and basically following the Transcend procedure but using this app rather thank Apples Disc Utility to make a copy of the Macintosh HD onto the formatted JetDrive. Might be worth Transcend putting that in their FAQs or even doing some work with the app provider.MacBook Air now running perfectly on new JetDrive
Trustpilot
3 days ago
1 day ago