


RoadHawk Ride R+ Cycle Edition
Product ID: 52430858
💧Waterproof up to 10M
📹1080p HD Resolution
🔄Loop Recording
🚴♂️ Ride the Future of Cycling with RoadHawk!
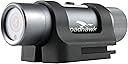
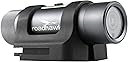
The RoadHawk Ride R+ Cycle Edition is a high-performance action camera designed for cyclists, featuring 1080p and 720p recording options, loop recording functionality, and waterproof capabilities up to 10 meters. It includes a variety of mounts and accessories, making it the perfect companion for any cycling adventure.
| Department | unisex-adult |
| Manufacturer | Roadhawk |
| Item model number | 3R40006 |
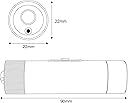
| Package Dimensions | 19.6 x 12.8 x 9.2 cm; 539.99 g |
| ASIN | B01FVK7074 |
| Guaranteed software updates until | unknown |
B**K
Great Camera, small, light and very easy to use.
I have the earlier version of this camera called the Ride and due to battery life getting short on that one I thought time to upgrade to this R+ version meaning I would also get 1080p resolution and some other neat stuff - read on.First off let's tell you that the picture quality is excellent and more than good enough to record "on the road incidents" which was my main reason for buying. The picture quality on 1080p is very clear and even with rough UK roads, I could easily make out the registration plates of passing vehicles. I switched to the 720p setting and even that was good. I tried both the helmet and bar mounts and the picture is more stable when mounted on my helmet in one sense, but only if I kept my head still. The bar mount, of course, is very stable but will pick up on the bike vibrations more. RoadHawk has greatly helped stop this by the design of the rubber insert on the bar mount.Regardless of how you mount the camera, you get clear video and pictures (with the remote). True the video may not be as clear when moving, as the motion stabilised cameras but they are bigger and typically twice the price. With RoadHawk R+ you get a really neat and light camera. If you want to take still pictures then you need the remote which uses a short screw on extra module. With this fitted, you can power on / off and take stills and video all controlled from the remote. The stills feature is really neat for capturing something you want without having to make a note of the time so you can later find it on the video recording. If you have date/time stamp on then both still and video will have the information, if you don't this stamping turned on then you could use the file create date/time stamp. So if there is something you want to look at on the video use the remote to capture a still and you have a simple way to find the right recording.Depending on your settings the camera will vibrate as it switches on and off. This means when helmet mounted it's easy to know what is happening without needing to see the lights. Such a cool feature, no more having to remove my helmet just to see if the camera is on or off. You can also configure the laser, this comes on for a short period and clearly shows where the centre of the camera is pointing. While it is a "safe" class 2 laser so if you have this enabled you should look way from people as you switch on. Class 2 means it won't do any lasting damage, it's the same class as they use in barcode readers, but most people don't know that and get very concerned it pointed in their direction. Update: I have found that if you just give the camera button a short push while recording the laser will activate for a short period, ideal if you want to check if it's recording or not. A longer push is needed to either switch it on or off.To access the recording either plug in the USB cable or remove the SD card. They don't supply and nor do you need any software to manage the recordings, they are the industry standard so Windows/ Mac computers have no problems. They do supply software which has the manual and a settings tool combined in one package. A good idea to combine the two much more likely you will read the manual. Even if you don't as you select a setting extra information relating to that setting is supplied, making the whole process very easy. Tip: If the software doesn't install in Win 10 its because you don't have the Adobe Air (free) software, install this and then install the RoadHawk software.The product is very robustly built, I don't intend to crash but if I did short of a road roller driving over it I believe it would survive any impact you could give it while riding a bike. The IP rated sealed metal case will handle anything the weather can throw at it too.There is a single button to control the camera, i.e. so simple even I can use it. The connection to it is via USB Mini connector and not the more common USB micro cable. The only advantage that the large mini cable has is it's easier to insert the correct way the first time. Tip: I always mark the top of any USB cable with white Tippx. The older USB mini not a big deal but it does mean having either an adapter StarTech.com Micro USB to Mini USB 2.0 Adapter F/M or carry the actual cable with you to charge. It would have been nice if it was the same USB micro connector as my phone and Garmin kit etc. The internal battery will last for about 90min. fine for shorter rides. They offer a neat extra battery pack which in use will mean about 4.5 hours use and once that is used you can then use the internal battery, so about 6 hours in total.In the box are various mounts, why they didn't have photos of them on this page like their other version motorbike version RoadHawk Bullet R+ Moto Edition I don't know, so I suggest you visit their website where you can see all the various mounting options. I have a cage helmet and for me the best mount is this one Roadhawk Tripod Tray Mount which can be used with zip ties, sadly this mount is not included in the box so you need to order it in addition if you want it as I think it gives the most secure mount on a cage helmet.TIP: Much better an zip ties are these reusable cable straps Pasow 50pcs 6-Inch Reusable Fastening Cable Ties Adjustable Strap Wire Management - Multicolour . Update: After watching back a few rides to get the angle and looking a the mount the camera was in perfect alignment with the grooves of my Kask helmet so I tried just the camera held in the grooves, perfect except it would slide forwards or backwards. I fixed this with some silicon tubing ULTNICE 5 Pairs of Bunion Protector Toe Sleeves Gel Protector which stopped the camera moving and made strapping easier too.The mounts they supply are 1 x curved and 1 x flat like these Roadhawk Flat Surface Mount (Pack of 3) and one handlebar mount. I did try and find an area on my helmet where I could stick either of the two supplied mounts, but my Kask helmet doesn't have a suitable area.All of the mounts can use the excellent RoadHawk Pro Adjustable Cradle Mount . There is also a fixed version included but this would need the mount in the perfect place., I suggest you search here for Roadhawk Mount to see the other options or visit their website. Personally, I think it would have been better if they had camera + remote for less money with say one discounted mount of your choice.What else do you get in the box, the remote + remote wrist controller and a lanyard end caps, one fully sealed and the other with small holes for better sound quality. For reason best known to RoadHawk the lanyard cap doesn't fit on the end of the remote module. The remote is on a wrist strap which I think wearing on my wrist is pointless, trying to ride and operate it not ideal. Much better to use the strap to fit it to your bike, the only problem with this is getting it tight enough on the hard tubing. Not a problem, remove the strap and remember those cable ties, perfect for the remote too.So whatever type of bike you ride with this camera you are going to get great video in what seems to me to be the smallest, lightest most robust camera with really useful features on the market.
P**M
Good Quality Safety Camera
I bought the Roadhawk to replace a Chinese equivalent (Campark) that had failed after just 5 months use. The Roadhawk was nearly 5 times the price, but offered a 2 year guarantee. My requirement is simply for a cycle safety/evidence camera.So far I’ve used the Roadhawk on several rides between 90 minutes and 2 hours in length and on one longer ride of about 5 hours.The Roadhawk is robust and feels as though it would survive a knock or two. My preference is for bar mounting – I know others have grumbled about the extra fittings needed for vented helmet mounting – but I’m pleased with the supplied fittings for handlebar use. There’s one bar clamp that accepts a slide in holder for the camera. 2 slide in holders are supplied – one fixed, the other on a rotating ball mount. Both work well, and bar mounting gives a perfectly acceptable and steady picture. On the 1080p setting (you can choose between 1080p and 720p), number plates are easily readable in daylight. (I tend to ride only in daylight, and the only time picture quality has been iffy was riding down a tree lined avenue on a sunny day – the lighting contrasts and dappling effect caused the camera to struggle a little, but, overall, no complaints). I’ve swapped out the supplied 8GB SD card for a 32GB one, and this will give just short of 5 hours recording time at 1080p quality before overwriting the first recordings (assuming that you set loop recording to “on”).The onboard battery is consistently delivering about 1 hour 40 minutes or so on a full charge. Extending the range is very easy, and connecting a 3350mAh external battery gives more recording capacity than I am likely to need in a day. (As others have mentioned, it’s either external or internal battery power, and switching must be done manually. On my longest ride so far of 5 hours, it was entirely on the external 3350mAh battery. There was some juice left in the external battery and a full charge in the camera battery when I got home). Roadhawk supply a weatherproof external battery pack and weatherproof connector cable at extra cost. Being a Yorkshireman, I’m using a much cheaper Anker battery and I’ve made my own cable. (There is a spare end cap in the box, vented so that the microphone can be used. In best Blue Peter fashion, using some sticky back plastic, glue, blunt end scissors and old washing up liquid bottles, I’ve mated this to a USB lead that is now weatherproof at the camera end. The battery is in a plastic bag inside a top tube bag on the bike that keeps it dry at that side of things).I hit the software install problem that others have mentioned. Rather than a Win 10 issue, I think it might be a 32 bit software/64 bit computer issue. I tried the install on a 64 bit Win 10 PC. On running the Roadhawk .exe file, it tried to install 32 bit Adobe Air and just hung at that point. If you seek out the Adobe Air web page first and install the 64 bit version (if appropriate) and then run the Roadhawk installer, it will successfully install the camera interface software.Early days, but I’m pleased with the Roadhawk so far. It does all that I want and, assuming it continues to function for 2 years or is fixed/replaced under warranty if it doesn’t, I will be happy with my purchase.
Trustpilot
2 weeks ago
1 month ago