Desertcart purchases this item on your behalf and handles shipping, customs, and support to Vanuatu.
🔥 Stay cool, perform hotter — the ultimate thermal upgrade for pros!
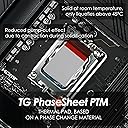
Thermal Grizzly PhaseSheet PTM is a 50x40mm high-performance thermal pad featuring phase change material that liquefies at 45°C for optimal heat transfer. It adapts to uneven surfaces, offers excellent thermal conductivity, remains stable after multiple thermal cycles, and is non-electrically conductive, making it ideal for CPU, GPU, and electronics cooling in demanding environments.


| Asin | B0DB84CQW6 |
| Best Sellers Rank | #681 in Computers (See Top 100 in Computers) #1 in Thermal Pads |
| Brand Name | Thermal Grizzly |
| Cooler Heatsink Compatibility | Varies by component |
| Customer Reviews | 4.5 4.5 out of 5 stars (1,601) 4.5 out of 5 stars |
| Global Trade Identification Number | 04260711991059 |
| Included Components | Thermal Pad |
| Item Weight | 20 Grams |
| Manufacturer | Thermal Grizzly |
| Model | TG-PS-50-40 |
| Number Of Items | 1 |
| Number Of Packs | 1 |
| Part Number | TG-PS-50-40 |
| Unit Count | 1 Count |
User
Best seller…
Thanks its all good
User
Application is too difficult
Incredibly difficult application, following all instructions including putting in freezer did not help, thermal pad was stuck to the plastic and was ruined by the time I got it out, stick with paste, this is not worth the hassle, I can get a regular paste application done in under a minute, but this took me an hour and still failed horribly.
User
Strange results
I'm shocked to say that it just didn't work for my laptop cpu..I don't know why but it's extremely shocking.I sliced it to 6 layers and placed 3 layers on cpu and 3 on gpu for best conductivity to leave no airgapBut that also didn't help...
User
Great product
Came in nice, neat packaging. Works very well.
User
THIS THING IS INSANE
I own a Lambda Tensorbook 2 (basically a Razer 15) for a few years now. Some days ago, I opened it up, and re applied thermal paste (MX-40) carefully on GPU and CPU. The improvement was significant, but it showed two hotter spots which were still causing some throttling. So I decided to try this product.I left it in the fridge about 10 minutes, cleaned the old paste, cut the sheet into two pieces for GPU and CPU, and applied the sheets over them. BOOM. 5 seconds.The peel is a bit hard to remove, technical tweezers helped. I cut it slightly bigger than the chips, and still got some left for a change in the future.TEMPS ARE INSANE! The PC sits now at 4300 MHz across all cores in PL2 (boost mode) with avg temp around 80 (more or less 20 seconds boost, 90 W), and at 3700 all cores in PL2 at about 60 degrees. ZERO THERMAL THROTTLING.The GPU couldn’t get hotter than 61 degrees in 5 minutes of test load.My fans are now basically never on. I am very happy with the purchase.
User
Great customer service
Great product, used it to install in my ryzen 7 mini PC, and have definitely seen some temperatures drop. My original sheet had a defect were the removal line was, I emailed the company and recieved 2 replacement sheets and a bottle of duronaut thermal paste. So I'd definitely recommend it.
User
Easier than Thermal paste and works amazing
Another amazing Thermal Grizzly product.Easy to use, much easier and simpler than Thermal paste.Used it on my RTX3090 massive improvement of thermals.I highly recommend this product
User
Don't think go for it, even as a absolute beginner!
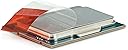
If you're on the fence, just go for it, don't overthink it. I'm a complete beginner and I still managed to apply the Phasepad successfully, so you can too.A few tips from my experience: be careful when cutting the pad. I mistakenly cut it in the wrong spot, so the red-colored extra liner that helps you peel off the main liner ended up on the leftover scrap piece instead of staying attached to the pad, which made the liner harder to peel off without that extra liner to grab. Peeling off the first liner was easy. Peeling off the second liner was trickier, since the pad kept trying to lift off with it too, likely because that peel edge was missing due to my cutting mistake. I ended up slightly damaging one edge, though it was very minor. My fix was to try the other edges instead, and one of them worked, and eventually the whole liner came off cleanly. After that, I mounted the AIO cooler.One important thing about removing that second liner: if the pad starts lifting off the CPU along with the liner instead of staying put, don't force it. Press the pad back down and try peeling from a different edge instead. You'll know a liner is ready to come off safely when you see a clean gap of air between the liner and the pad, which means they've separated properly, and it'll peel away easily with nothing sticking to it. It doesn't matter if you rough up other edges along the way; once you find that "clean gap" edge, removal is easy.On keeping things cool: I refrigerated the pad twice, once before cutting and once after, just for extra safety. I also ran my room AC at full power on chill mode the entire time I was working with it, which I think was one of the best decisions I made. It kept the pad from warming up and made the whole process much easier to manage. My advice: crank the AC and take your time.Quick context: this is on a desktop with an AMD Ryzen 5 7600X. Now for temperatures, before and after. Under a heavy OCCT stress test, my CPU used to hit 101°C, and rendering a single frame of a 3D file pushed it to about 99°C. Right after applying the Phasesheet, render temps were around 98°C, which makes sense since the pad hadn't burned in yet. After 2 to 3 days of use, temps dropped to about 94°C max while rendering, and it's kept improving since then. It's still in the burn-in/progression phase, so I'll keep updating this as it improves further.Another thing worth mentioning: my desktop used to crash a lot under heavy load before I applied the Phasesheet. Since applying it, I haven't had a single crash, even after running plenty of heavy tasks.Worth noting: my PC also has a fair amount of dust buildup, whether in the AIO cooler or elsewhere, so that's a factor too, but the results have held up the same regardless.Don't panic early on: the first time I started the PC after applying, it reached a higher temperature (83 to 84°C or more). If you see high temps like this at first, don't panic, since the sheet needs time to burn in and settle, so give it at least 2 to 3 days before judging the results.On tools: I used tweezers for handling, but they're not strictly necessary. Use them if they help, or skip them if you're comfortable working without.Bottom line: even if you've never opened a PC before, you can do this. Just watch a few tutorials on mounting your AIO or air cooler back on, since that part has its own learning curve too, especially getting the alignment right and tightening the screws in a cross pattern, as tight as you comfortably can by hand with a screwdriver.
Trustpilot
1 month ago
5 days ago