


Full description not available
D**E
Everything you need in one small kit. The latest Pi is more powerful, more capable and well worth a look.
As a software developer and then a career in PC sales, I consider myself fairly capable when it comes to PCs, I've assembled and configured literally hundreds over the years. However, I've only ever dabbled a little in Linux and alternatives, and have been interested in the capabilities of the Raspberry Pi for years. It's been a long time coming, but this is my first one. And I'm very impressed.This is one of the newer versions (although the Pi 3 has been around for a couple of years now, the B+ was only released in March 2018) and has a host of useful features, including Fast Wifi, 4 USB ports, an HDMI port, a Gb Ethernet port, Bluetooth, and so on. The great thing about the Raspberry Pi is that it's pretty much a complete computer on a single small standard sized printed circuit board. And the great thing about this kit is that with the exception of a keyboard, mouse and monitor, everything you need to get going is included.Assembly is simple, the top and bottom of the case are removed (held together by clips, no screwdriver needed), the Pi clicks into the base, and this is clipped in to the body of the case. I found a couple of heatsinks included in the kit, there were no obvious instructions where to install these but one went on the CPU and the other on a black chip by the USB ports (which is the LAN chip). Then the top clicks in place, and that's assembly done.Insert the supplied Micro SD Card, plug in a keyboard, mouse, the supplied HDMI lead (with the other end in your monitor, obviously) and supplied power lead and it's ready to boot. Oddly, the power lead comes with a button which seems to work the wrong way round, power is on when the button is "out" and off when "in". No matter, the LED in the mouse shows when it's powered up. Switching the monitor to HDMI mode and the setup screen is displayed, I chose a full install, and after about 10 minutes this is complete and it's ready to run. It boots quickly and connecting to my Wifi was quick and painless.A bunch of apps for things like documents, databases, presentations and the like is included, as are games and a few other utilities. And of course there's an absolute shed load of stuff available on the internet.My personal interest in the Pi lies in some of the more interesting possibilities, such as controlling robotic devices. I feel the need for a major project to get the best out of this box of tricks, perhaps used as a basis for a solid state DVR, taking feeds from my wireless cameras? Or maybe for a home automation project. The potential uses are near endless.In summary, the kit comes with everything practical required to be up and running in under half an hour. After that, it's up to your imagination.
P**J
Excellent Starter Kit for Learning, Hardware Projects and Retro Gaming.
The product comes well-packaged with everything you'd want in a starter kit. Easy to assemble and get up-and-running. Apply the supplied heatsinks, place the Pi board in it's case, and insert the supplied SD Card. Connect an HDMI display, keyboard and mouse, and plug the PSU into mini-USB socket and then into the mains supply. Flip the ON/OFF switch and the Pi boots for the initial setup. Once connected to the internet it self-updates the supplied Linux-based windowing Operating System, and you can download many additional features including a full suite of office productivity packages.The Pi range of boards are well-known for the wide range of hardware and electronics hobbyist add-ons available, but to keep costs down none of these are included - after all, if they included absolutely everything you'd be paying for things you might never use - and at a much higher overall cost.For myself, a favourite feature is having everything load from an SD card, because that means I can have multiple configurations, each on it's own card. If I need a bit of relaxation I can unplug the mouse and keyboard, plug in a game controller, insert an SD card configured for Arcade-Style gaming, and that's exactly what I get.The best thing about this starter kit is once you have the base unit in a usable form there is the freedom to customise it in any way you choose and learn as you go. There are many online videos with ideas and tutorials to guide you on your way. So what are you waiting for? Have fun!EDIT: I have been reading some reviews critical of the power supply unit (ABOX provided a 5v 3a with mine), and the 'lightning bolt' icon appearing while gaming. I have discovered that this can be due to the drivers in the gaming 'distro' (OS and software installation). I took the step of running an update to the package (NOT for the novice as it turns off auto login until you re-enable it). After doing this I haven't seen a single lightning bolt.
G**O
A truly noob-proof kit to get started
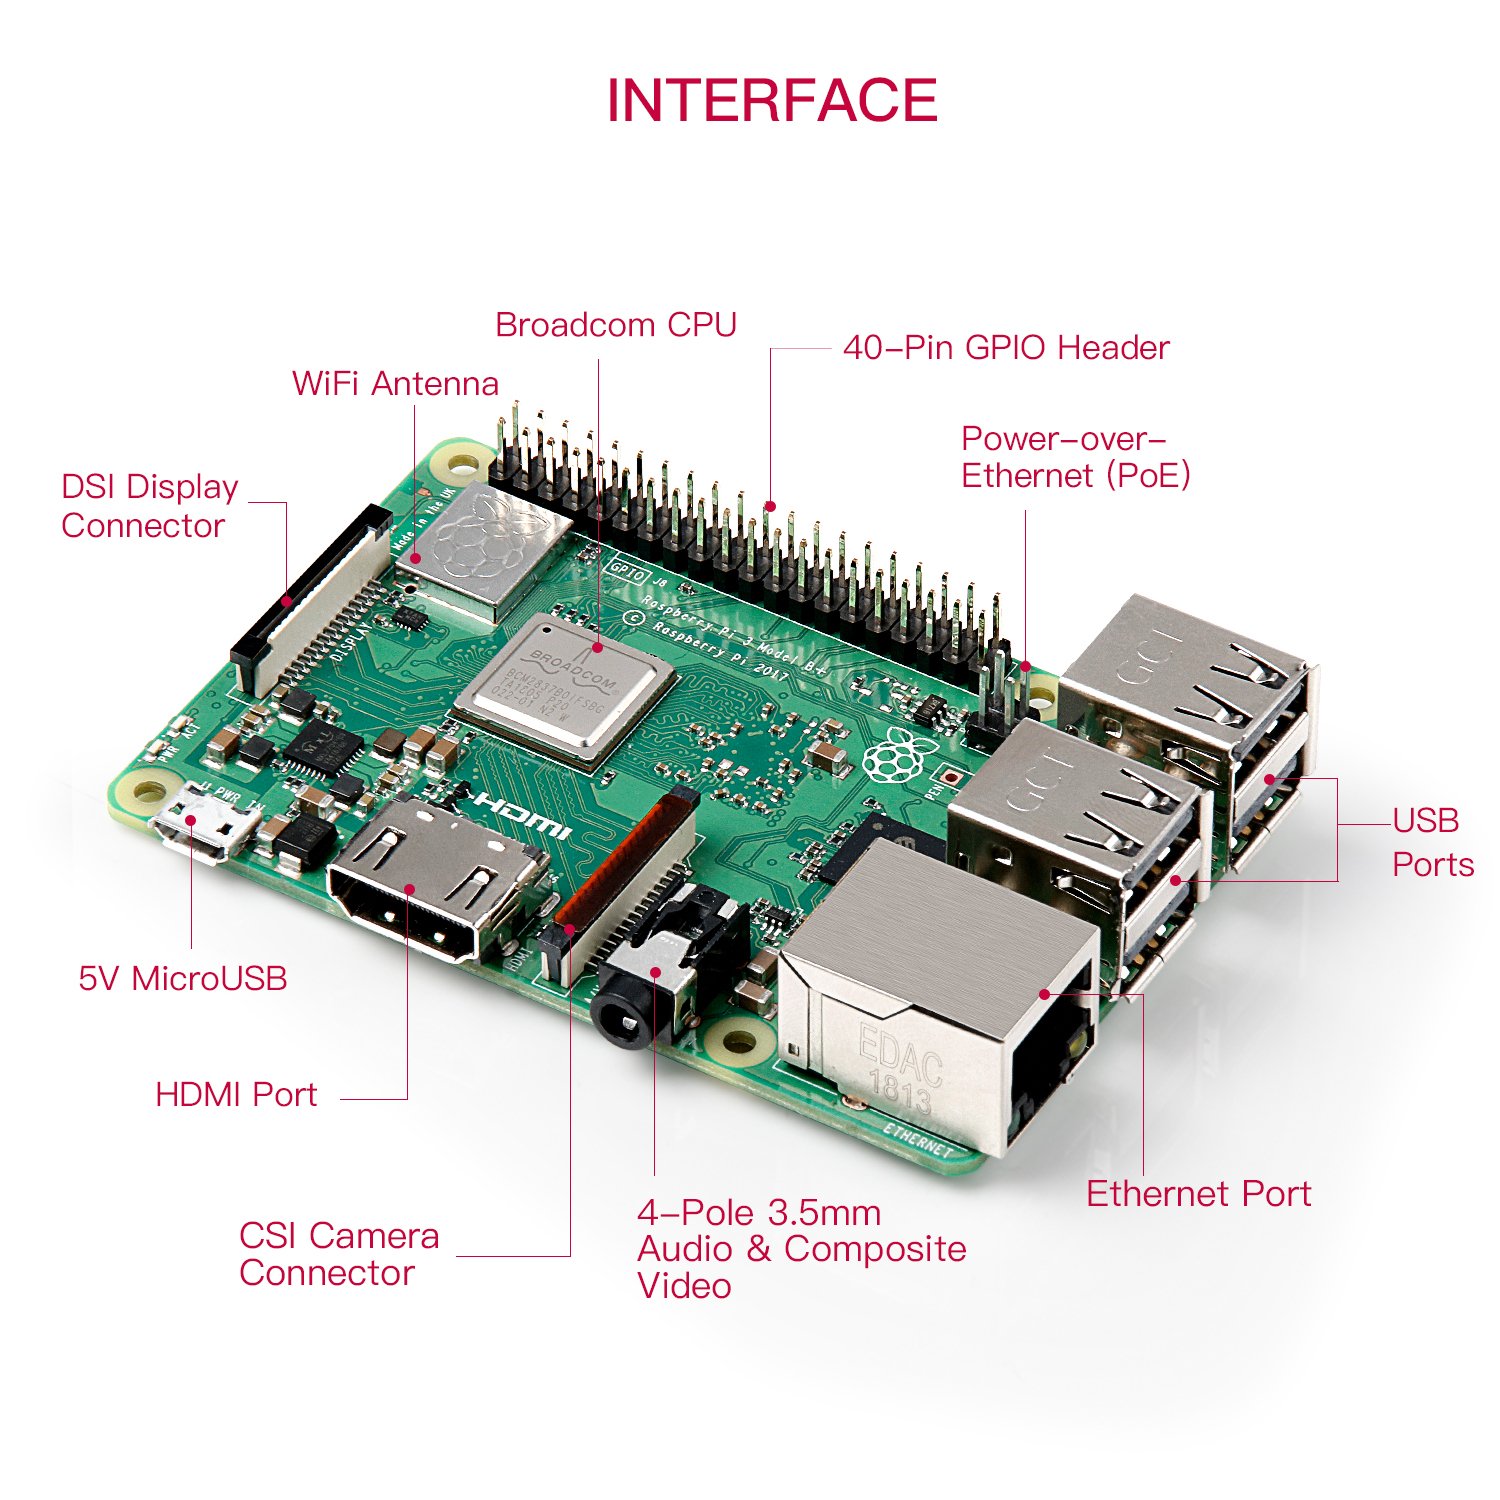
The Raspberry Pi is one of the most famous multi-purpose single board computer, and this kit will make its installation extremely easy, since it contains everything you need to get started, like:- Rasberry Pi 3 (Model B+)- Plastic case- microUSB power adapter- 32 GB MicroSD (Samsung Evo, class 10)- Some heatsinks- microSD reader with dual port (traditional USB and USB-C)The new “B+” iteration is bringing a lot of new features, especially in the Networking department. We’ve finally got a gigabit Ethernet, 802.3az (energy efficient Ethernet), Jumbo frames, and PoE support.Please note that the NIC is still running on a USB 2.0 HUB, which can handle a theoretical max throughput of 480 Mbps. Still a fair upgrade from the previous 100 Mbps though.The SoC appears to be the same as the predecessor, apart from the max CPU frequency that jumps from 1.2 to 1.4 GHz.Installation:The microSD comes with the NOOBS package (new out of the box software) preloaded. It will allow you to install your operating system with only few clicks. I suggest RASPBIAN for a complete computing experience. There is an option to install OPENELEC as well, which is a media center system.So just connect your keyboard/mouse, power it on and proceed with the installation which takes around 7/8 minutes with the provided class 10 microSD card. You’ll be all set after the first restart.Last but not least, the power adapter has a little switch on the cable, which allows you to restart the board without doing a “manual” power cycle.
Trustpilot
1 month ago
1 month ago
