Description
🚜 Upgrade your ride, command the yard with style and power!
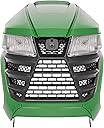
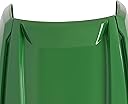
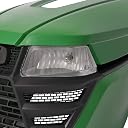
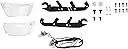
- ALL IN ONE COMPLETE KIT - Includes hood side panels, upper hood, front grille, and headlights for a full front-end refresh.
- RUGGED ABS PLASTIC BUILD - Engineered with high-quality ABS for superior toughness and weather resistance.
- ENHANCED VISIBILITY STYLE - Built-in headlights boost low-light operation while elevating your tractor’s aesthetic.
- PRECISION FIT FOR JOHN DEERE - Seamlessly compatible with X300-X394 series for a perfect factory-like restoration.
- QUICK HASSLE FREE INSTALLATION - Designed for easy bolt-on replacement with clear instructions—get back to work faster.
The HECASA Complete Hood Kit is a durable, ABS plastic replacement set designed specifically for John Deere X300 through X394 lawn tractors. It includes hood side panels, an upper hood, a front grille, and integrated headlights, providing both aesthetic enhancement and improved low-light visibility. This all-in-one kit offers a precise fit, weather-resistant finish, and straightforward installation, making it the ultimate upgrade for maintaining and modernizing your tractor’s front end.