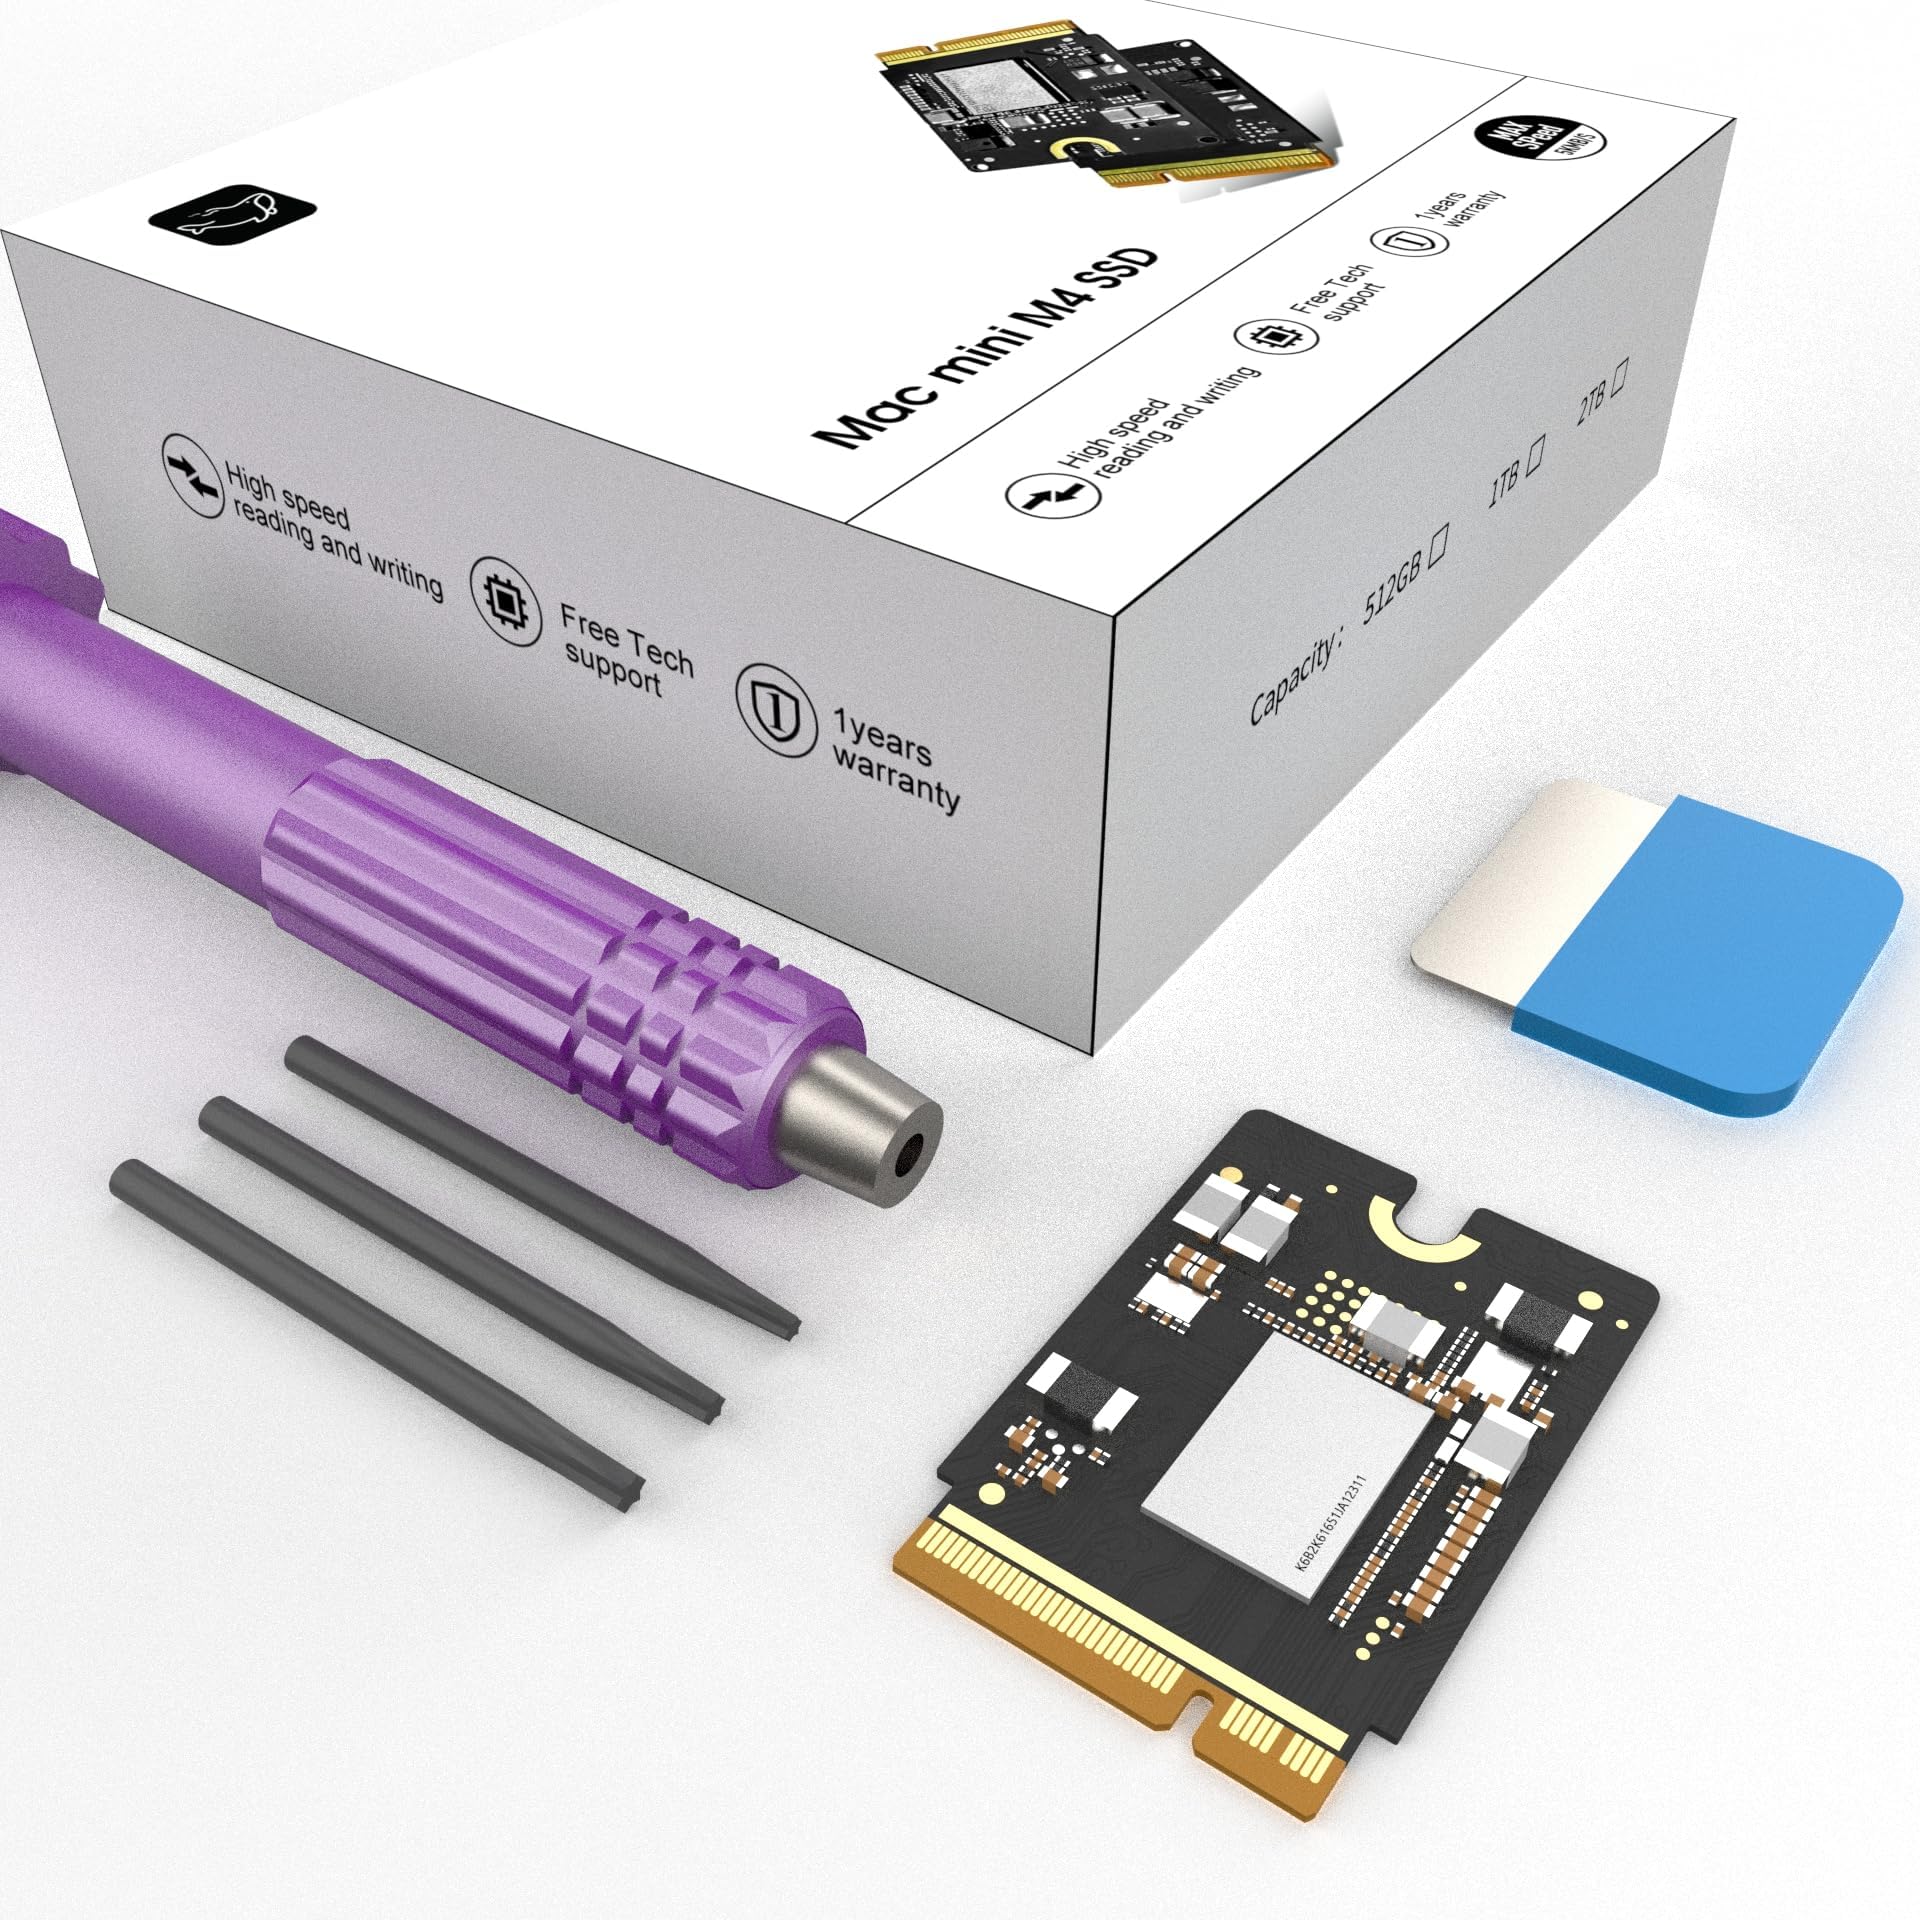


Mac mini M4 SSD 2TB Hard Disk Upgrade DIY
Product ID: 706566289
Details
- Brandsbaceflay
- ColorBlack
- Hardware InterfaceeSATA
- Hardware PlatformARM
- MaterialPlastic
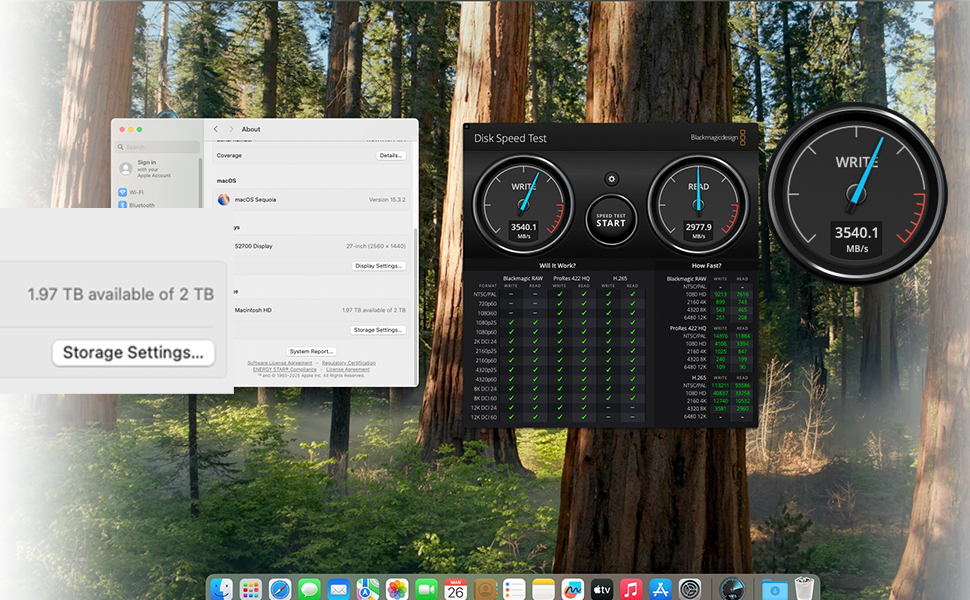
⚡3300 MB/s blazing speed
💾1TB storage boost
🔧Precision M4 NVMe fit
Buy anything from 5,000+ international stores. One checkout price. No surprise fees. Join 2M+ shoppers on Desertcart.
Desertcart purchases this item on your behalf and handles shipping, customs, and support to Vanuatu.
🚀 Upgrade your Mac Mini M4 to pro-level speed and storage—don’t get left behind!
The Mac mini M4 SSD 1TB Hard Disk Upgrade DIY Kit is a precision-engineered storage expansion solution that quadruples your Mac Mini M4’s capacity with a high-speed 1TB NVMe SSD. Delivering blazing 3300 MB/s read/write speeds, it ensures lag-free multitasking and professional-grade performance. Designed for effortless plug-and-play installation, this upgrade is rigorously tested for reliability and perfect compatibility, making it the ultimate choice for creative professionals and power users seeking to future-proof their Mac Mini.


| ASIN | B0DYJ2FQYG |
| Best Sellers Rank | #1,009 in Internal Solid State Drives #16,696 in Computer Internal Components |
| Brand | sbaceflay |
| Built-In Media | mac mini m4 ssd 2tb |
| Color | Purple |
| Compatible Devices | macmini m4 |
| Customer Reviews | 4.1 out of 5 stars 59 Reviews |
| Data Transfer Rate | 3300 Megabytes Per Second |
| Enclosure Material | Plastic |
| Hardware Interface | eSATA |
| Hardware Platform | x86_64 |
| Item Weight | 0.02 Kilograms |
| Manufacturer | sbaceflay |
| Material | Plastic |
| Memory Storage Capacity | 2 TB |
| Mfr Part Number | M4-2TB |
| Model Number | M-2 |
| Supported Devices Quantity | 4 |
| UPC | 726899873371 |
| Unit Count | 1.0 Count |
| Warranty Description | 1 |
W**T
Works great, faster than the original Apple SSD
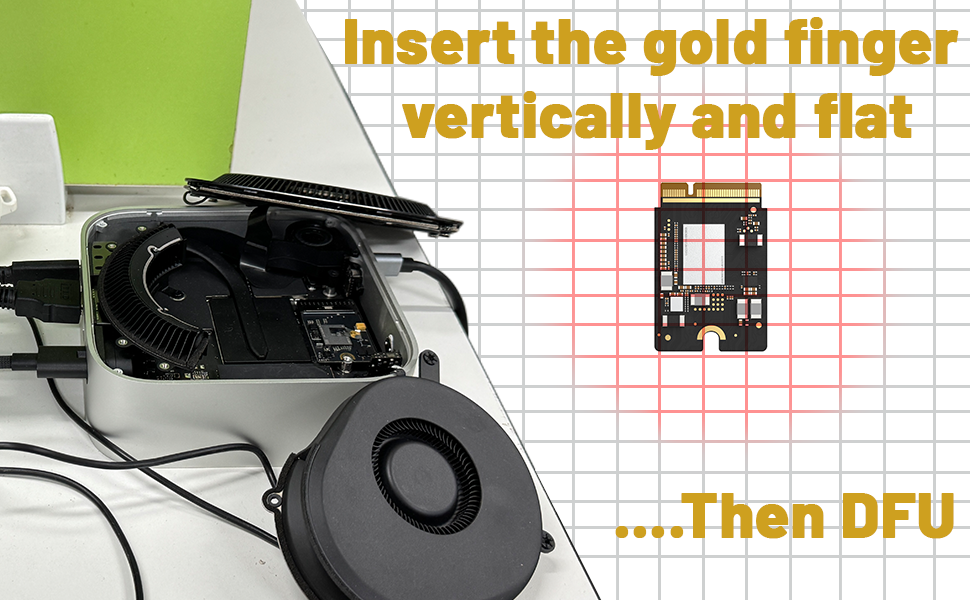
October 2025 update: Still very happy with my choice. It's been working fine for months now with no issues. I would definitely buy from this company again. Works great, and still going strong after a month. Following iFixit and other YouTubers' instructions worked well for me. No problems getting into the case, but I did have the help of an iFixit kit that includes spudgers and guitar picks to pop the bottom shell open. Once you get past that (without any scrape marks!), it's pretty easy. I did not need to pull away any of the connectors, like some people do with the power switch. That little connector is very fragile, and does not pull away laterally the way most people would think it works. It needs a gentle upward tug. When you put it back on again, press down from above, and don't try to slide it in. I watched one YT'er break his on camera because he pulled in the wrong direction, so be very careful if you decide to remove yours. I'm extremely pleased with the extra speeds I'm getting, and very, very pleased with my new 2TB Mini!
J**.
Upgrade your mac mini hard drive for cheap.
I was afraid the chip may not work as its a brand new kit for installation on a now replaceable drive for macs. However, after watching some howtos, and selecting what I believed to be a better option to purchase from the others, I'm glad I got this one. I have had my mini m4 running nonstop for several months and its working without a problem. Updates are no issues for mac os updates and read/write speed are fantastic for video edits upto simple 8k edits according to my blackmagic disk speed test. I've only done upto bmpcc 6k videos and its working as it should.
H**S
Good product
Complete with all necessary tools, easy to install, flawless setup. Happy with the purchase.
J**D
Failed to initialize
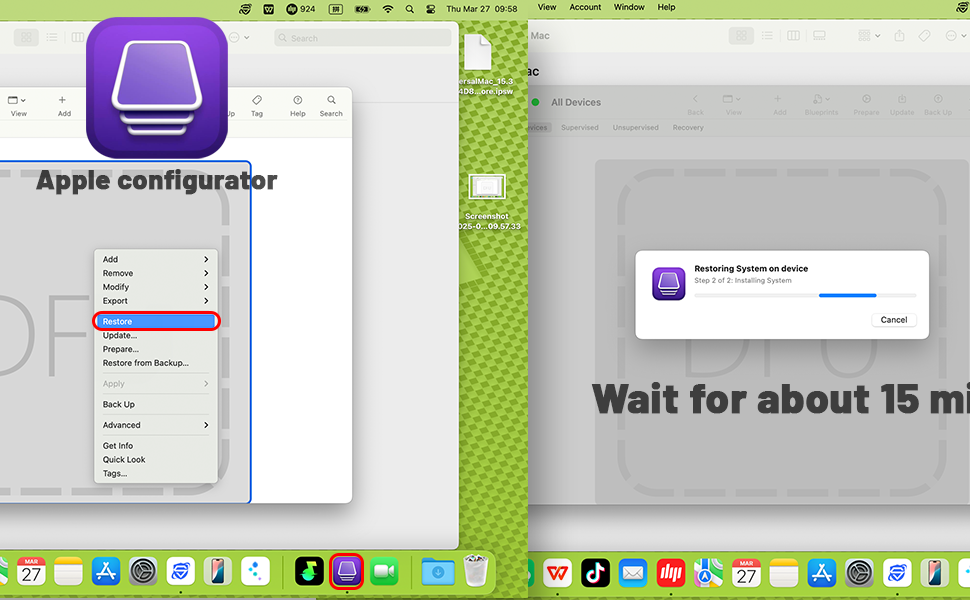
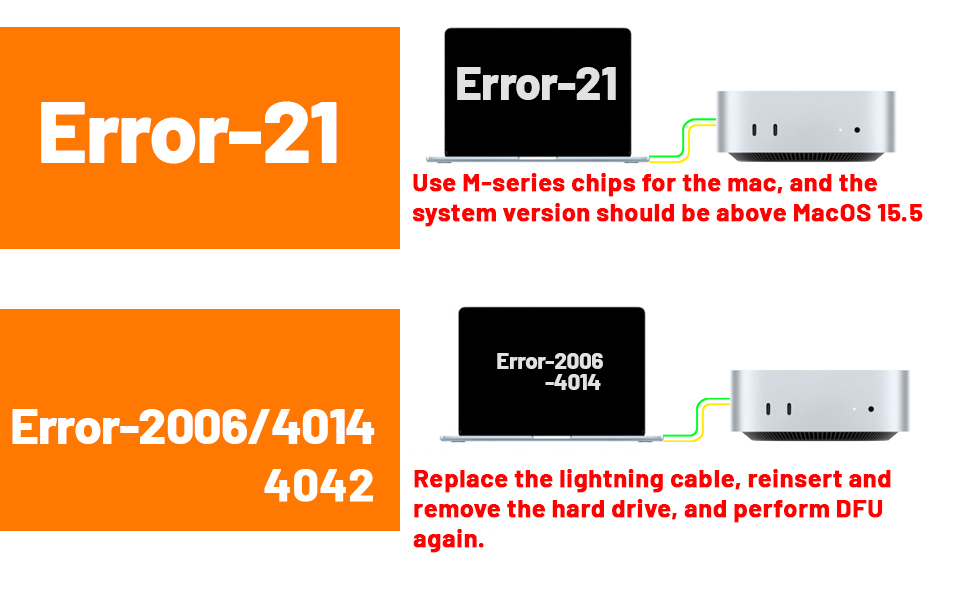
Was excited to beat the egregious Apple storage upgrade tax. Tried several times with multiple Macs, USB-C cables, even different firmware versions. DFU failed every time. Error code 21 is a hardware failure. The Mac works fine with the stock SSD. I'll try again, because I am an expert at taking apart the Mac Mini M4 at this point. I wanted to request an exchange but the automated system only let me do a return. UPDATE: I did buy another SSD upgrade from another vendor on Amazon, and it’s working fine. Fired up on the first attempt. I think these just might have a high failure rate and minimal testing/QC by the vendors, so if you don’t have the patience to try a couple times, this project could be frustrating.
K**B
Great upgrade, but finicky install.
This is a no-brainer upgrade for the Mac Mini. I bought a new Mini with the standard, paltry 256GB drive, not wanting to pay around $800 for the 2TB drive, and turned to this 2TB upgrade. I followed one of the YouTube videos that shows how to take the Mini apart without disconnecting the cables, and that whole process went really smoothly. The tools that came with this drive are great for the task at hand. But, things went south when I tried to restore the new drive. I kept getting an error message (2006) and had no idea what it was. The orange light on the Mini was pulsing, indicating a hardware error. I thought the drive was bad, so I sent for a replacement. But before it arrived, I found what the error code meant on a competitor's page, and proceeded to take the drive out and put it back in just slightly skewed. Voila! That did the trick. Apparently these drives, or the Mini, are sensitive to the slightest change in position. Once I did that, everything fired up just like the YouTube videos. At the time of install, this company didn't have the error codes listed on Amazon. Now it looks like they do. The only thing that would make it better is if they had a link or QR code to the installation video as well. Other than the finicky nature of the install, this is a great upgrade. Time will tell if it lasts as long as my last 3rd party Mac SSD upgrade (six years), but so far so good.
R**Y
Money saver
Installed really easy into the Mac mini. M4 works great nice and quick love it.
G**T
Will buy again
Working solid for 5+ months. Planning to buy another soon. Initial installation appeared faulty, however, all was fine after verifying electrical contact between main circuit board and disk circuit board. I suspect the contacts may be compromised if the disk circuit board mounting screw is too tight or too loose. We invested in a torque driver to set the Torx Plus 8IP screw to 0.65 Nm per Apple instructions.
D**6
Saved me so much
Works perfectly and save me so much money over the apple upgrade!
D**J
Fino a qui, tutto bene
Montato senza troppi problemi il 16 Giugno, oggi è il 21 Agosto e ancora funziona tutto regolarmente. Sono contento di aver acquistato questo prodotto, ho risparmiato bei soldini, spero duri a lungo.
N**N
Works well! Dont use provided screwdrivers.
Works well no issues so far, easy to install. I found the included screwdrivers were no good not quite the right size there was a worry about stripping the screws so I would use alternate drivers.
G**L
Great solution to a silly problem
The setup is a bit ‘nerdy’, but fairly simple and foolproof with the required tools and one of the good how-to videos on YouTube; you also need to have another fairly recent Mac at hand. It takes about an hour and the result is truly spectacular, transforming the cheapest Mac ever (?) into a powerful, fast tool.
D**T
Kommt zu Abstürzen.
Finger weg.
A**R
Apple Mac mini M4 SSD Upgrade
Upgrade is straight forward as long as you do your research and take steps to protect your device during the process. The only issue I had was not using an Apple USB C cable which caused the restore to fail in DFU mode. My Mac now has a 2TB SSD (was 256GB) at a fraction of the price Apple will charge you.
Trustpilot
2 months ago
1 week ago