
Trams & Recollections: Sunderland Trams in the 1950s: 85
S**D
Some corrections and extra information
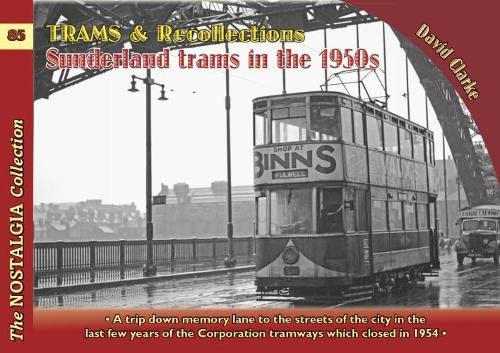
The photos in this book are very good (with three exceptions) but the captions are disappointing. Here are some corrections and extra information which should be useful to anyone who buys the bookFront cover image - The caption inside says the English Electric cars 87-95 dated from 1934. They were all supplied in 1933. It is the Wearmouth bridge not the Monkwearmouth bridge.Caption 1 - Although both forms are used, the trams showed ‘Wheat Sheaf’ not ‘Wheatsheaf’ and the pub which the junction is named after is called ‘The Wheat Sheaf Hotel’. In short, it is two words not one.Caption 2 - Again, it is the Wearmouth bridge and not the Monkwearmouth bridge.Caption 3 (1)- The cost to Binns of the famous adverts was £1 per vehicle per annum. This sum was set in 1921 in an agreement negotiated by Binns’ Commercial Manager, William Waples (who was also a well known local photographer). When the Corporation later sought to increase the amount, the agreement was found to be irrevocable. This rate applied to all the trams and buses until Sunderland gave its transport away to the Tyneside Passenger Transport Executive in 1971. The caption text ends with the words ‘Heading for’.Caption 3 (2) - The text begins ‘Grangetown in Fawcett Street’. (the missing text is ‘Heading for’). and ‘the first with’ should be ‘the only single-truck centre-entrance car with’, as car 53 was the only one of its type to have the ‘Blackpool’ style central bumper with three ornamental strips on either side and the tail lights below the headlights. None of the car ends sloped back as much as those at Blackpool.Caption 4 - The ex-Manchester ‘Pilcher’ is number 41. The ex-Huddersfields lasted to the end because they had air brakes. The ‘Pilchers’ did not have air brakes so went earlier.Caption 5 (1) - Car 99 was built in 1934 not 1935. Heavy consumption was not the only reason for withdrawal. Both 99 and 100 were prone to derailment on sharp curves and car 100 had sluggish brakes due to the air pipes having too small a bore.Caption 5 (2) - Car 70 will not ‘return to Grangetown' from here. It has come from Fulwell and will ‘carry on to Grangetown’. It is standing in Burdon Road, not Borough Road which is to the right of the junction behind the car. The arrow on the system map should be amended accordingly.Caption 6 (1) - The street is Holmeside not Holmside. Humbledon was not the original terminus of the Durham Road route. The first was at Barnes Park Road, then Humbledon, then Plains Farm, then a terminus was laid out at North Moor Lane but it was removed before use, then the final one at Thorney Close Road.Caption 6 (2) - The other ex-Ilford car in the photo is number 7.Caption 7 - Car 52 was assembled in the Hylton Road depot and was the last new tram, as correctly described in caption 15(2). This caption refers incorrectly to ‘Holmside’, which should be Holmeside as noted above.Caption 8 - The large building in the background is the Ritz cinema and the rear offside of a Sunderland District bus waiting at its loading point is also visible.Caption 9 - This image is ‘squashed’ horizontally, making 83 look like a narrow gauge car. The street is ‘Back Mary Street’, not Derwent Street and this is believed to have been the only example of an urban tram route laid along a back lane. The building on the right in the tram picture is not Chaplins. It is ‘Charles Jude, Auctioneer and Valuer’.Caption 10 - Car 8 arrived in 1938 not 1937. (car 7 was obtained as a sample in 1937 and the rest were bought in 1938). The location is Albion Place, not Vine Place.Caption 11 - Car 42 was the last tram to enter service in Sunderland, having been damaged in transit from Manchester. (The last tram bought was 85 and was put in use before 42)Caption 12 - The first half of this caption belongs to image 29 (and vice versa). The location is at the old Redby School in Fulwell Road opposite Osborne (not Osbourne) Street and this is car 6, not car 8. Locations 12 and 29 on the System Map need reversing.Caption 13 - The location is not ‘at Barnes Park’, which is the next stop. This stop is at the Bede Grammar School on Humbledon bank.Caption 14 - The caption gives the impression that 87 lasted until the Durham Road line closed but it survived until the whole system closed on 1st October 1954.Caption 15 (1) - The ex-Ilford Brush cars were used extensively on Durham Road but were inferior to the other cars on the route which were much more comfortable.Caption 15 (2) - The ‘Rose and Crown’ in the background and the ‘Londonderry’ on the right are still decorated with bunting flags put up for the Coronation twelve days earlier. This caption should be no.16, as shown on the system map.Caption 17 - Car 41 disgraced itself two months later when it derailed and crashed into a shop front as it turned from Park Lane into Derwent Street.Caption 18 - The image has an unfortunate blemish, is there no good print? Car 22 is running downhill to pass its birthplace in the Hylton Road depot. (see below)Caption 19 - Car 22 was one of three supposedly rebuilt from small single-deckers. It was a practice known slyly as ‘creative rebuilding’, a way of financing new vehicles out of revenue rather than borrowed capital. The car is not at ‘the Willow Pump’. The pub is ‘the Willow Pond’ and it is off to the right at the other end of the block.Caption 20 - Note the cast iron box between the shelter and the tram. This remains in place and was part of the tramway street furniture but it s not a section breaker box. This tram stop was a lay-over point so the box was possibly for a telephone to ring the depot in the days before mobile phones. Oh to see inside!Caption 21 - The caption should read ‘the only such vehicle around on that same June day’Caption 22 - Car 51 has been more than freshly cleaned, it has been completely repainted, a practice which ended in January 1953.Caption 23 - This became a compulsory stop after two fatal accidents on the bank down to the Hetton Collieries Railway bridge.Caption 24 - The odd thing about Western Hill is that, apart from a slight fall at the far end, it is just about flat.Caption 25 - Car 23 was a very co-operative tram, being the only one to advertise both the Co-Op Wholesale Society and the local Sunderland Co-Op. Unlike most of the fleet, there was no advert on the other side of the car. The various adverts on the trams were one of the ways which small boys could tell which tram it was.Caption 26 - The Grangetown terminus was on the left hand pavement beyond the tram, which is seen occupying the middle of what was the A19 trunk road before reaching a more conventional position on the double tracks to the Wheat Sheaf.Caption 27 - It is car 90, one of the EE 1933 cars, not car 80. Norman Adamson’s butcher shop in Gladstone Street was on the corner of Selbourne Street, the streets in this area being named after the members of William Ewart Gladstone’s cabinet.Caption 28 - Car 99, new in 1934, was the first one with glass roof windows and twin headlights, both of which features were incorporated into cars 26 to 28 in the following year.Caption 29 - The first half of this caption belongs to image 12 (and vice versa). The ‘older part of Durham Road’ referred to in the caption is called Riversdale Terrace.Caption 30 - Car 96 was built in 1933. The two termini were connected electrically; the Dykelands Road section was powered by an underground cable from the Sea Lane terminus.Caption 31 - The entrance to Dacre Road is just beyond car 9 and the rear of the first house is on the right. Note the gate in the fence, handy for popping out to catch the tram.Caption 32 - In the forties, most UK tramways were in a bad way after wartime neglect, many were abandoned and the trams offered for sale were little more than scrap. Bury had closed the routes served by the modernised car 30, which lost its role and spent a lot of time in the depot because it was too fast to work with the remaining old cars. Therefore it wasn’t trashed and was a rare bargain for Sunderland.Caption 33 - Car 83 is not at the Queen Victoria Hotel. It is at the Roker Victory Club (see the name on the gable end). It was renamed long after the trams were abandoned.Caption 34 - Car 77 was one of group 72 to 83, front-exit cars with narrow entrances. They were very unpopular until rebuilt with normal platforms in 1929-30.Caption 35 - Cars 54 and 55 did not have cranked trucks like those of the English Electric (EE) centre-entrance cars. The Brush trucks were ‘pinched’ in the middle to provide room for a very high narrow step. The doors were on this step and, when closed, left a dangerous gap behind so a wooden ‘cracket’ had to be moved from one side to the other and dropped in behind the offside doors on every journey.Caption 36 (1) - This image is a poor choice to show the attractions of Sea Lane. It shows nothing of the sort!Caption 36 (2) - Car 85 came from Bury in 1948, it was not a "front exit" car supplied by English Electric in 1921.Caption 38 - Cars 86 to 98 are regarded as one batch but the prototype 86 was less powerful than the others. The EE cars 87 to 95 had different body details and 96 to 98 were all different to 86 and the EE cars.Caption 37 - This is a Sunderland Echo photograph, taken in April 1950 after it was announced that the route was to be closed when enough buses were available. The driver is the late Gordon Douglas, who built a large number of working models of the trams, and used them to raise a lot of money for charity.Epilogue - Lovely !
Trustpilot
2 weeks ago
1 month ago