


YAGADGET iPad 4th Gen New Ipad Touch Screen Glass Digitizer Screen Replacement Kit + Adhesive + Special iPad Tool Kit (Full Do It Yourself Kit) Black
Product ID: 7476886
🔧DIY Ready
🖥️4th Gen Touchscreen
🛠️Complete Tool Kit
🔧 DIY Your Way to a Brand New iPad!
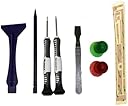
The YAGADGET iPad 4th Gen Touch Screen Glass Digitizer Screen Replacement Kit is a comprehensive solution for restoring your device. This kit includes a high-quality black digitizer, a complete tool kit, precision adhesive, and a mini LED keychain light, making it perfect for DIY enthusiasts looking to breathe new life into their iPad.
J**S
Exactly what I needed... BUT...
I typically don't do product reviews but I'm making an exception on this one. First the bad: The item didn't NOT come with everything pictured in the photo. In fact, I didn't get anything OTHER than the digitizer and the sticky tape that goes on it!! NOT ONE single tool came with my screen. With that out of the way....I'm a techie of sorts so I have my own tools laying around and for anyone else who may not, you can get the tools for this job for under $15. You will need to purchase an additional heat gun/hair dryer if you don't have one at home also. Fortunately for me, I already had one. Anyway, after finding a YouTube video I was comfortable with, I replaced the screen in about an hour and a half. It was a pretty simple, but requires patience and a steady hand.This would have been a 5 star review if the tools had been included. All in all, I would still recommend and order again.
G**T
Good product, but lower quality.
I was not really impressed with the quality of this product. I purchased this replacement screen so I could fix my IPad obviously. I'll admit I'm a picky person when it comes to the quality of my electronics, but I like to fix them with the most authentic replacement parts and return them to the best original condition as possible. I feel this product did not meet my expectations. Two things I noticed about this screen that was different from the original factory screen, was the material and faint lines on the screen. First off the product description says glass screen, which it probably is, but I in MY OPINION, I feel like it has more of a plastic feel. It just doesn't seem have that glass durability feel, in other words it feels cheap to the touch compared to that of the original screen. Secondly I noticed faint lines(square grid formation) while the LED panel was lit. Most likely these lines are for finger tracking and sensitivity, but I never noticed them on the original factory screen. If your like me, I notice every little thing. Overall good product, the screen fits, tools are durable and useful, and the adhesive is cut to the correct dimensions. Only complaint is the lower quality of the material of the screen and the barely noticeable lines.
B**F
Great. But, I'm an idiot.
"20 words"? I already said I was an idiot...I have to elaborate?Shipping was immediate. As everyone has stated, watch a video or find a good pictorial about taking these apart. Spend the extra 9 bucks and buy a iSesamo...but, if you don't you're not going to know how much you regret not having one so...you know...whatever.If you don't wear glasses, you really should get goggles. Especially if the screen is broken any more than one crack, because shards of glass are going to be flying all over. Have your vacuum out and ready to go before you start disassembly.There's a good chance you're going to damage the bezel here and there: before putting the new glass in, run your fingers around the bezel and sand down any parts that aren't smooth. I use 400 and 600 grit for a lot of things so, I used 600.This time around, I'm buying a new bezel: 5 bucks so....(The unit came with a free gift of a car plug-in charging adapter....which was perfect because it just so happened I needed to buy one. Thank you, seller.)Everything went swimmingly with the new glass. I was very pleased but cautiously didn't heat-seat the glass for the first couple days: so I wouldn't have to pry it out if it quick-failed.When I was satisfied the unit would last a while, I began the heat-seating and promptly cracked the glass from pressing too hard at the gap where the volume button is so....yes....I'm just now ordering another digitizer....
V**Y
PHEEEEW!!! NOT FOR THE AVERAGE TECHNOGEEK...
Well I did it. Phew!.... Scaaaaaarry!!!! One tip for the masses. Don't do this unless you are willing to pay more than the simple screen repair cost after you're done messing up your home key or stripping the plastic gasket off the edge like i did. I will likely have to eat the cost of this little adventure some day when I get around to getting it fully repaired. The Home Key is the scary part. DON'T YANK ON IT!!! getting that sucker back in was well, "pain" has many definitions, this would be one.All in all, if you're like me who works in a tech field and think, "Ah! No big deal! I've built networks! Servers! Giant robot mother-ship models with motorized moving parts!" HA! This was scarier than when I dropped it in the first place! I can't complain about the product though. The screen worked as promised. I would have liked a little instruction though. (I wonder if the ipad repair places will just repair what I messed up and not charge for the screen.) :-/
U**1
Did the job
Glass does seem weaker than what was originally on there but the price was well worth it. Apple wanted $300 for a replacement. With a youtube video, heat gun, and this kit, I was more than able to do it myself. Took about 2-3 hours, partially because the glass was so shattered on the ipad before the replacement.This glass however, and maybe with any glass you buy is VERY breakable. Do NOT push down to hard or try to force the glass to fit inside the ipad. The iPad I have has bent edges and I tried to get the glass to fit in there... not wise.All in all this is a great product and happy I purchased it. The time it took to replace was actually kind of fun as I learned a lot about the ipad. Things to consider:1. WEAR safety glasses. If you have small bits of glass... they can EASILY fly up.. I can't stress this enough.2. Heat gun... looks like you don't need one but you do... unless you have the ability to separate glass from an adhesive as your super power. I got a heat gun at a store for about $25. I don't consider this part of the cost as it has other uses.3. Go to youtube, type in the version of your ipad and say glass replacement, (ex. "ipad 4 glass replacement). Most likely in seconds you'll have a video.
Trustpilot
4 days ago
2 weeks ago