💡 Illuminate smarter, not harder — the future of lighting is ballast-free brilliance!
The Aluxcia 22W GX24Q/G24Q 4-Pin LED bulb delivers 2200 lumens of cool daylight (6000K) brightness with high energy efficiency, replacing traditional 42W CFLs. Designed for easy retrofit without a ballast, it fits universal GX24q bases and is ideal for residential and commercial recessed and surface-mounted fixtures.
Brand | Aluxcia |
Light Type | CFL |
Special Feature | Energy Efficient |
Wattage | 22 watts |
Bulb Base | G8 |
Specific Uses For Product | Lamp |
Light Color | Cool Daylight White |
Voltage | 120 Volts |
Unit Count | 1.0 Count |
Color Temperature | 6000 Kelvin |
Number of Items | 1 |
Indoor/Outdoor Usage | Indoor |
Power Source | Corded Electric |
Color Rendering Index | 80 |
Power Consumption | 22 Watts |
Light Source Type | LED |
Item Weight | 0.01 Ounces |
Light Source Wattage | 22 Watts |
Product Dimensions | 1.8"W x 5.9"H |
Accepted voltage frequency | 100 to 120 Volts and 60 Hertz |
Control Method | App |
White Brightness | 2200 Lumens |
Efficiency | High Efficiency |
Connectivity Technology | Normal bulb |
UPC | 650226406461 |
Part Number | GX24LEDCW |
Item Weight | 0.01 ounces |
Item model number | LST0858 |
Is Discontinued By Manufacturer | No |
Size | 1 Count (Pack of 1) |
Color | Red, White, Blue, Black |
Special Features | Energy Efficient |
Batteries Included? | No |
Batteries Required? | No |
J**E
Bright, but a little long
Very bright light, but is lo ger than the florescent bulb I was replacing and unfortunately had to return it.After rewiring my bathroom fan to accommodate the led bulb and plugjng it in, I right away realized I should of read the dimensions in the descriptions. It was too long to work with my exaust fan, but man was it bright! Wish they made a shorter version.
J**D
Nice Product - A little hard to install
The biggest issue is that most existing fixtures that take this size bulb are florescent requiring a ballast condition the electricity before lighting the florescent bulb. To use this product you will need to wire around the existing ballast. No. 1 - Turn off electricity to this fixture/circuit! Then - you will cut and strip the two wires going INTO the ballast (hot and neutral - in my case black for hot and yellow for neutral) - then cutting an stripping the four wires coming OUT of the ballast (in my case red and blue - red being hot and blue being neutral). So I installed two wire nuts. The first was the hot wire that originally went into the ballast (black) and the two red wires going to the fixture. I spun those three wires into a wire nut then did the same for Neutral (yellow and blue) wires. I insured no bare wires extended past the wire nuts and then wrapped the wire nuts and wire in electrical tape. Turn back on the circuit and your light should work. The new LED bulb works great. I truly wonder if it's saving any electricity because it is so bright.
J**N
Dim After A Few Months
We have 10 lunchroom fixtures we put these in to replace the CFL lamps we used to use, after only a few months now the light level is not near what it was when we bought them and the color tempiture is off from the different fixtures which only seemed to happen over time. You would think LEDs would last for at least years not months.
O**S
Instructions made easy.
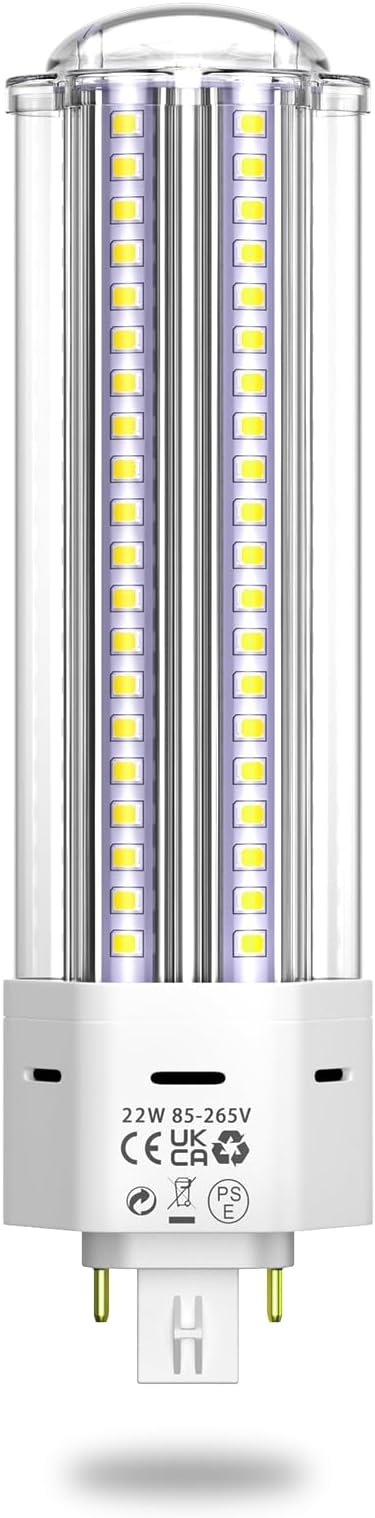
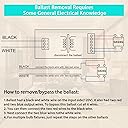
The instructions were not correct but I understood what they were trying to say. Instructions say "Had" black, white, red, blue wire, what it should have said was "Has". First turn off electrical breaker, install the LED bulb, then I used my wire cutting/stripper tool cut the 1 black & 1 white wire going into the ballast, about an inch or so from the ballast, then cut the 2 red & 2 blue wires about an inch or so away from the ballast. I then used my wire cutting/stripper to remove about 1/4 to 1/2 inch of the plastic insulation from each wire. Then used 2 wire splicing bullets, first one to put the black wire into the small end and used my crimping tool to crimp it down tight, then I put in the 2 red wires into the larger end and crimped them down tight. Tugged on the wires to make sure they were not coming out of the wire splicing bullet. I repeated the same procedure for the 1 white wire and 2 blue wires. I turned on the electrical breaker and the light came on right away! 🙂 The procedure took about 5-10 minutes. The light bulb does not come with any tools or wire splicing bullets. You could use wire nuts instead and not use a crimping tool.
M**T
Immediate bright light
This bulb was installed in to a bathroom exhaust fan. This bulb turns on immediately and brightly lights the bathroom. The original bulb was a CFL that took several minutes to warm up and fully light the bathroom.Removing the ballast was easy. The bulb box includes directions on how to accomplish that task. The whole job of changing the bulb and removing the ballast took about 15 minutes.
L**S
A little difficult to install
It’s nice and bright once you figure out how to install it correctly. You need to watch a YouTube video. There aren’t good instructions on how to install it in the box. You’re going to have to cut some electric wires to you old light fixture and then reconnect them differently. I’m pretty handy but this was still a little confusing, the directions in the box really didn’t help much. I haven’t had it long enough to talk about the light's longevity, hopefully it will last a long time since it was an expensive bulb.
S**D
surprised
Switching my fluorescent bathroom light to LED was easy and no more replacing hard to find bulbs or ballasts! Not to mention not having to replace the whole fan unit that came with the light. I do caution that the install requires some electrical skills so please be safe.
W**R
Lights up my yard, my neighbor’s yard, my next door neighbor’s yard, etc.
Light’s up my backyard great, we never shut it off. It lights up my kitchen through our French doors too.
Trustpilot
1 week ago
1 month ago