


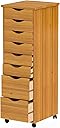


Adeptus Original Quick-2-Connect Roll Cart, Solid Wood, 6+2 Drawer Narrow Drawers Roll Carts, Medium Pine
Product ID: 83097147
🌳Sustainable Pine
🚪Removable Drawers
🛠️6+2 Drawer Config
Buy anything from 5,000+ international stores. One checkout price. No surprise fees. Join 2M+ shoppers on Desertcart.
Desertcart purchases this item on your behalf and handles shipping, customs, and support to Vanuatu.
🛒 Roll into Organization with Style!
The Adeptus Original Quick-2-Connect Roll Cart is a versatile storage solution featuring six 3.25" drawers and two 6.5" drawers, perfect for organizing crafting and art supplies. Made from sustainable pine, this cart is designed to fit in smaller spaces while providing easy access to your essentials.
D**R
Sloppy Milling and Warped Cabinet Side
Upon opening the box we were shocked to see how bowed one of the ADEPTUS 8 Drawer Roll Cart Solid Wood side panels was. So bowed that it was unusable. We attempted to straighten the panel by weighting it down for a few days without improvement. The seller would not send us a replacement side panel but after several days agreed to a return but only gave us five days to do so. We gave up trying to repackage it and decided to again try to straighten the side panel. Using fourteen clamps we clamped it flat and left it outside on a covered deck for a rainy week hoping the moisture would cause the wood fibers to relax. Then we brought it in for another couple of weeks leaving it still clamped. After removing the clamps it was pretty darn flat and we were able to assemble the cart (You can never have too many clamps).We were also disappointed to find one of the large drawer faces had a sizable chip in the top corner, a drawer back was split and the front edge of the top was dinged. No point in asking the seller for help. The pine used for this cart is not prime lumber. There are plenty of knots and occasional splits.Section 4, page 7-9 of the instructions says to use all the back panel nails to secure the back panel. If you do you won’t have any nails for the drawer bottoms. I suggest against using the supplied nails for the back panel. See tip #4.Tip #1 - Record the process of unpacking this cart, otherwise you will never get it back into the box if needed.Tip #2 - When installing the drawer runners you need to give them a good wack with a 16 ounce hammer starting at the end of the runner at the stud farthest away from the other two studs. Be sure you’re working on a solid surface.Tip #3 - The instructions tell you that after assembly to check the cart for squareness. No point in doing this, the factory milling isn’t that accurate and if you use the factory drilled holes (including dowel holes) it will not be perfectly square but it should be square enough. Besides, there is nothing you can do about the squareness of the cabinet.Tip #4 - You may find that you have to sand the edge of the rear panel to get it to fit due to any lack of cabinet squareness. The provided nails for attaching the back are too thick and too long. There is very little space to drive a nail along the back edge of the sides. Chances are some of the nails will protrude out the sides of the panels. Use a smaller nail such as a #18 x 5/8 inch and a very small bit drill pilot holes along the rear panel just far enough to penetrate the panel. This will help hold your nails in place as you hammer. Use a small hammer on the back, 7 ounce or so. Using smaller nails will not diminish the cart’s sturdiness. Use a nail set or small punch to finish driving the nail’s head to avoid dinging up the side panel edges. We added a spacer, a piece of wood 10-7/8 inches long and a quarter inch thick, and inserted it between the bottom of the back panel and the rear caster support for nailing.Tip #5- When assembling the drawers, start with the drawer face face-down on a solid table or workbench and cardboard between the drawer face and work surface. Start by attaching both sides to the drawer face. No need to drill a pilot hole, but do run the screws in straight to avoid splitting the wood. Use the bottom panel groove as a guide for attaching the sides and back.Tip #6 - When attaching the drawer back be aware that top edge is rounded like the top of the drawer sides. Be sure to let the drawer face extend over the edge of the work surface and to place a spacer beneath the back before nailing the bottom panel. The provided nails are okay here but still drill very shallow pilot holes in the bottom panel. All our drawers came out square.Tip #7 - If you find that the bottom drawer face hits the front caster support, or that one drawer face scrapes another drawer face, you’ll need to adjust the positioning of the drawer face and sides, and it’s not that difficult. Just remove the four screws holding the sides to the face. Leave the sides attached to the back. Tap a toothpick into the previous screw holes drilled in the face and break them off flush. Now readjust the position of the sides to the face and reattach using the same screws. Just give some thought as to which way you need to adjust, up or down. I ran into this with two drawers.My husband was interested in a cart as well but first wanted to see what mine was like. Now I think he’d rather just build his own from scratch.Disclaimer - Hubby wrote most of this review since he was mainly responsible for assembly.Bottom line - This can be a decent cart when finished provided you receive unflawed components. Otherwise, yikes!
G**0
Manufacturer will NOT replace defective parts
We ordered several of these attractive, real wood cabinets. Three of them went together almost perfectly without any major issues and are standing proud in various rooms of our home. Being real wood, as one might expect there were some minor cosmetic flaws but they were mostly relegated to the rear of the cabinet or the inside of a drawer and did not matter at all.One unit however did not go together right. The wooden dowels did not enter the wooden sides as far as they did with the other cabinets - possibly the holes were drilled too shallow or the dowels were a bit too long. In any case when we attached the large, top panel to the cabinet and ran the screws in, the dowels pressed with too much force and split the wood right on the top of the unit as shown in the pictures.Since this was a severe cosmetic and structural defect in plain sight we contacted the supplier and asked them to replace the top panel. They asked for pictures and we sent exactly the ones shown in this review. Then they said they required us to ship the entire unit for replacement. This wasn't feasible as the unit had mostly been assembled. They refused to simply replace the broken top panel and merely issued a small fractional refund.I do not believe this is the way to do business. As you can see by the photos this cabinet looks really bad even after we attempted to glue the broken wood back into place. Had the defect been on the back or bottom, it wouldn't have been a big deal. If they make these things then surely they could have simply sent a replacement top and we would have been good.
L**F
Not perfectly set up
Small adjustments were necessary to compensate for slightly mis-drilled holes
E**R
Good value for a set of rolling drawers
When you first open the flat box that you receive you get a momentary feeling of "oh crap" looking at all the pieces, but the reality is it's easy to put together for anyone that has had any woodworking or assembly experience. The parts all seem to line up and I wasn't short on anything. The use of self tapping screws prevents the need to pre-drill holes for the screws and you get a few extra screws and nails Incase you lose a couple. The instructions aren't detailed but as long as you take your time and make sure you use a little common sense (finished surfaces point outward, drawer bottom slots must match all the way around, etc) you should be fine. I assembled mine while watching a movie so I was not going for speed but I had no problem figuring things out. The only issue I had was one of the pocket screws that holds the top piece in place came through the top. It looks like that one pocket was drilled a little too deep. I recommend using a handheld screwdriver with a good size grip on all the pocket screws but it's ok to use your cordless drill to run in all the drawer screws. All in all it looks good and does exactly what I needed. I would buy it again.
Trustpilot
3 days ago
1 month ago