🚀 Upgrade Your Storage Game!
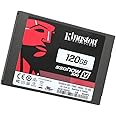
The Kingston Digital 120GB SSDNow V300 is a high-performance solid-state drive designed for reliability and speed. With a compact 2.5-inch form factor and SATA 3.0 interface, it offers 180MB/s read and 133MB/s write speeds, making it an economical choice for those looking to enhance their computing experience.
Manufacturer | Kingston Digital |
Brand | Kingston |
Item Weight | 1.87 ounces |
Product Dimensions | 2.74 x 3.94 x 0.28 inches |
Item model number | SV300S37A/120G |
Batteries | 1 Lithium Ion batteries required. |
Is Discontinued By Manufacturer | No |
Color | Grey |
Number of Items | 1 |
Size | 120GB |
Manufacturer Part Number | SV300S37A/120G |
J**K
Wow! That was amazingly easy
Quick Summary:Everything you need to easily upgrade to SSD laptop drive. Fast, reasonably painless process. Minimally techie. Should be manageable for anyone who can follow directions.Long Review:Background: I was in the process of resurrecting an ancient T60 Thinkpad laptop with a 60GB HD and 4 GB memory scrounged from a dead Z61M. Admittedly, the T60 is a dinosaur, but still usable and I hated to see it go to waste. I installed a fresh copy of Vista 32-bt Business edition and a basic set of apps then let Windows Update gradually grind through all of the updates. With the old non-SATA HD it was usable, and MUCH faster with the memory upgrade from 1GB to 4GB. Still, it was a bit pokey and I decided to see if an SSD HD would help, which it did in spades.I ordered the kit, which comes with everything necessary to migrate the OS and apps from the current HD to the new SSD drive: included is the SSD HD, a simple HD enclosure + USB cable + disc mirroring software. There are no printed directions, but there are user manuals included in PDF format on the disc. What might not be immediately obvious is that the included CD is a boot CD - insert it, reboot, and if the laptop is configured to boot from CD before the HD, it starts without problem. Then, it's a matter of simply installing the SSD HD in the included HD enclosure and using the USB cable to connect it to the laptop. Once the CD loads, it presents a menu of choices that include things like backup, restore, mirror, etc. Select mirror. It should automatically detect the laptop HD and the SSD drive via USB. Follow the prompts, which allow you to select either full automated or manual/customized disc mirroring. I used the manual option so as to set up disc partitions the way I wanted. Click on the OK/start/whatever button and off it goes. I left it for 20 minutes to do some laundry.On this old laptop via a USB 2.0 interface disc mirroring of about 60GB worth of files took about 20 minutes or so. Once this was done, I shut the system down, unplugged the power supply and removed the battery, then swapped out the old HD for the new SSD drive. All in all, this took less than 5 minutes. I rebooted and viola! MUCH faster boot up and faster application start up. I did have to reauthenticate the Windows OS - I'm assuming because it recognized new hardware - but this went without a hitch in under 60 seconds.So... is the system a screamer? You're joking, right? No. It's still a dinosaur. But a very much more usable dinosaur. And the point is not this old laptop but the KD SSD drive, which works amazingly well so far. I've been running it for the past couple days and am very happy with basic web browsing, web mailing, streaming videos, and basic office app use. It's good. What I'm most impressed with was the ease with which the process occurred. A simple set of paper directions might have been helpful, but it was easy enough to figure out.How does the KD 120GB SSDNow drive stack up against other SSD drives? Haven't a clue. Google it. Personally, I needed ease of use and reliability over wringing out the last fraction of a percent performance. The Kingston kit nails ease of use in my mind. Whether the drive holds up over the long haul remains to be seen. I'll try to check back in with an update once I get a few more miles on the tires...So, overall, I'm very happy with the kit and would unhesitatingly purchase it again.Oh, and just to be clear - I'm not a roboreviewer and the Kingston didn't send me a complementary kit to play with and review - I'm just a satisfied customer.
D**N
Yes! Absolutely yes! But read these caveats first.
I was skeptical about SSDs until I finally got this one installed and , man, now am I believer. If you have the skills to install one of these, you should order one right now! Here's why: I have a old Lenovo Windows 7, i3 desktop that took forever to get going from a restart or cold boot. The hard drive would grind away for 20 to 30 minutes on every mandatory "update" restart. All resources consumed. The keyboard would barely work. I just had to walk away and come back a half hour later. It was maddening, especially with the endless updates Microsoft sends out (You MUST reboot....) Sound familiar? . So imagine my surprise (and delight) when I booted for the first time to this SSD and Windows logon screen appeared in just 10 seconds! 10 SECONDS!!!! I could barely believe it. I log on and my desktop is up and running in another 5 seconds. Un-fricking-believable! Of course all apps also launch almost instantly now too (well, except for browsers, which are faster but still pokey thanks to all the calls on nearly every web page). If you want to breathe new life into your PC, this, without question, provides the best bang for the buck. Mine is now much MUCH faster than it was when new.Almost anyone with even moderate skills can install a SSD in a desktop PC but here a few tips that will smooth the process.1. First, make sure your equipment is up to the task. That means SATA II or III system, with open sockets to plug this thing into (Look where your current hard drive is plugged into the motherboard or controller. There should be empty adjacent sockets). And an extra power lead from the power supply. Most desktops of the last 3 or 4 years are probably OK but open up the case and check before you order. Also make sure you understand how to get into the BIOS settings, since you will have fiddle with the boot order during the install. (In my case, press F1 during boot)2. Save yourself a lot of time and just buy an SSD with enough capacity to cover whatever content is on your drive. I cannot stress this enough. That makes it super simple to clone the existing hard drive to the SSD with the included Arconis software and you will be up and running in a few minutes. I tried to go cheap and get a smaller drive and spent hours moving music, movies, pictures, etc onto an external hard drive. And uninstalling programs. And even then I struggled to get content down to the level needed to clone. Be aware that although the capacity of this drive is 240G, you will need to get your hard drive content down to about 220 or less to clone it. And don't forget to include all the extra partitions, etc. That became a major pain for me. Save yourself the trouble. Just buy the bigger capacity SSD. The time and aggravation it saves you is more than worth it.3. If you insist on going cheap and downsizing, begin by downloading a program called WinDirStat, which is free at downdload.com and other sites. It will show you how much content is in each directory. That makes it easier to determine where huge amounts or content are hiding. Then you can easily reduce the content to the level you need. I had about given up on reducing content to the necessary levels until WinDirStat discovered a special directory the manufacturer used to store a complete backup of the original Windows 7 install and all included software and drivers. 45 gigs! Once I removed that, I was good to go.4. Once you install the SSD and get it up and running, go to system settings and force it run a new Windows Experience Index. This apparently makes a few technical changes (Trim) that makes the SSD much faster. The cloning software also has this option but you can do in Windows and also immediately see the improvement in the speed of your hard drive. I went from the low 5s before to 7.6 after SSD installed (7.9 is the max score possible)5. The mounting bracket that comes with this SSD kit can only be securely mounted if your drive cage allows drives to be mounted to the SIDE rails. Screws must come in from each side. My case had some odd BOTTOM mount setup (but thankfully had an open bay for second drive) and no holes lined up on the mounting bracked. Be prepared to improvise if the hard drive cage does not have correct configuration. Not a big deal. This thing is very light and could probably just hang loose inside the case. But if you want a proper install, this is something to be aware of.
Trustpilot
3 weeks ago
1 week ago