✨ Close the gap, open the style! 🔥
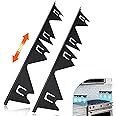
The KOZHOM Slide-in Range Rear Filler Kit is a 30" long, black aluminum triangular gap cover designed to fit universal slide-in ranges like Whirlpool and GE. It prevents debris accumulation behind your stove, offers a sleek built-in appearance, and installs easily without appliance disassembly. Engineered for durability with heat and corrosion resistance, it includes mounting hardware and professional support for a seamless upgrade to your kitchen.
| Manufacturer | KOZHOM |
| Part Number | KZ-RG01 |
| Item Weight | 1.35 pounds |
| Package Dimensions | 30.25 x 3.25 x 2 inches |
| Item model number | KZ-RG01 |
| Style | Black Finish |
| Batteries Required? | No |
L**.
Works well
Like it! A little thing, but saves me money. It was easy to install and now I have no gap between wall and range
S**N
Looks great!
Doesn’t fit the gap exactly as needed but somehow lays flat and looks great!
T**.
Fits perfect!
I gave 4 instead of 5 only because you really cannot use the adhesive option, the bar is too heavy. We tried due to our granite coming past the countertop and not being able to screw into our cabinetry. We basically had to rig it by putting a screw under the bracket into the wall. It works and covers the gap so we are happy with it!! I highly recommend. Thank you!
C**P
Back Splash Filler workaround.
The Slide In Range filler worked well for us however the location where it is installed was not covered in the instructions. The granite counter and backsplash made it nearly impossible to install the filler using the enclosed clips or brackets. The work around was formulated by my girlfriend. She suggested that we place a short length of 5/8 board on the back wall and just lay the edge of the filler on the board. I temporarily placed the board and filler together and it seemed that her suggestion was going to work. Having measured a number of times, I sunk 1 screw through the board (middle) into a stud and then I was able to rotate the board establishing level.Using 2 of the 6 screws with the kit, I located 1 on each end of the board about 1/8” away from the wall. To finish and secure the filler I used 5 small dabs of Gorilla stick on the wall side, installed the filler and pressed the filler into the wall. As you can see, the filler fits perfectly and although initially I had doubts, we made it work.
R**A
Fill the void
Like the design perfect fit for what is was intended to do
R**N
Great once installed. Tricky to install.
Install was trickier than I expected. I am an experienced DIYer.
K**R
Love it
Took a bit to get it leveled and figured out and turned in the right direction. Once that problem was solved. It's perfect and exactly what I was wanting. The other reviews mentioned lack of screws, brackets, and instructions, but of mine had all of these
A**O
Wasn’t clean and install
It saves so much work by keeping food residue on it and easy to clean and install
Trustpilot
3 days ago
1 month ago