

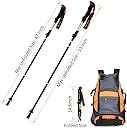


iTovin Collapsible Trekking Poles Adjustable 47" to 53" Long, Folded to 14.5”, Weighs 0.65 lb Each
Product ID: 75806879
Full description not available
J**S
Good quality and value
I purchased this because I suffer from a vestibular issue that doctors have yet to figure out and when I got to craft shows and such where there's a lot of walking and people, I need something for stability. I'm 58 and too young for a walker and I borrowed a cane from my mom and I feel really old with that...One of my daughters suggested a walking stick.I passed up some carved wooden hiking sticks at shows that were way too tall.I saw this and thought it would work for walking around the block and at craft shows. The price was right too.It's very sturdy. I had a bit of trouble putting it together because the instructions are not clear. I saw where you can view a YouTube video, so I did and got it together in minutes where it took me close to an hour before.I wish it could be adjusted to be shorter as a cane but then it would not be a hiking stick I guess.I recommend this stick for hikes and stability walks.
A**R
Great trekking poles
I purchased these poles in anticipation of a hike up two Adirondack high peaks. I have climbed several peaks previously and had never used trekking poles before. After using these I realize that was a mistake. I packed these poles to the top of the first peak, they were lightweight, compact, and fit easily within my backpack when inside their individual packages. The individual packs allow for you to secure these poles on your backpack externally with bungees or straps too, I don't think it would be easy to secure them on a backpack without the individual packages. I pulled them out at the first peak to use for the descent, I loaned one to my hiking partner and she now says that she will be purchasing one before our next hike. They assembled easily on the peak but I must admit that when I first set them up at home they were a little difficult to figure out. There is a picture for assembly on the Amazon site and there is also a good youtube video demonstrating assembly. After you assemble them once it is a cinch but I would not wait and attempt the first assembly on the peak or in the parking lot before a hike. I am a large person at 6'2" and 260 lbs and I did not trust the poles at first, they did bend under stress, and I probably wouldn't put all of my weight on them but they are reasonably sturdy for lightweight poles. I used them to descend the first peak in an extended position then at the bottom I used them to ascend the second peak in the shortest configuration, they were very easy to adjust on the trail. These poles are ideal for a taller person and they may be too long for anyone under maybe 5'7" (it's personal preference though, so maybe not). The rubber feet were very grippy on the rocks and I found really good purchase on areas where I didn't think I would. I did receive the two free tips but the poles came with rubber feet attached and not the metal tips that were advertised. These things are a joint savers on the descent and they really help conserve energy and reduce shock from jumping down from rock to rock on steep trails. Highly recommend these trekking poles and I will not hike without poles again.Update... While cleaning the poles after my first excursion I noticed that the metal tips are installed underneath the plastic tips. They look sharp and hard but I haven't tested them yet. So these actually came with two sets of rubber feet, and as I said earlier, the rubber feet provided great grip on rock.
S**C
Good poles, but beware!
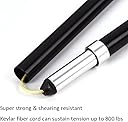
These poles are lightweight and very strong. I have no complaints about them other than the first pair I ordered included one that was missing the spring loaded lock button for the upper section. I emailed iTovin about that, and never received a response back. I bought another pair to replace the one non-functioning pole. I would have bought only one, but as singles the poles wouldn't ship to where I live in Mexico, but a pair would, which seems dubious to me since both were from the same Seller.
G**G
Great product, but the Instructions Beg for a Technical Writer to Edit Them
These poles seem sturdy enough. The instructions leave a lot to be desired, though. If you speak, read, and write in English, good luck understanding what the instructions try to say. It does take a bit of internal translating and imagination to figure it out. I have included my own numbered assembly instructions below. I hope that will help.I bought these poles in November 2016 after shopping around quite a bit. Since I still hike without poles, I was looking for poles that would be strong and light, but which I could shorten enough to fit inside my backpack. I didn’t want to carry them in my hands when I’m not actually using them. I plan to use these only if one of my knees starts to bother me as I walk or hike. During my shopping, I found fairly expensive models that didn’t have as good a design as these and didn’t fit my needs for disassembled length.The poles are made mostly of aluminum, so they’re light enough and strong enough for me. Each section on the poles also has a silver-colored, blunt reinforcement sleeve to add strength and help prevent flaring or sticking that a simple section-inside-section joint might cause.Since these fit the sections on top of each other, using special guide tips, instead of relying on friction on telescoping sections, I felt I could trust these poles more than other poles on the market. The top section does use the friction type clamp over a telescoping section inside it, but that only leaves one spot where each pole might collapse a bit as I lean on it. That clamp has a proper adjusting finger-nut, as they usually do, to control the clamp tightness to secure the section inside it.The poles ship already folded down, each in its included carrying bag. After you assemble and disassemble the poles once or twice, it should be easy. But, the first time can be difficult if you don’t know what you are doing and try to follow the included instructions.These are my instructions on how to assemble each pole:1. Remove the pole from its bag and undo the hook-and-loop strap (Velcro?) that is holding the sections together.2. With one hand, hold the handle of the pole and let the sections dangle down to the floor but not letting the tip support the weight of the pole’s sections (see my pictures).For simplicity, let’s number each section from the floor up. Section 1 has the tip; section 2 is above section 1. Section 3 is inside section 4, which is inside the handle. Also, sections 3 and 4 are marked on the lower end with Down Stretch.3. If needed as you hold the pole up, with your free hand, guide section 2 onto the top of section 1.Section 2 might align and drop directly onto section 1 on its own.You should see the bare internal cord between the two bottom sections and the handle assembly.4. Find the marks that say Down Stretch on the top two sections in the handle assembly (see my pictures).5. Open the orange lever of the outside locking mechanism on the handle.6. Extend section 4 down from the handle until you see the centimeter (cm) markings and continue until it is between 125 and 130 cm so you have room to grip the section.7. Grip section 4 with one hand and with your other hand, pull down section 3 and slide section 3 onto section 2.It should slide down easily and fit over section 2 to make the pole look like it is ready to use. If you drop your hand down and let the pole rest on the floor, though, you will notice that as you continue to drop the handle, section 3 will telescope freely into section 4, which lets you know that the pole is not ready to support any weight.8. Make sure all sections are fully in place against and inside each other, and then tighten your grip on each of the two top sections (3 and 4) and continue to pull them apart and against the spring resistance until the locking peg pops out of the top of section 3 and locks in place (see my pictures).9. With the orange locking lever still open on the handle, slide section 4 up or down to find the height you need for your trek and then tighten down the locking lever.Do not exceed 135 cm on section 4, as that can evidently hurt the internal mechanism.Section 4 has a STOP marking to remind you not to pull it out any further.To disassemble each pole, reverse the steps. When you are ready to push the locking peg back into section 3 to telescope it back into section 4, pull the two sections apart just enough so the peg won’t be rubbing against the sleeve on section 4 and making it harder for you to press it in while you slide it up into and under the sleeve on section 4.
Trustpilot
1 month ago
2 months ago