
💡 Upgrade your laptop storage game—because one drive is never enough!
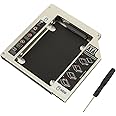
The Witamy SATA 2nd Optical Bay HDD Caddy transforms your laptop’s optical drive bay into a high-speed secondary storage slot. Compatible with 2.5-inch SATA HDDs and SSDs, it fits 9.5mm bays on most major laptop brands. This plug-and-play solution requires no extra cables or drivers, enabling dual boot and expanded data storage effortlessly, all backed by a 1-year replacement warranty.
| Hard Disk Form Factor | 2.5 Inches |
| Max Number of Supported Devices | 1 |
| Manufacturer | Witamy |
| Form Factor | 2.5-inch |
| Item Height | 12 Centimeters |
| Item Width | 12 Centimeters |
| Product Dimensions | 12 x 12 x 12 cm; 80 g |
| Hard Disk Description | Mechanical Hard Disk |
| Hard Drive Interface | ATA-4 |
| Are Batteries Included | No |
| Item Weight | 80 g |
A**K
Long term review
It does one thing and it does it perfectly.
A**U
Trouble installing. Perform very good
Recieve well packed, delivered early.Condition: very thin and fragile so handle with care.. Dont apply much pressure while installing and handling. It had improper latch screw holes..screws were not fitting in them so i had to use tape on the latch.also it was not an easy fit into the bay.but a little push did the job.Caddy has 2 way switch.Performance:I have Dell Inspiron 15 5559.Unlike 1st impression it performed very well..i placed ssd in internal bay and my old HDD inside caddy. When booted from HDD(In caddy) cpu and HDD was showing constant 100 percent utilisation. I tried the 2 way switch and didnt made a difference.also copying speed was droping drastically(starting at 100mbps and dropping to 0kbps) and shut down speed was very low too. Then i thought the caddy was incompatiable. But after removing OS from HDD and booting from SSD(fresh OS installation.Not clone) everything went super fine..boots in 20 seconds, cpu, HDD utilisation, Shut down speed were normal.Copying speed is good.and all applications installed in HDD are running flawlessly as HDD in optic bay is using Sata3 speed. I had a doubt wether my optic bay was limited to sata 2 Speed.now both the drives runs @ sata3 speed.
V**M
Good Quality | Perfect Size
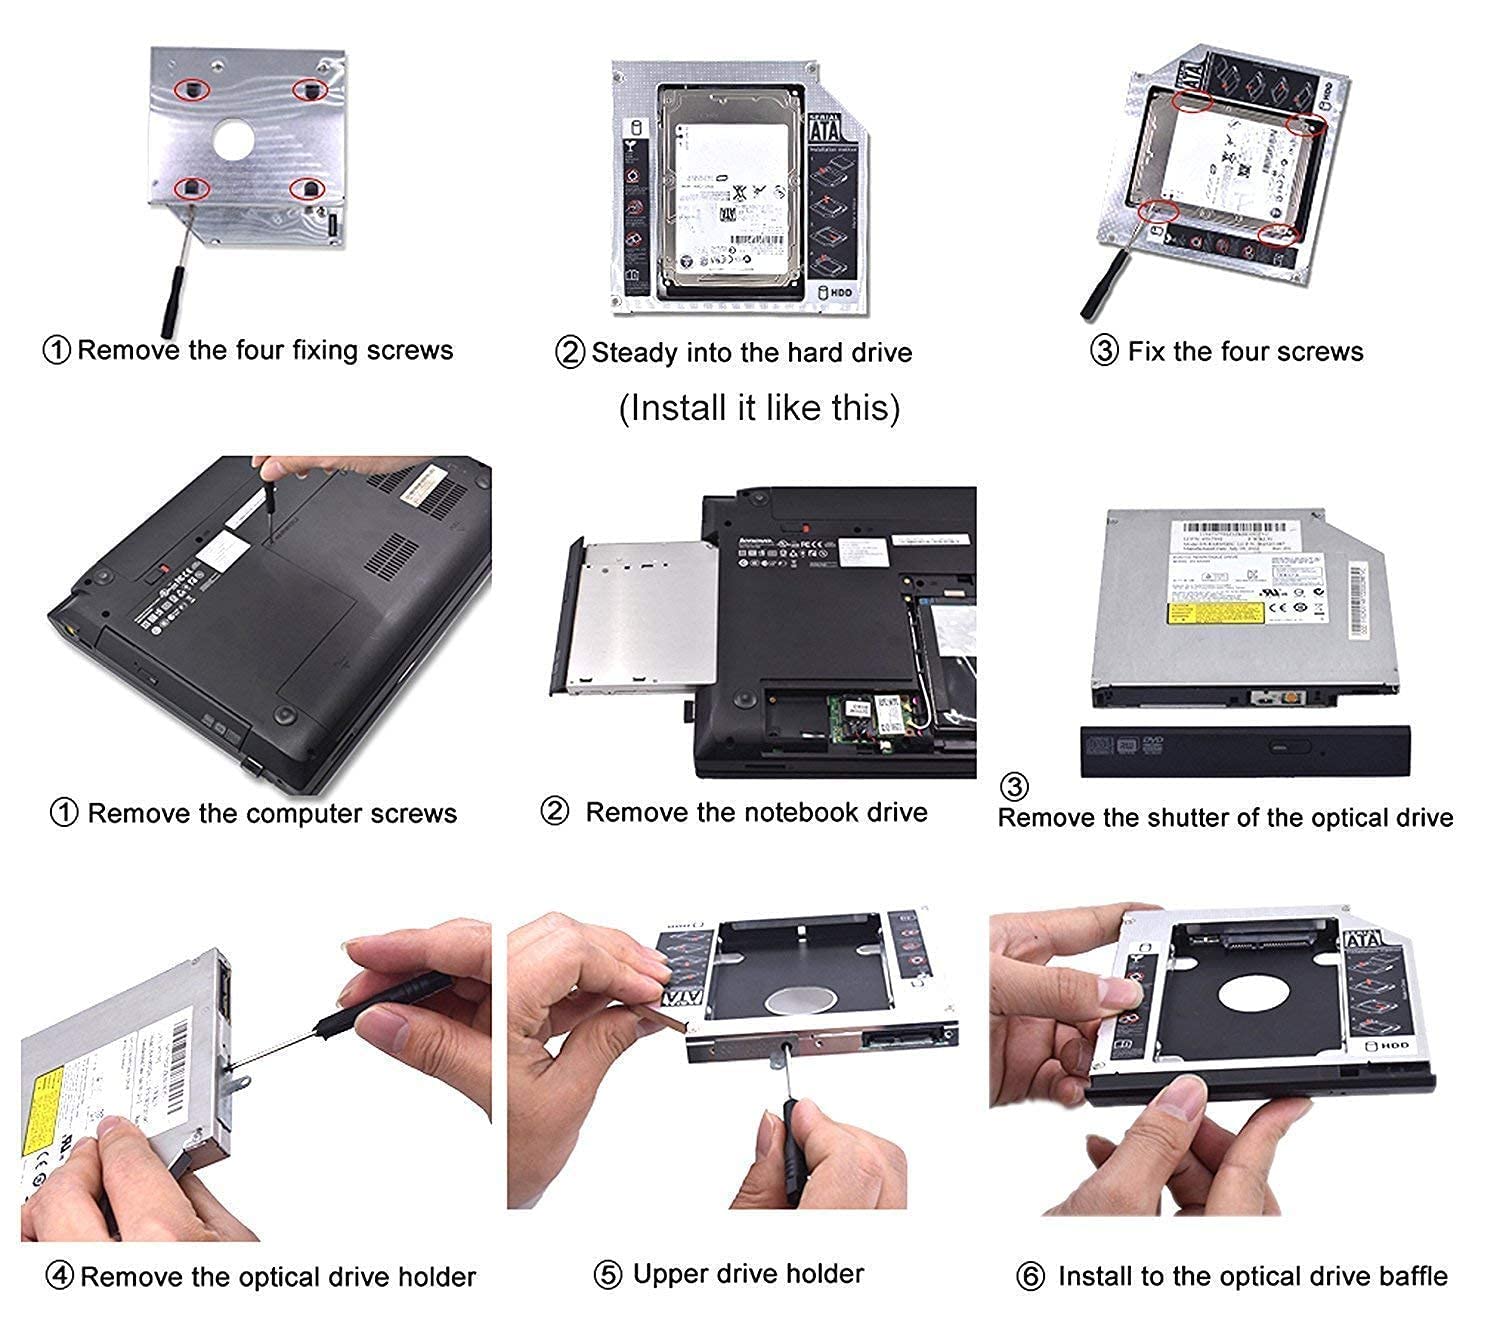
I bought this for my Toshiba Satellite C50A-i2012 laptop at Rs.429 (incl shipping) from Punjab Online to my place Kollam, Kerala. It was delivered through Delhivery. I've been thinking of upgrading my laptop with an SSD for a while now. Recently I bought the Sandisk 120GB SSDPlus SSD for Rs.2.3K from PrimeABGB.PROS---------1. I bought the 9.5 mm version and fit perfectly inside my laptop.2. The product is as per the description and images shown and is of good quality.3. It's made of Aluminium and had a protective plastic coating on one side when I opened it. You need to remove it before installing.4. Comes with a small Philips head screw driver. It is compatible with all the screws.CONS---------1. The instructions were ambiguous and labelled in the wrong orientation. They say about a "caddy latch" but nothing like that was found on the caddy itself.INSTALLATION--------------------1. Remove the protective plastic covering.2. Use the Philips screw driver to retract the four screws that fastens the SSD to the bay. Two screws are headed and two are headless (set screws).3. Insert the SSD into place and slide it in.4. Use the screw driver to fasten the four screws that secure the SSD in place.5. Remove the ODD from your laptop by removing one screw (usually) from the back of your laptop.6. Detach the "L clamp" from the ODD drive and fasten it onto the caddy. Caddy has two holes (one for screw and one for pin) on the exact location for that.7. Carefully push in the caddy into the laptop's ODD tray.INSTALLING OS----------------------If you're using this setup to load an operating system, then these are the steps to follow for Windows 7. Note that most of the laptops that are 2 or three years old, or low performance ones come with SATA 2 ports. SATA 2 has a max speed of 3Gbps (375 MBps). But today's SSDs are SATA 3 capable with speeds up to 6Gbps (750 MBps). So you need to install the SSD onto the fastest port available. You can use "Piriform Speccy" to determine which ports you have. If both SATA ports of your laptop are SATA 2, then you can install it anywhere. The caddy's output connector is a SATA + Slimline power connector. So this might confuse you as it is different from the SSD's or HDD's connector. Slimline connector is a reduced version of normal SATA power connector. So it doesn't affect the speed.1. When you want to install OS to a 2.5" SSD or a new HDD, you presumably having an OS already installed on your existing HDD/SSD. So if you want to keep that installation, you can easily "migrate" (copy) the entire existing installation to the new SSD/HDD. Use the "Migrate OS to SSD" option found in the "MiniTool Partition Wizard" program to copy your installation. For this to work, you need to "delete" any partition on your destination drive and make it "unallocated". You may need to restart the computer to complete the installation as per the prompt.2. Choose the option B if you only want to move your C drive where OS resides.3. Once the copying is complete, restart the computer and enter into the BIOS settings. There change the boot priority to the new drive first.4. Boot to any of the drive. In my case, the system booted from my existing HDD.5. Use the Partition Wizard software to delete the installation on the source drive and restart the PC to complete it.6. Now you have moved your complete OS to the new drive. If you see the "System Reserved" in My Computer, just remove the drive letter assigned for it. As you have deleted the C partition the new drive will get the C letter assigned to it automatically. So no need to worry about that.7. Create a new volume on the unallocated space on source drive and use it for anything else.If you found any of these information as useful, please consider upvoting my review. It'll help me get better reviewer ranking. If you have any improvement suggestions or any product related queries, please post them as comments. As always, I've attached high resolution images of the product. Thanks for reading. Have a good day :)
S**I
Not Worth Buying
I expected it to be atleast an aluminium caddy but it is a plastic. It doesn’t worth that much money. I also had problem with installing support screw standoff from the original caddy. They didn’t put any screw threads. But once it is secured inside the laptop, its okay to use. So not happy about the product.
J**D
Worked perfectly with 1TB Toshiba hard disk in HPElite Book
I bought this for my HP Elite Book 8460P laptop. Wanted to upgrade my laptop with new 1TB Toshiba Hard Disk .PROS---------1. I bought the 12.7 mm version and fit perfectly in the above mentioned model of laptop.2. The product is as per the description, aluminum body (good for dissipating heat) and as shown in image.3. Philips head screw driver and four screws are included.CONS---------1. The instructions were not detailed nor precise.2. The "Caddy latch" is placed inside (front left) and should have been convenient if it was placed externally.3. There is no light indication that the hard disk is running.Tip:When i initially installed my new 1TB Toshiba Hard Disk (5v 1Amp) it was not detected and the icon for the new hard disk did not appear.It required formatting. But since the icon was not visible in my computer, Open "Disk Management", here the new volume will be visible and after formatting to the required format (preferably NTFS) the new volume will be visible in "my Computer" or "This PC".I kept the caddy latch in the normal position.I copied Data from my external HDD (USB 2) to this new caddy drive and achieved speed of more than 32Mbps.
A**A
Does the task
At first you have to sure about your DVD writer's form factor, whether it's 9.8 or 12.8 mm; you can do that by measuring it's width.Now, after receiving the product, it was well packaged and delivered as promised. No surprises, it's Amazon, full marks.Now the caddy, it is well built and goes in swiftly in DVD writer's socket. While going in you can't expect the same fluency like DVD writer because it's aftermarket product.It attches your HDD with no problems whatsoever. Read/ writer speeds are also decent. Overall good to go.
R**P
Great for storage expansion !!
It does what it says without any problem. Using this with my WD 1TB HDD as a secondry storage for 3.5 years at the time of writing this review. Had ZERO ploblems till now.• Easy to install• 1 Screwdriver provided inside• 4 Screws provided to fasten the disk• Can be used with HDD or SSDAn additional tip : Prefer fast SSD in main SATA slot and use cheaper SSD or slower HDD with the caddy as secondary storage.
Trustpilot
1 month ago
2 days ago