🏡 Build magic, light up love — your mini masterpiece awaits!
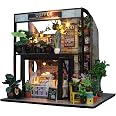
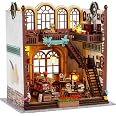
The Flever Dollhouse Miniature DIY Kit offers a detailed, pre-cut MDF wood structure with fabric and printed paper decorations, plexiglass dust cover, and integrated LED lights with music movement. Sized at roughly 8x8x7 inches and weighing 1.63 pounds, this Romantic European style kit is designed for ages 14+, providing a relaxing, social, and rewarding hands-on crafting experience that doubles as charming home decor or a unique gift.


| Item Dimensions L x W x H | 7.87"L x 7.75"W x 7.08"H |
| Item Weight | 1.63 Pounds |
| Size | 7.87x7.75x7.08 inche |
| Style Name | Romantic European |
| Theme | Movie |
| Color | Multicolour |
| Material Type | Wood |
B**E
A little treasure
Saw one at a nursery plant shop. They are fantastic. My Amazon one looks exactly same. Not opening it to check it out as it is a Christmas gift for a friend
T**S
Diy
Love this, and would definitely do another
L**U
Correcting previous review
Correcting earlier review: instructions were included! I wish there were descriptions but I'm glad that paper instructions were included in general. Seeing only the QR code in the beginning caused me to panic.
A**O
Will order again
Great product
A**N
Nice DIY kit
Easy to do... fun and relaxing. The quality of the kit was nice, lots of goodies to make. Heavy on plants and boxes... 2 of my favorites. For some reason I put this kit off for a long time because I didn't think it would be all that fun to do.... and now that I'm having to search for new ones ...I finally got around to doing it ... it was a pleasant surprise.
D**H
Coffee House
This was so fun to put together. Directions were sometimes hard to follow but this was not my first book nook to put together so I was able to figure it out.
B**N
Instructions end before build is complete
The first issue I have with this kit is that there are a lot of skipped steps in the instruction manual. I made a couple of errors along the way because I couldn't tell what I was supposed to do or in which order I was supposed to do it. I was able to fix these errors. I build a lot of these kits. This is part of the process in many of them, and I wasn't really upset about it until page 17.The assembly instructions end on page 17, and the assembly isn't complete. So I proceeded to try to assemble as best as I could and quickly realized that things need to go into specific places for everything to fit. So I tried to disassemble a couple of parts to do it correctly, but we were at a point in the build where doing so was impossible without breaking it.So I broke it. I blame the manufacturer for this. It's currently sitting on my hobby bench as I try to brainstorm ways to fix it. I've been down this path before. I have a feeling it's going to end up in the trash.I spent two weeks on this build. The quality of the materials is superb. It's all a waste of time, though, if you don't have a competent technical writer on your staff to write a workable instruction manual.That said, if you think you can assemble this without instructions, the one thing you'll need is glue. I used three types of glue: Wood glue, super glue, and latex glue.
B**K
Love the roombox, Directions are sorely lacking
These kits are not for the feint of heart, they are incredibly challenging.If you manage to get through it and assemble it to completion then they are beautiful and worth the trouble. They are a very small scale, not sure but I think quarter inch scale. I'm used to 1" to the foot so that made it somewhat challenging but still doable.The biggest issue and it is an issue with all the kits I've done so far is their lack of directions. Most kits when you do them have schematics of the parts. This one you have to convert the parts sizes as they aren't one to one. They are half the size on the sheet so a lot of time wasted measuring to see if it's the right part or not.They do NOT have a layout of the printed sheets on the schematic which sometimes made finding the correct printed part a challenge. They have them all overlapping in one tiny picture so all you see is the edge of all but 1 sheet.You'll need a magnifying glass and a lot of light to read t he book, the printing is very tiny and they skip a LOT of the directions. Skip right past them. Most of what they do put in there is just pictures but no directions about placement and since they skip over so much of the assembly it makes trying to figure out how to assemble everything difficult.The lack of thorough assembly directions makes doing these an extreme challenge and the only way I've gotten through 3 of them was finding videos of people putting them together but you have to keep stopping the video and even those aren't as thorough as needed.These are really nice once together so I do keep doing them anyway, but I've been doing miniatures for 40 years. I think if I had no experience I probably would have said forget it and not done any more of them. I like them because they are complete and they look nice when finally done. My husband usually redoes the wiring so that they can be plugged in instead of battery operated but even with over 60 years of experience in electronics the tiny wiring is hard to work with. :)To the company, these would be a lot easier if the instructions were complete and detailed enough pictures to figure out the placement of stuff. Don't just skip over parts of the assembly. It's like pages of the booklet are missing.Sometimes the stuff that's in the pictures aren't the same color or print as you actually get with the kit and that just makes it worse. So please work on the instructions to make these easier to assemble. I would rather have more layout sheets with the correct sizes to lay things out and pay a few dollars more for the extra paper than to have you downsize everything and have to try to measure it all. That's such a waste of time.
Trustpilot
2 weeks ago
1 month ago