🖤 Block the light, own the night—privacy and style in one sleek film!
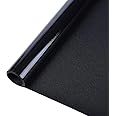
The rabbitgoo Blackout Window Film is a 75x200 cm premium PVC vinyl designed to block 100% of light and UV rays, providing superior privacy and heat insulation. Its adhesive-free, reusable design ensures easy, residue-free installation and removal, making it perfect for renters and versatile applications including windows, glass doors, and aquariums. This film also doubles as a writable surface, adding a creative edge to functional blackout protection.


| Product Dimensions | 200 x 75 x 0.01 cm; 400 g |
| Ultraviolet light protection | true |
| Anti-Tick Material | PVC |
| Care instructions | Use on a smooth surface. |
| Is assembly required | No |
| Number of pieces | 1 |
| Batteries required | No |
| Item weight | 400 Grams |
E**A
Makes a huge difference!
I recently applied the rabbitgoo Frosted Privacy Window Film to my bathroom window, and it has made a noticeable difference. The frosted design provides excellent privacy without sacrificing natural light, creating a bright yet secluded space. Installation was straightforward; I used a spray bottle to dampen the glass and applied the film smoothly, ensuring there were no bubbles. The film adheres well and has remained securely in place. It’s also easy to remove and reposition if needed. Overall, this film offers a cost-effective solution for enhancing privacy in any room.
R**S
It does what I needed, reflects the heat, visibility/privacy not an issue
Rabbitgoo 60 x 200 cm “One Way” window film. It does what I needed. It was OK to put up, if one is careful, otherwise it might be a nightmare.The privacy only works for those inside if the peeper outside has brighter light than in the room and then they only see a reflection, this is usual during the day, but the reverse at night! So draw the blinds at night.It reduces radiant heat input very significantly. This is why I bought it, and it works much better than the so-called e-coating on the glass (I paid for it, but is there any? Is this a common double-glazing con?) However, it is not as good as a proper dichroic film.I needed to reduce the insolation through our glass doors, and while I bought these rolls a year ago I only applied them last week. It has made a big difference! Before film, inside floor temperature in the sun measured at 36°C, compared with the shaded part at 24°C. Later, when it had all cooled down again, I installed the film. Next day at the same time the bright part of the floor was 28°C and the shaded part 25°C. The step outside was 45°C.I've also added it to some south facing bedroom windows. My pic shows a very thin line of unfiltered daylight down the trimmed edge of the film, in focus but the garden view is of course out of focus.How it might be done if you are as OCD as me.1. Clean the glass and the surrounds very carefully, removing all contaminants, especially traces of Windowlene or Flash, etc.2. Check the scalpel/craft knife is very sharp.3. Fill a clean spray bottle with water and a drop of Fairy liquid to work as a wetting agent. Use this solution and a clean old soft J-cloth for a final clean of the surface.4. Move the Clear Film sticky tab to the side at the top, this will make peeling it off later much easier.5. Stick some generous tabs of Sellotape on the film across the top, one each corner and one (or two) in the middle depending on how wide. This is so the film can be given a first position hanging in place from the frame by the sellotape; now it is easy to adjust and trim as necessary to make sure it covers all the glass with a small margin of about a centimetre at the sides, and maybe a bit more top and bottom.6. Spray the glass generously, so it’s running with water.7. Carefully begin peeling down the clear film from the sticky back of the silver film, keeping it all away from the glass. An assistant can help here, because now is also a good time to spray the back of the silver film, but it is possible for one person with a narrower glass.8. About halfway through peeling, check the centre of the silver film is hanging true, and now is a good time to begin helping it to stick, but only with a light brush down the wetted centre, simply to control it.9. Remove the rest of the clear film, paying attention to the centre and hanging true, and covering all the glass.10. If it is in the correct position, only now begin to gently work the water out to the edges, radially from the centre, initially using another soft cloth. Use a squeegee only when the film is secure and wrinkle free, and always work towards the edges from the centre.11. Once the film is stable, sellotape removed, most of the water excluded, and the edges are well worked into the corners and glazing seal, then trim it with the craft knife. Try and do it with a single firm pass along each edge (without damaging the rubber seal), ideally use a ruler to keep the film flat and guide the knife tip. Pay careful attention to the corners which are guaranteed to try and mess things up.12. Finish off with the soft cloth, paying attention to the edges and seals.13. Do not overwork the film; this can introduce wrinkles because it is more likely to stretch after a good soak.14. Allow it to dry overnight, maybe a couple of days even, before succumbing to the temptation to tidy it up a bit more.
A**N
Good quality! Recommend
Why did you choose this product over others?:I got this for my front door. It’s exactly as advertised. If there’s more light inside it will be more noticeable inside. However, during the day with light on, you need to be very close to see inside. I would have mounted on large window but it would stop the rays to heat inside. It seems to retain the heat inside as well. It’s useful if you’re looking to keep the heat away or retain it inside and want privacy. To mount it is a bit tricky if windows aren’t properly cleaned because any grease left will be visible afterwards. So it’s very important to follow all the instructions provided, step by step, but note below. I degreased first the window, then sprayed plenty of water. Removed the cover foil and applied the film on the window. Please note that I don’t recommend using a card as recommended in the instructions! It will leave permanent marks on the film. I used a squeegee and was easy to stick it. Make sure you apply plenty water before using the squeegee because it will make wrinkles otherwise. I had to throw away 2 films because of insufficient water. Third one was perfect though. If you need to go again in some spots, use again plenty water and there will be no wrinkles.Quality:Excellent quality, as advertised.Effect:Mirror effect as advertised.Heat retention:It seems to retain the heat and reflect the heat from sunlight.Looks great:It looks as expected.
E**E
Great item for privacy
Excellent quality item. Easy to cut down to size too. It does block a lot more light than I expected it too but I can cope with that for more privacy. It’s easier to put up if you use a lot of water, I had a spray bottle and kept the area extremely wet which actually made it easier to get rid of any bubbles at the end. I’d say it is great value for money.NB I purchased the silver film. The window on the right of the photo has the film on whereas the window on the left hasn’t
J**N
Good film, quite dark.
Thick enough that it's not too difficult to apply. Applying is the hard bit. Watch 'enough' youtube to see how others do it?Packaging poor. None from manufacturer (just poly film). Amazon put it in a paper bag - My 750mm wide was bent when it arrived!I find this film quite dark - compared to another in the house.
J**K
Excellent for privacy at home
Excellent quality and value. It does make the room darker but you cant see inwards at all even with the light on in some rooms. It's easy enough to apply, lots of water is the trick.
E**E
Functional, but difficult to install
I gave this product 3* because it does make a difference to the brightness of the light coming through the window.2* deducted because I've literally gone through 3 rolls of this stuff, carefully applying the vinyl with plenty of water on both the film and the window with a squeegee - and it still results in creases that you just can't remove. The result looks "OK" but nothing like the smooth look on the pictures.If you're looking for something that's easy to use, look elsewhere.
Trustpilot
1 day ago
3 days ago