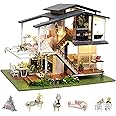
🌟 Build Your Dream Garden, One Piece at a Time!
The FleverDollhouse Miniature DIY House Kit offers a delightful crafting experience for ages 14 and up. With a finished size of 12.6" x 9.6" x 10" and weighing 4.5 pounds, this kit includes pre-cut wooden pieces, fabric decorations, LED lights, and a toolkit for assembly. Perfect for art lovers and DIY enthusiasts, it promises hours of engaging fun and a stunning final product that captures the essence of Monet's garden.
| Item Dimensions L x W x H | 32L x 24.1W x 25.4H centimeters |
| Item Weight | 1.63 kg |
| Size | 12.6x9.5x10 inch |
| Style Name | Modern |
| Theme | Monet Garden |
| Color | Monet Garden |
| Material Type | Wood Paper Plastic Metal |
L**C
Super cute, challenging, fun kit!
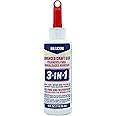
This is a review for the New Zealand Queenstown miniature kit. I have made a couple of small miniature kits like this one but this is the largest one so far. It took about 45 hours off and on over 3 weeks to complete. Very relaxing and so much satisfaction when complete. Each little piece was fun to make and to my surprise look very real. Very ingenious use of tiny tidbits to make cute little household items. I enjoyed making making this so much that I was actually a little sad when it was finished.THINGS I WISH I HAD KNOWN BEFORE VENTURING INTO THESE KITS...VIDEOS:- Find the making of videos on YouTube that show pretty much step by step how to build the kit. Although the instructions are pretty good and better than most kits they sometimes are not 100% clear in some places. The videos help get you thru some of the more challenging pieces. I watched about 3 of them instead of the normal crud on TV before I started the build so I knew what I was getting into prior to starting. It really helped in the long run. I referenced them several times while building as well.GLUE:- I used Beacon 3-in-1 glue for the majority of the build. Apply to the surface to be glued and allow it a few seconds to get tacky before bonding to next piece so it doesn't slide round on you.- I used Grandmother Stoves Stick Flat glue for wallpaper, floor and larger flat surfaces that require addition of paper. You paint it on with a craft paint brush or sponge paint brush. It is water soluble so it cleans up easy even if you forget to do it right away and your brush dries up.TOOLS:- Use really sharp pointed small craft scissors. Curved nail scissors help with circular cuts too. The paper items for the house are teeny tiny and require a lot of fussy cutting.- Get some good needle point straight and curved long handle tweezers. These will come in very handy for the whole build.- You will need a small wire cutter and needle nose pliers. You can get an inexpensive jewelry making kit that has these items (including tweezers).- Get a good Xacto knife or utility knife.ASSEMBLY:- I followed the directions step by step, page by page, however, in hindsight I wish I had gone thru and made all of the pieces that go into the house first then assembled the house and lighting. I found it a little hard to get the pieces into the assembled house with the second floor and roof on but using tweezers I was able to get the pieces in and glued down. There is a YouTube video out there that one person shows how that works.- When making the fabric pieces - use the templates provided to cut the fabric out. I didn't do this on the arm chair and had lots of issues covering the pieces for it with fabric. Also, make sure you are covering the correct side of the pieces with the fabric. I messed up twice on the wings of the arm chair by covering the wrong side of pieces and they only provide just enough of every fabric to use so there is little to no room for error.- Don't be afraid to organize your house differently than the instructions show or not make every piece that goes in the house. Play around with it and make it your own,. You can even paint the house a different color. I veered off course a little with that and love the results. I even replaced the TV picture that was provided with my own family photo.If you have dexterity issues still give it a try. For me this kit really helped with mine buy the time I finished the project. It was a little hard at first as I have numbness in my right hand (middle, ring and pinkie fingers) but it actually helped me use those fingers much better. I was kind of amazed and very pleased at that outcome. I plan to keep doing these kits or design some of my own to help long term too.Just take your time making each piece and know that a good bit of time is spent waiting for glue to dry. I would start one piece then while parts of it were drying I would start the next one so I could keep moving along.I really loved making this kit and as each little piece was completed I would be so thrilled with how cute it was. Well worth the money and time!
E**N
El paquete llego abierto e incompleto, no veía envuelto en nada.
El paquete llego abierto, en mal estado, golpeado e incompleto, la verdad muy decepcionado ya que este tipo de producto requiere un trato con sumo cuidado, ni siquiera veía con una bolsa al exterior de la caja.Además de que estaba abierto venía sin algunas piezas y maltratadas.Ya he comprado en otros sitios antes productos de la misma línea y si son tratados con el cuidado qué se merecen
J**D
Kit de ensamblar para mi hija
Este kit fue adquirido con la finalidad de ayudar a mi joven hija adolescente a tener un medio de entretenimiento educativo y positivo. Sin duda ha disfrutado mucho ensamblando la casa. NO es del todo evidente lo que hay que hacer, pero esto la motiva cuando concluye una etapa de construcción y pasa a la siguiente. Es un buen ejercicio de habilidad manual y de comprensión en el espacio lo que se debe construir. Seguiremos adquiriendo este tipo de kits cuando concluya con el que tiene.
A**N
Casita didactica
Está muy completa, bien detallada pero considero tomarla como didáctico para la escuela . . . No como está nunciada (juego)
L**L
I don't actually see beer here....
This is my third kit and my plan is to buzz through every kit they make. These are so very intricate and you need a lot of patience. I have a few suggestions:1. Get a stand alone magnifying glass. You will be able to see much better since these kits are half the size of normal kits (which are 1:12)2. Get a really sharp exacto knife. You need this to cut out the paper items, which are very small.3. They can't ship glue overseas, and I've read a few reviews complaining about that. Suck it up. Go buy your own. Get Elmer's for regular gluing and Alene's tacky glue for when you glue fabric. Use small brushes to brush the glue on. I don't recommend wood glue, as it dries very intact and if you need to gently take the item apart and reset, you run the risk of breaking the item pieces apart and ruining the pieces.4. This is the one thing I wish I would have figured out earlier: some of the items are also printed on paper. This means if you have, say, fabric that is labeled C23, there is also a section of paper labeled C23 and you need to find the tracer on that paper and use that tracer for the fabric (or picture frame, etc) in the next step. Download the Google translate app on your phone and you can easily decipher what each tracer says on the paper.I love these kits and the amount of enjoyment I get from them far outweighs the amount of time it takes to make the kits. In fact, that's what makes it so much fun.I have also found missing parts and the company has always been responsive in getting back to me to send the parts. So don't worry about that.All in all, these are so worth the money and if you enjoy miniatures and a challenge, these are for you.
Trustpilot
3 days ago
1 day ago