🚪 Nail every hinge like a pro — no buts about it!
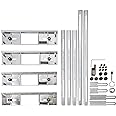
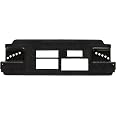
The PORTER-CABLE 59381 Door Hinge Template Kit is a precision-engineered solution designed for professional-grade door hanging. It supports both 3 and 4 hinge doors between 6 and 8 feet tall, with adjustable templates for hinge sizes from 3 to 6 inches. Featuring spring-loaded nails, carbide router bit, and a comprehensive set of guides and rails, this kit streamlines hinge mortising for consistent, time-saving results. Packaged in a sturdy carrying case and backed by a 3-year warranty, it’s the essential tool for millennial pros who demand accuracy and efficiency.
Manufacturer | PORTER-CABLE |
Part Number | 59381 |
Item Weight | 23.8 pounds |
Product Dimensions | 40.25 x 7 x 4 inches |
Country of Origin | Taiwan |
Item model number | 59381 |
Size | One Size |
Color | Multi |
Style | Template kit |
Finish | Brushed |
Material | Blend |
Pattern | Solid |
Shape | Rectangular |
Power Source | hand_powered |
Item Package Quantity | 1 |
Mounting Type | Door Mount |
Included Components | (4) Metal hinge templates; (3) Short steel rails, (2) Long steel rails; Carbide-tipped router bit; Template guide; Lock nut; Corner chisel; (2) pairs of end gauges; (8) Small thumb screws; (6) Large thumb screws; Hex key; Carrying case; Instruction sheet |
Batteries Included? | No |
Batteries Required? | No |
Warranty Description | Limited 3 Year Warranty / 1 Year Free Service Contract / 90 Day Money Back Guarantee |
G**N
Super Accurate
Perfect, super accurate and well built. Directions are a little difficult to understand and it would be nice if Porter Cable would provide a video demonstration, as it would save a great deal of time as it really is pretty simple to set up once you understand all the pieces.Like any precision measuring device you have to be careful handing it so you don't knock it out of adjustment once you have it set up. I could only find one video on youtube and some of the information given was not accurate regarding flipping the jig etc. Just follow the porter cable instructions and it is foolproof. They explain the right and left hinge door when viewed from the barrel side and how to position the door on its side, with top of right hinge door to left. If you imagine facing the hanging doors and the barrel pins are visible, then the right hand door will be rotated to the left and placed on its side and the hinge jig place on that edge with the edge of the jig held tightly against the door and nail in position.The locating pins on the jig are for setting the jig position when mortising the Jamb. If you remember that you will not have any trouble using the jig, really very simple.I am amazed at how accurate the mortises are and beautifully cut with the porter cable 5/8 radius cutter and bearing guide which you have to purchase individually as the kit come with the bit and guide for the 1/4 radius hinge.
T**R
Professional tool with professional results
Porter cable leads the industry in wood door prepping tools. I have their full set and it wasn’t my first choice because of price but since all I do is fix doors and frames for a living I decided to spend the money. This jig is worth every penny. This type of work requires a lot of attention to detail and is very unforgiving but this tool will help you speed up that process. As a commercial carpenter I’m happy with the template guide and bit that came with the set, I used it for 4 1/2” square hinges. If you have smaller radius edge hinges you will need a different bit and guide.I prefer to measure to the top, not the center of the hinge. I use a combo square against the inside edge of the jig and subtract an 1/8” to line up my measurements. I am not making a pencil mark, I am stretching the tape to the edge of the combo square for accuracy. My top of my top hinge on the door needed to be 7 3/8” so I set the hinge size (4 1/2”) on the jig and set it on the edge of the door while it’s laying on it’s side. I place my small combo square inside the template up against the top edge of the jig and measure to the square 7 1/4”. Tap in both pins on your first setup and repeat for the other hinges with their respective measurements. Then I find which spacer works for the hinges to match my frame. Every commercial manufacturer is different let alone every residential manufacturer so it may not line up with their standard stamped hash marks. After you have the pieces that work for your setup tightened down you can now use this jig rapid fire. This is not to say it’s not worth treating it like a bomb squad so none of your measurements shift on the jig, or double checking your placements either before or after each door but that is the nature of the beast. The key is to watch the door thickness guide pegs stay up against the edge of the door. I noticed I usually only had to hammer in a pin on one side from each hinge to make sure the door thickness guide pins were tight and it wouldn’t move on me. Granted I’m not slamming the router into the edges and I’m focusing on keeping it flat and down (plunge router) the entire time. I’m using a Makita trim router with the template plate (RT0701CX3 kit with template adapter) and it’s perfect. I have the power set to 4.If you’re not getting perfect results I’m letting you know it’s not the tool. If you read through the reviews you’ll see that not every do it yourself or carpenter for that matter can handle this tool or task. It makes a tedious process easier and less tedious but don’t expect anyone to have the OCD or skill required to use it.
F**V
Great tool, once you get to know it.
Door slab replacements are a big part of my business. I have used the original version of this tool for many years. Admittedly it was somewhat difficult to set up which is why I only used it when I had multiple slabs to install, like door upgrades in condo's or townhouses. It served me well, however it had become loose and some of the components were worn to a point where I constantly had to check and/or readjust it. Also, parts just weren't available anymore. This prompted me to purchase PC's updated version. I can't tell you enough how sweet this tool is compared to what I went through to use the old one. It takes less than 10 minutes to set up and in the way it's designed it holds all of the adjustments well. It adapts quickly if I'm retrofitting multiple slabs with different hinge spacing and positions. Using it to relocate hinge mortises on the jambs or taking existing locations and spacing then transferring the locations to a slab or visa versa is the best part. I had the benefit of working with the old tool first so I had an understanding of the concept and process and what the final result should be. This why I say that once you've used this tool for a little while and get the "feel" of it, especially if this is your first time with a gauge such as this, you can't help but be pleased. I recommend purchasing part #86018 (3 1/2") jamb gauges from Porter Cable Servicenet. I bought the one size, since it's the most common hinge, but I use it for all of the other sizes. If you end up buying the 59381 you'll understand why when you read about the jamb gauge's function in the instruction manual. I hope this helps. Lots of luck.
Trustpilot
2 weeks ago
3 days ago