Some deliveries may take a little longer than usual due to regional shipping conditions.

DOWNLOAD THE APP


Customer Services
Copyright © 2025 Desertcart Holdings Limited
DOWNLOAD THE APP


🥄 Elevate your kitchen game with gourmet homemade yogurt – because your gut deserves the best!
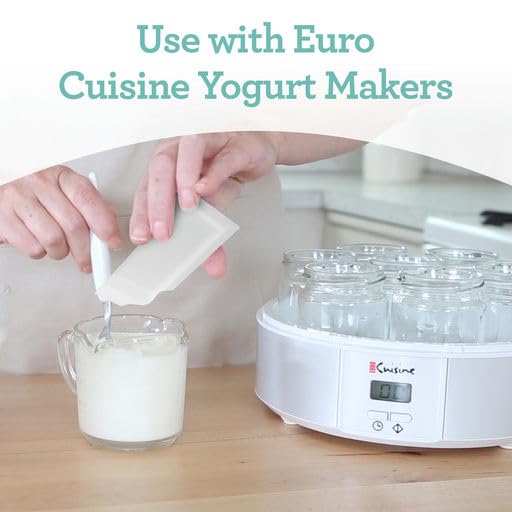
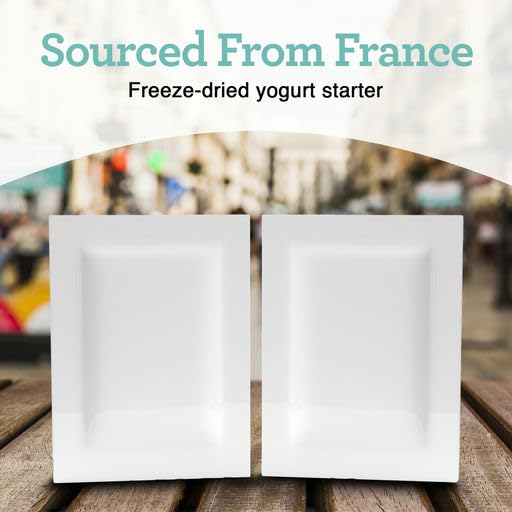
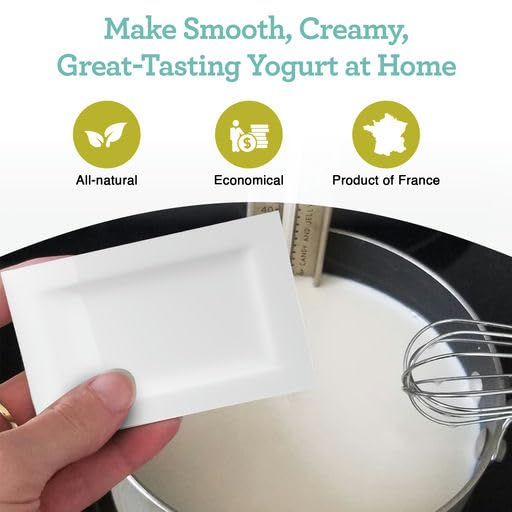
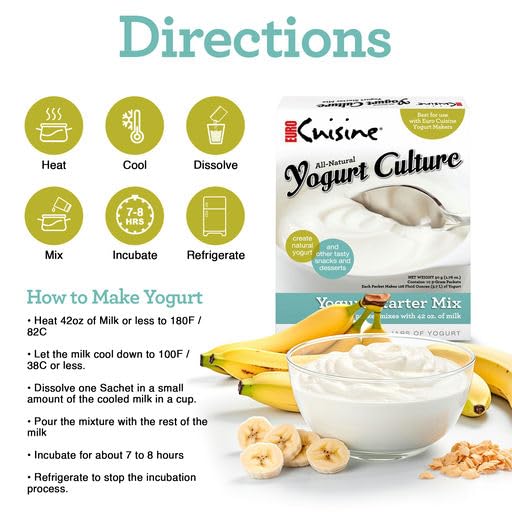
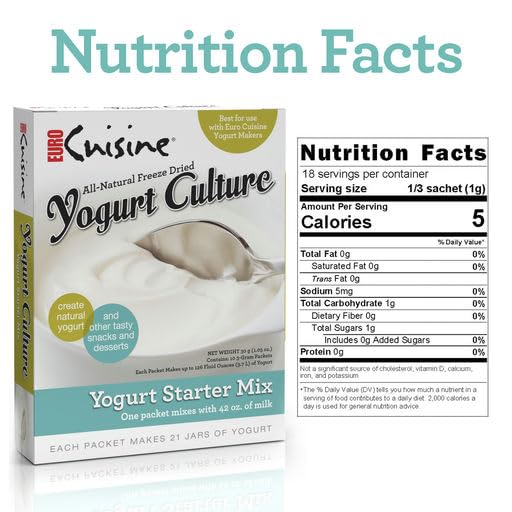
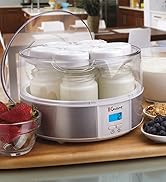
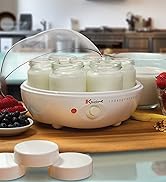
Euro Cuisine RI52 All Natural Yogurt Culture Starter is a premium freeze-dried probiotic blend imported from France, designed to create smooth, creamy, and protein-rich yogurt at home. Compatible with all milk types including dairy-free options, each 3g pouch cultures up to 42 oz. of yogurt, offering an economical and authentic way to enjoy customizable, gut-healthy yogurt with long shelf stability.


| ASIN | B000EONEU0 |
| Brand | Euro Cuisine |
| Brand Name | Euro Cuisine |
| Cuisine | French |
| Customer Reviews | 4.3 out of 5 stars 1,334 Reviews |
| Item Weight | 3 Grams |
| Manufacturer | Euro-Cuisine |
| Number of Items | 2 |
| Number of Pieces | 2 |
| Size | 0.17 Ounce (Pack of 2) |
| Specialty | Dairy Free |
| UPC | 737770265215 |
G**A
Wish I'd tried this sooner
I tried making yogurt using Fage and other "good" brands. It never tasted like the parent culture and wasn't all that thick. I read some blogs that said you needed a freeze dried culture and then searched here at Amazon. There were many good comments here, so I chose the one that would give me the characteristics I wanted. Success! It's truly delicious. I have tried culturing it as short as 4 to 5 hours and as long as 10. It seems to thicken more the longer you leave it. At 4 hours, I get at least 50% whey when I drain it to get something close to a Greek yogurt in thickness. At 10 hours, I get only about 12 ounces of whey when I started with about 40 ounces of milk. I use 2% organic milk most times, though I've use non-organic 1% also. The 2% appears to give me a taste and texture that rivals whole milk yogurt that I purchase. I leave some plain and flavor some. I use the plain to inculturate the next batch - one time I waited at least 10 days - and it's worked every time. I only use about 2-3 T of plain to 40 ounces of milk. I like the Euro Cuisine Greek Yogurt Maker that is sold here, but find that I prefer cheesecloth. I still use the Euro Cuisine - it's a handy container - but it's not as easy to clean as cheesecloth. I also found that the Matbah Insulated Food Server - also sold here on Amazon - is an excellent container in which to put the cultured milk. Since my oven does not have a pilot, it doesn't keep it warm enough. But, this container does. After 2 hours, it's still about 105 F and after 4 hours it's still around 100 F and already set enough that it doesn't matter if the temp goes down more.
E**N
It's also recommended that you make your own 24-hour yogurt using a ...
I am of Mediterranean origin and yogurt is a key element of our cuisine. We consume 1/3 gallon of yogurt everyday and eat it with almost every dish. That is why we make our yogurt daily and never buy it from outside. Home made yogurt is a kind of tradition in our house that has passed many generations. I have tried various cultures as starter but for the last couple of years I rely on this one. First of all, key to making thick yogurt lies in the technique rather than the culture. All you need is to warm the milk in moderate heat up to 185 F which is very close to scalding. You should keep an eye on the milk as it can get burnt leaving you a nasty pan to clean and a burn taste in your final product or overflow which again is a mess. But this should not discourage you since if you keep the heat in moderate setting and/or mix it a few times during heating it should not be difficult to guess where to stop even if you do not have a thermometer (I strongly recommend buying one for accuracy and consistency) The purpose of initial heating is not killing the bugs like many people believe. Even if you use pasteurized milk which I do, this initial heat is necessary to get a thick end-product since that high temperature denatures the milk proteins and makes it easier for helpful bugs to work on them. Next step you allow it to cool down to around 110 F or to the level that you can barely touch with your finger. That temperature is ideal for the growth of thermophilic (heat loving) bacteria and this starter contains those type. Then you add one sachet to one liter of this pre-treated (heated and cooled) milk and after thoroughly mixing you immediately cover it and incubate. If you are using a yogurt maker 5-6 hours of incubation should be adequate (for those starting from this culture) if you do not have a yogurt maker then cover it with blankets ( a few sets) or various cloths to keep the internal heat (traditional technique I had used for many years before buying a yogurt maker) This time the incubation time depends on the external temperature, how you cover it and the volume of your milk. But around the same time should be fine Traditionally people in my home country use pre-made yogurt as a starter culture and they even borrow culture from neighbors when they need to change it. A store bought yogurt could be a replacement for using a starter culture sachet like this one but in the long run, this comes cheaper than buying yogurt from the grocery every once in a while and is more convenient since it can be stored for a long time at a cool-dry place with no need for refrigeration. I use my previous yogurt as the starter culture for the next one. 2 table spoons in one liter of milk is more than enough, and that way the incubating time can be significantly reduced compared to using starter culture like this one. For example, using yogurt maker, I incubate the yogurt made from a previous yogurt for 4 hours to get the desired thickness. Under same conditions it takes 5-6 hours to get the same density when starting from this powder. However using previous yogurt as starter, the efficiency goes off in time while the acidity increases due to other colonies finding their way to the medium. If you keep everything clean and store your yogurt in closed containers in the fridge then this cycle should last around 45 days until you need to start a fresh cycle from this powder. That is how I get this one order last for a year without sacrificing from the quality. Therefore I rate this as a 5 star product due to the price and the convenience it offers. I hope this tips help the other home yogurt makers save some money, remember: yogurt has been made for thousands of years and using starter culture is only a thing of the last few decades... Note: I use T-fal YG232BUS Balanced Living Yogurt Maker with LCD Timer, White and Update International THFR-17 5 1/2"-Long Dial Frothing Thermometer during the procedure I explained above. I can recommend both products for those who need one.
N**B
It worked!
Ok, I didn't really follow the directions on the package. All I did was boil 2 glasses of water and mix with a whole can of condensed milk. Then I added 2 cups of cold 2% milk. Then I sprinkled the powder and used a whisk to stir.. I don't have a yogurt machine so I used the traditional way, the only way I know of: a large pot of hot-warm water. So I managed to divide the entire contents into 5 glasses (cuz I had 4 classes of liquid plus one can of condensed milk). After covering them with plastic wrap I put them into the pot that's half full of warm tap water mixed with boiling water. After 7 hours (overnight), I looked at the yogurt and it was still liquidy so I thought I had failed. But I didn't give up so I dumped out the water and poured in another gallon or two of warm tap water and let the same batch of yogurt try incubating again. Three hours later, I picked up one of the glasses and saw that the yogurt had solidified. IT WORKED!!!! Finally! The taste was as I'd expected. Yummy, creammy and smooth.
K**.
Awsome starter kit.
Great starter kit. I use it for years and buy it over and over again. It's used to be more packets in the box,but they reduce it to 2packs.
R**D
Perfect starter - Good value
I've been using this brand for decades and it's never failed me. I make yogurt weekly, no longer in a yogurt maker, but simply in my old fashioned slow cooker (heat milk on high for 3 hours, turn off slow cooker, let it cool for 2-3 hours until it reaches 120 F, stir in your starter, cover with lots of towels and let it sit for 6-12 hours depending upon tangy-ness. I freeze the second pack to make a fresh batch after about 3 months or more - and I reserve a bit from each batch as a starter for the next. It does just fine - just remember to cool your milk before stirring in the starter, otherwise you'll kill it.
C**G
Best yogurt starter
I love homemade yogurt when made with this starter. It is relatively foolproof with an inexpensive yogurt maker, and really delicious--much more delicate and fresh tasting than what you buy in the store. It sets up well and provides a good base for added fruit and honey for a healthy, nutritious and satisfying breakfast or lunch. One packet of starter is added to a batch of warmed milk, per your yogurt maker's directions, stirred and left for the required length of time--about 6 to 8 hours. That's all there is to it. The finished yogurt lasts well in the refrigerator and can also be drained through cheesecloth for a denser, Greek-style yogurt. I'm told the quality of the yogurt depends on the starter and this is the only kind I'll use.
C**2
Worked, but too tangy for me
I have been using a fresh dairy starter. It always came out thick, smooth and had no tangy after bit. I tried this and it made it ok, not as thick or smooth and it had one heck of a tang. I follow the timing directions. I you like that tangy bite to your yogurt you will be very satisfied with this. I don't like that tang, so its back to using 2.5 tablespoons of plain greek yogurt for a started. I pay 90 cent for a 5.5oz container and freeze half. Much less expensive and a better over all taste for me.
J**S
A Great Starter & Easy to Use
I've had the Euro Cuisine Yogurt Maker for well over a year now, but I'm just now trying out the starter the Euro Cuisine company offers. While a little more expensive to use than six ounces of plain yogurt, it is easier to use. As a bonus, this starter requires no refrigeration, so can sit around for awhile before use. This is especially handy if you plan to use this starter as your back up starter, rather than as your primary starter. The product comes with enough starter to make two batches. Use of this starter involves the boil method of yogurt preparation. I've been using the boil method already, so this was an easy transition for me. I discovered that the boiling point is lower with this starter than with a plain yogurt starter and you don't have to cool the boiled milk down as far. As a result, the prep time is shorter than when using plain yogurt. The incubation period seems to be about the same. My first batch was perfect. The yogurt is just a bit tarter than when made with a plain yogurt starter, but still quite good. If you mix your finished yogurt with a little fresh fruit or a touch of fruit spread, the tartness isn't as noticable, but it depends on your preference. I love making and eating homemade yogurt. The Euro Cuisine starter is a welcomed addition to my process.
Trustpilot
2 weeks ago
1 week ago