🔧 Elevate Your Prints with Precision!
The FYSETC Ender 3 V2 Solid Bed Mount is a set of 3 high and 1 short silicone spacers designed to replace the springs under the heated bed of various 3D printers, including the Ender 3 and CR-10 series. These heat-resistant and pressure-resistant mounts ensure stable and precise leveling, eliminating the need for constant adjustments. Easy to install and compatible with multiple models, they enhance your 3D printing experience.
A**2
Way better.
This helped along with my b l touch to make more high quality prints.
G**0
Doesn't fit ender 3 s1 pro
Thought it might fit all ender 3s however the 4th one is to short it needs 4 of equal length. Seems like decent quality though
J**E
Works great on Ender 3
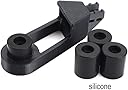
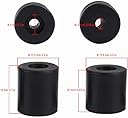
I cannot speak to the CR-10, but I can confirm that these fit the Ender 3 perfectly, and without requiring the 3D printed parts mentioned in the description . In fact, I had already replaced the stock bed springs with the yellow heavier springs. Yet, those yellow springs still allowed the bed to move around a lot, requiring constant leveling. Though, once I installed these silicon bed mounts, the printer became a well-behaved speed deamon at last.Backing up a little, you only use these solid bed mounts if you have mounted a probe, such as the BLTouch or EZABL. Also, while installing, I replaced the bed level adjustment wheels with 4mm locknuts. Then, use a bubble level and tighten the locknuts a little at a time to level the bed in all directions. The goal is to level the bed against the frame so that the bed stays level when slid forward and backwards. Next, you will need to level the gantry using the now level bed as a reference. I have a dual Z axis drive installed, so this is easy. If you have only the stock single Z drive, then this might require taking the gantry off and adjusting the bolts to get it level.When done leveling, you should be able to move the hot end down to the bed and move it back and forth on the X axis without any change in Z height from the bed. Then, you should be able to slide the bed back and forth on the Y axis and repeat the X axis gap test. This is a really critical step though. You need a level bed against the frame and a level gantry or the print quality will be terrible. With the lock nuts now secure and the bed and gantry both leveled, now the probe can do its job and level against the bed shape itself. Plus, being that you used lock nuts on the bed, all the hard work will stay put.Finally, the silicon bed mounts can really shine by dampening vibration as the bed slings from front to back during prints. This vibration dampening effect is why these silicon mounts are far better than solid aluminum. The practical result is reduced ringing on the Y axis.I am extremely happy with the silicon bed mounts now that they are installed using the procedure above. My Ender 3, albeit a heavily modified Ender 3, now prints the best it ever has. I get a really consistent first layer height and the prints adhere better with a uniform constant height. On top of that, my Z layers are smoother since the Y axis lines up better with each bed move. Best $10 I have ever spent on this printer.
B**K
You'll notice they sell taller ones for the CR-10. Get those.
So.. The files linked to download don't show the file for the non solid version where the shorter silicone piece would sit. It is the original one where it's solid pieces, and the bracket is filled in with plastic..Someone maybe on one of these reviews (I forget now) said it had been removed.I linked a reworked one on thingiverse with the plastic pieces removed, and the hole dug out to the right height to allow them all to sit flush.If it's still around elsewhere, forgive me, but I couldn't find it since thingiverse's search is all screwed up.Either way, these work great. Thanks!My understanding of these spacers, is that they aren't actually meant to replace springs per say, they're spacers for tightening the bed and using in conjunction with an auto bed leveler, hence the original design with solid plastic spacers..These allow a tiny amount of adjust-ability to square it up, but not so much as springs did.Just to hammer the point home, some places sell these in metal. They're for use with ABL's, not to re-spring your bed. If you want to keep adjust-ability but feel you don't have it, buy some stronger springs, or move your z stop switch and tighten the springs you have more, and adjust in the last 1/3 to 1/4 of it's travel where it will 'fix' more in place.*update*I did have an issue.A very solvable one, but because the tension on the spacers was relatively close to where they make contact, and because the push back isn't the same as when they were springs, I found the adjustment knobs came loose while the printer bed moved.Increasing tension on the spacers to tighten it more to stop this resulted in them becoming too short, and not allowing the nozzle to touch the bed any longer. It was simply too short.I solved this by adding a 3mm neoprene spacer to the end, which allowed for that much more crushing, adding back force to the adjustment knob.Honestly, You could likely use a whole ton of these in place of the spacers to begin with.Once I was sure it was super level, I followed up behind the adjustment knobs with a second nut with a drop of blue locktite on it to keep it in place. Works great now.It's possible they are a trifle short. They now sell taller ones. Get those instead.
J**L
Work well, but a little short
I like the rigidity of the silicone bushings. I think they are a little short for the CR-10S. I had to add 2 washers below to ensure a good compression and not cause my Z-Axis to bind when trying to go down that far. The washers also should allow you to leave the old Z limit switch on. Without washers, the Z limit switch has to come off to allow for the travel (if you put some compression on the bushings). The build plate seems very sturdy with these and I hope they last for quite a while.
N**L
Very convenient and time saving
Since I installed these, I only need to level the bed when changing a nozzle or filament. The bed stays level. Basically if I am leveling the bed, it is because I am concerned that I may have moved the Hot end. Before I bought these I would have to level the bed after almost every print, or anytime I had to pry a print off the bed.I don't use a BLtouch or any kind of automatic bed leveler, I do it manually with a piece of paper, and I have had very good results since I installed these.
G**H
Very nice mounts.
Very nice mounts, much firmer than my yellow springs, and far, far firmer that the original Ender-3 springs. As a note, if you purchased you Ender-3 (original) fiarly recently, it mot likely already has the correct size mount with a socket for the smaller silicone mount for the back left.
C**K
This is a real improvment.
Once you level these silicone replacements up they won't constantly go out of tune the way metal springs do. Set it and forget it. If you're printing TPU, you could print your own. But these are so cheap and well made, and Amazon Prime ships like lightning. So, better to buy them. PS: Don't forget to relevel your bed. These things will change your bed height.
Trustpilot
1 week ago
1 week ago