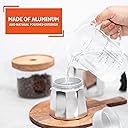
This little coffee pot is capable of brewing delicious coffee with a little work and patience you will have a great little coffee maker I have used these for 20+ years I am happy to share what works for me because the directions are vague in places. However there are things that you need to do first before using it to brew your coffee I will explain why. Now If you are not willing to take the time because your lazy, and/or ask for a golden goose during a factory tour whining when factory owner says no your not going to like this coffee maker do yourself a favor give it away as a gift. If you have arthritis or your hands hurt I have arthritis and carpal tunnel just have someone help or just take your time this is not a race. When I pulled this one out of the box I noticed aluminum dust and debris inside and that the threads are a little rough this is to be expected it is not coated this is a cast aluminum aka Pot metal. For many years before the plug and play instant gratification nonsense came about everything you can think of cookware wise was made like this and it was excellent it lasted forever. So I am going to walk you through what I did to make this a good little coffee maker and how to maintain it. First use warm not hot water and normal dishwashing soap along with a non abrasive dishwashing sponge or cotton washcloth or soft bristle nylon brush . Do not use acidic, aggressive, or caustic cleaners its not neccessary and you will ruin your coffee maker. So begin to thoroughly wash/rinse everything inside and out including funnel until all dirt and debris are cleaned out and dry everything with a cotton cloth. Fill the coffee maker with water as the directions specify to the valve and assemble do not add coffee. Now when you assemble the top to the base do not over tighten dont forget your gasket sometimes they fall out just place it back in place. Hold the top and base when tightening not the handle or you will break your handle. As you feel the base make contact with the silicone gasket in the top just tighten snug to seal not over tight this will help seat your gasket. If in doubt about how tight turn until top makes contact with bottom turn until it snugs about a half of an inch extra tighten you don't want to bind your silicone gasket. Place on a burner with the handle away from the burner so it doesn't melt turning heat to medium high while waiting for it to finish the brewing process watch the little brass safety valve it will probably steam a little this is completely normal your valve is working fine. If it leaks between the top and base while percolating remove from heat, allow to cool and tighten a little more when you refill it this sometimes happens dont give up. Pour off the water and allow it to cool this is your first heat cycle a very important part of breaking in your new coffee maker. Absolutely do not cool it off under a faucet with water I know its tempting yet just patiently wait for it to cool on its own down to room temperature for everything to expand contact properly. When it has completely cooled off pull it completely apart again. Looking inside you might see more little black spots or loose debris this is normal rinse and wash them out again as described above. Wipe dry the outside and inside dry with a cotton cloth this prevents water spots and helps loosen any debris. Fill with water to valve again tighten snug not too tight and place it on a burner on medium heat allowing it to run water through watch the pressure relief when finished pour it out allow to completely cool to room temperature completing your second heat cycle. When cool disassemble your coffee maker notice how it comes apart your gasket in the top should seat nicely with the bottom and you shouldn't have any cast debris they should be gone it should look nice and clean inside. Now I will tell you what I do for a delicious cup of espresso. Fill with water using cool or cold filtered water up to the valve, drop in the funnel, add coffee level with the top of funnel loosely no need to tamp, screw on top notice how nicely it seats after all that work, place on burner on medium heat, listening for it to percolate its done when the top is about 3/4 full usually, and pour your espresso into a cup enjoy. It should taste amazing if its too strong or too weak adjust your coffee amount or heating temperature. When finished rinse thoroughly and wipe dry. If you place it in the dishwasher I don't recommend that I made that mistake. Hard water spots happen don't worry about them. With proper cleaning and care this should last for many years. I use these at home, shop, traveling, and they are wonderful on a camping stove. If you notice any yuck on the bottom from a burner or if coffee maker gets nasty dirty inside/outside I clean these with non abrasive white shop hand cleaner buffing it in until dirt is loose, wipe off excess cleaner, wash as described above, and cycle water through it. I have many of these in different sizes all plain aluminum like this. I have polished the outsides of these and and top inside to a beautiful shine with aluminum polish using the same procedure as you do with silverware when I encounter hard water or high mineral water. I have sanded the rough cast inside surface of the base smooth and polished the inside to a mirror shine for fun and easy cleaning. I have busted off or melted off the handles and replaced them with different designs of my own creation. I have Heliarc welded these if they get a seep in the bottom or if the lid hinge breaks/cracks. With care you should be able to pass this on to your children or someone close to you who loves delicious espresso. Hopefully this was helpful for you and you enjoy your espresso maker. If you have any questions just ask me and I will share what has worked for me. Good luck and importantly have fun.