We remain fully operational. Our teams are working around the clock to ensure your deliveries continue safely.

DOWNLOAD THE APP


Customer Services
Copyright © 2025 Desertcart Holdings Limited
DOWNLOAD THE APP

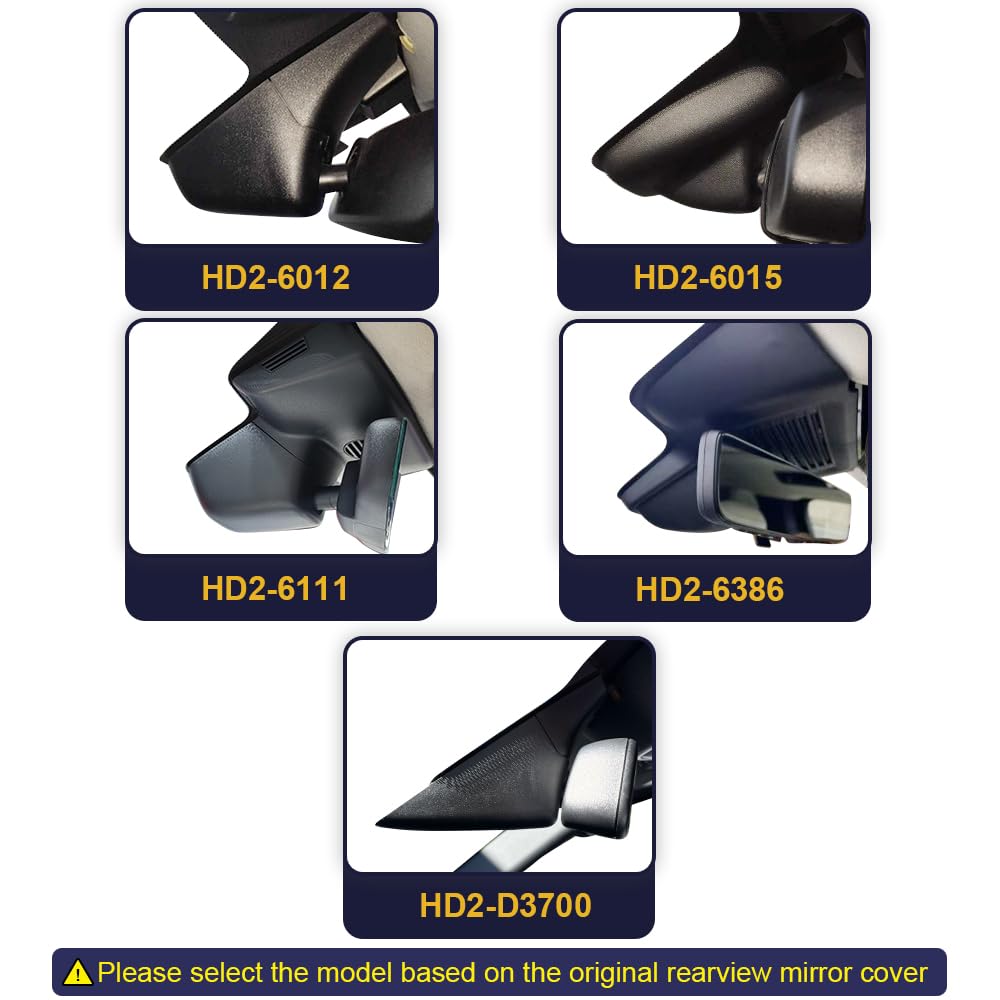
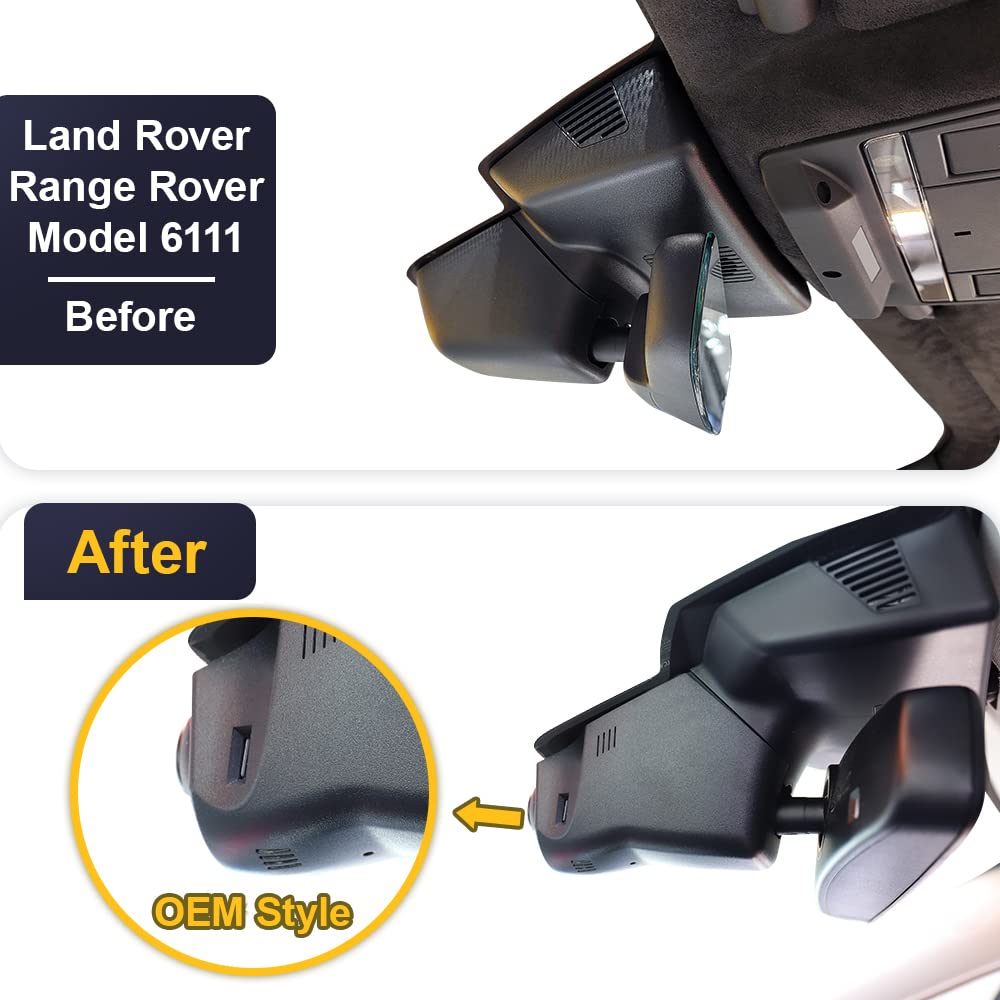


🚗 Elevate your Land Rover’s IQ with flawless 4K dashcam stealth
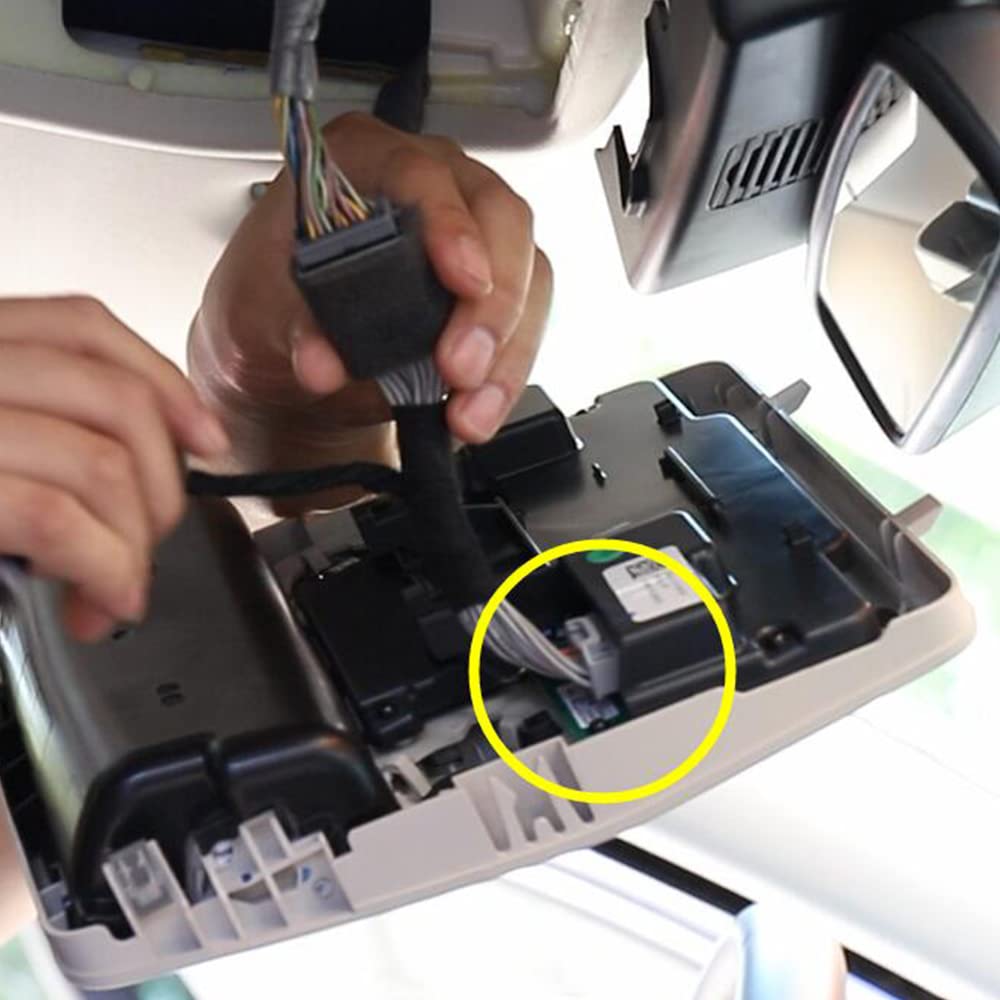
The Fitcamx Dashcam is a precision-engineered OEM-style 4K UHD camera designed exclusively for Land Rover Range Rover 2018-2022 models. It features a built-in battery, seamless rearview mirror integration, night vision, G-sensor collision detection, and WiFi connectivity with a dedicated app for easy video access and sharing. Installation is quick and wire-free, preserving your vehicle’s warranty and aesthetics.
| ASIN | B0BL3J6LPJ |
| Best Sellers Rank | 101,881 in Electronics & Photo ( See Top 100 in Electronics & Photo ) 1,455 in Car On-Dash Mounted Cameras |
| Guaranteed software updates until | unknown |
| Manufacturer | Dongguan Daozhi Electronic Technology Co., Ltd. |
| Product Dimensions | 10 x 30 x 23 cm |
D**N
Quality product
Fitted in a treat, very easy to fit, excellent video recordings, super clear image. Fitted to Range Rover Sport 2024. Excellent product. And it came with SD card, perfect.
I**.
High Quality with a True OEM Look
The product is high quality and truly has an OEM look — it’s impossible to tell the difference. I just wish it had a built-in GPS with a speed display. Installation took only 5 minutes and was very easy.
T**W
Best cam
Why did you choose this product over others?: Looked at a lot of others ,but couldn’t get any to blend in with the car .Until I found this, simple to install.Even wth my sore hands and shoulder I had this in front and rear within half an hour.And it looks great.One slight problem,it could do with some adjustment to the actual camera,not a lot but a tiny bit ,as it shows a bit more of the front of my car than normal.That said a brilliant piece of kit.
R**P
Mis leading information
According to a camx chat that I have had with them.... they do not have a Range Rover L405 specific product. They say you need the generic style which entails sticky pads to the windscreen and running wires around the outside if the windscreen... not as shown in this Amazon advert wiring connection through the courtesy light source. So when it says no sticky mess or unsightly wires and easy install... thats obviously using Advertising jargon for the exact opposite. Please check very carefully for your specific vehicle what is the correct product before pressing the buy now button.... because otherwise what you are expecting may not be we you recieve.
L**L
Se tiene que meter bien la tapadera en las guías del fondo si no lo metes no se alinea. Te tardas un rato pero si quedó bien
A**E
Sehr gute Produktqualität, OEM-Qualität, selbst der KFZ-Händler war begeistert! Sehr gute Aufnahmequalität, leicht zu installieren aufgrund guter Anleitung und Installationsvideo. Sehr zu empfehlen!
A**R
This is my first time using a Fitcamx product. I had an older Honda van and the camera was old, just like the van. The previous vehicle (Odyssey) had the camera powered by one of the auxillary power ports below the dash. The camera used a suction cup and the wire was tucked underneath a dash board cover. I hated the way it looked. Goodbye van. The van was updated to a 2024 Honda CR-V. I liked the idea of the Fitcamx system. I looked up the YouTube videos and installation was pretty much like the short video clips. The camera came with everything except a way to "fish" the rear camera wire through the factory wire loom/harness. Some videos show a coat hanger, zip tie, and even a red colored "installation" tool. The tool is plastic and has a slot to slide the wire onto the tool. Amazon sells a tool for about $10 but the delivery date was going to be a few days. I opted to try and push the wire through the rubber boot just by the wire itself. The wire went about 3/4th the length of the rubber loom but I could not get the plug through. I used a coat hanger and cut a one foot section and used a set of pliers to make a small loop. I pushed the loop end first and got the hook to come out of the loom. I hooked the wire onto the loop and began to pull the hanger through the loom. The hanger came out without the plug. I was able to get the plug far enough that a little pushing and pulling and the plug came out of the wire loom. This was the hardest part of the installation. The front mirror panel came off easily with the supplied tool. The front camera was easy and took a few minutes to install and the camera app was simple to download and get a picture of the cameras working. Connection between the cameras and my cell phone was a piece of cake. Both cameras are clear and I was able to see good detail on the camera. My main goal for the cameras is to make sure in case of an accident, I have video footage. I could have bought two separate cameras and saved a few dollars but I like the idea of the Fitcamx blending in with the mirror housing. I ordered the black colored camera even though my interior is grey colored on the factory mirror housing. I like the black colored housing because it actually blends into the dark windshield better so the camera aperture is nearly invisible. The grey colored camera would have been more visible. The installation took about 30 minutes of my time. The tools I used were a set of pliers, Phillips head screw driver, a coat hanger, and my cell phone to look at the Youtube video how to remove and install the mirror housing. Some people with no handy skills would be intimidated to install this camera system. The difficulty level for this install is a 2 out of 10. I'm sure if I had bought the cameras from a local dealer and had them install it, they would have charged me an hour minimum. I ordered a dash board cover with the money I saved installing this camera myself. I think this system is a combination of simplicity, quality, and a great value for what you're paying and what you're getting. It would be nice if every car maker install dual USB-C power ports on the upper panel near your light/lamp panel. This would make car camera/radar detector, GPS installation a breeze. A small one foot run of wire or less and installation would be a simple peel the sticker, mount the camera, and plug in the power.
�**�
I just installed this Fitcam X into my CR-V today. Since a series of unfortunate events has led me to my third car in a few years, this is now the third Fitcam X I’ve installed. This is another fantastic camera, but the instructions are lacking. FitcamX pros: I’m a big fan of these devices. They blend seamlessly into the car, no worry for thieves to obviously see tech sitting on the dashboard to entice a smash-and-grab. They’re a big more expensive, but probably cheaper than paying a shop to hardwire a dash cam, and even then, you’ve got an obvious extra part. These blend in. The camera works fine, the software is OK. To me, the video out of most dash cams are pretty good. On the CR-V, it fits perfectly. Con: As of March 30, 2023, when you purchase the camera, the instructions aren’t great. Inside the box is a user manual with a barcode that scans to a Youtube link (my previous 2 fitcams did this as well). On my last two cars, the video was car specific. This one, it links to a video for a 6th gen Honda Civic. If you visit the Fitcam X website and look at this model for the CR-V, the page also links to the video of the civic install. The two installations are not the same. I know this because I previously had a ’23 Acura Integra, which shares the same design as the Honda Civic mirror surround. The CR-V is different. The initial piece is one part that prys down vertically, whereas the Civic is two pieces that pry apart horizontally. Unfortunately, there’s no video or written instructions to tell you how to get the CR-V mirror housing off. Rather than damage it, I looked online for PDF instructions on how to install a Honda Homelink Mirror for the 2023 CR-V. The instructions, available for download from your favorite Honda parts dealer’s website, show how this part disassembles, which is the first step in installing your Fitcam. That mirror is Honda part number 08V03-3A0-100 if you want to go searching online for the installation instructions yourself. I’m going to still give it 5 stars because the setup is worth it. Hopefully Fitcam will record a model-specific video soon.
A**7
for hybrid Europa Version man sieht etwas Verkabelung von außen . Support very good
Trustpilot
5 days ago
1 month ago