We remain fully operational. Our teams are working around the clock to ensure your deliveries continue safely.

DOWNLOAD THE APP


Copyright © 2025 Desertcart Holdings Limited
DOWNLOAD THE APP


🎙️ Elevate your voice, not your clutter!
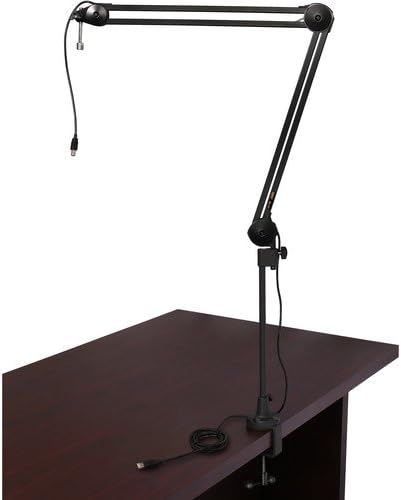
The Auray BAI-2U is a professional-grade two-section broadcast arm featuring internal springs for silent, sleek mic support up to 5 lbs. It offers 40" extension and full 360° rotation for precise positioning, a heavy-duty clamp for desks up to 2.3" thick, and an integrated USB cable for streamlined connectivity—perfect for podcasters, broadcasters, and voiceover pros seeking a clean, versatile setup.
N**E
Boom Mic Drop
Solid build, supports Blue Yeti.
P**O
USB-A (printer type) connector - may require an adapter for your mic
This comes with what I call a "printer USB" cable - technically "USB A" and I assume common on a lot of microphones until recently. I have a Shure MV7 which - likely similar to many mics today - has a "Micro USB" port. YES YOU CAN JUST BUY A SIMPLE ADAPTER. But it absolutely irked me to imagine having a bulky adapter hanging off the back of the mic, so I went nuts and tried to put a 10' native micro USB cable through it. In the end, it worked, and you can do it too. I trashed the boom stand learning, however, and had to buy a second one to modify it. If you want to do the same thing, here are the tips.First, you need to cut the old cable to remove it.Second, you can route a narrow-head cable such as https://www.amazon.com/gp/product/B08LZM79Y9/ref=ppx_yo_dt_b_asin_title_o04_s00?ie=UTF8&psc=1 INTO the same holes as the old cable starting at the base side, but in the two spots where you need to pull the head of the cable OUT, it will not be possible because of the small plastic guide/bushing. You can remove each one that is in play temporarily and get the cable through and replace it, all fairly easily. The two that matter and the screws you need to remove are indicated by the red arrows in this photo. You remove the screw, and then carefully pull out the plastic piece with a pair of pliers. There is no need to actually pull the arm out of that joint - just the plastic sleeve in side it. If the arm comes out it's not the end of the world - you just might have to spend some time with a flathead screwdriver to sneak the washers back into place. You can do it. But if either of the two arms near the vise grips in my photo pop out, you may be facing full ruination instantly. Each of those arms has a very high tension/compression spring in the tube that can really only be inserted by robots. So I recommend using a clamp or vise grips like I did to make extra sure that plate stays compressed over those arms throughout the procedure to play it safe. It doesn't have to be crazy-tight - just enough to keep it from opening as you remove your screw.
X**N
Great Mic Arm!! Shipped fast too!!
Just what I was looking for and at a great price for a slightly used/open box which looked new to me when it arrived. SCORE!!
Trustpilot
1 month ago
4 days ago