


ALUNAR 3D Printer DIY Prusa I3 Kit Self-Assembly Desktop FDM 1.75mm PLA 3D Pen Filament Heated Bed
Product ID: 171553567
Full description not available
D**D
Well I'll be damned... this is awesome!
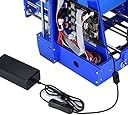
After reading the other reviews, and seeing that they were all still highly rated despite a few "issues", I decided "oh why not, you know you want to..."ONE WEEK REVIEW:Let's start with the cons... as there are not many:1) The Videos to describe how to put them together were low quality videos. Had to do a lot of rewinding and reviewing to see which part they were talking about.2) The power supply provided was bigger than the one in the video, took some electrical common sense to figure out that I wired the power into 2 grounds, thus providing no power.3) Also, since the power supply was bigger, for some reason it would not mount, so I had to drill an additional hole in the acrylic on the side of the printer to mount it.4) Not sure if it was my filament, or a dirty clog (seemed like the latter), but the first time I tried to put filament through it instantly clogged. Had to dismantle the extruder, and blowtorch the tip to unclog. Also, seemed a lot more difficult to remove than normal filament clogs, had to get feisty with a needle to get the gunk out. After reassembling, it was perfect.5) The Z-Stop is a pain in the butt. Generally if you need to adjust the Z stop, it's a fraction of a millimeter, but this is a weird "slider" kind of mount that is very hard to make miniscule adjustments. I just tighten it really good, and gently force it into calibration after a few Z-Home clicks and minor adjustments through brute force. Will probably redesign the z-stop.6) For some reason (maybe it's the way I assembled it?) the little fan that connects to the extruder blower for "tip-cooling" was long enough to touch the heating element on the extruder, and immediately melted. I will have to design and print a better one.PROS:Everything freakin works great! My biggest frustration, aside from rewinding the video dozens of times, was adjusting the Z stop. The first print you can see on the left, at the bottom the Z was too high, but it eventually corrected itself and made a very clean print. The print on the right was actually done through a smart phone Repetier connection with a better Z-stop calibration.You may be able to see the quality on the sides of the prints being a little spacey between the layers. The side that is showing is the only side that did this and I believe it's simply a bed leveling issue.All-in-all I love this printer. I will be doing some advanced prints here in the next few weeks and I will be giving a one-month review with any additional experiences I acquire during that time.6 MONTH REVIEW: Ok, so it has been a champ! I have had a few clogs in the extruder from switching between filaments and not purging the tip properly. Disassembled, torched, and reassembled.Things to make careful note of: First off, the power supply is, in fact, underrated for the package. I received a 200W power supply, which is just shy of the requirements of perfect functionality. I ordered a 350W power supply for 3D printers, and hopefully it will resolve my issue. The only issue right now is how long it takes to heat the bed. When I tested with a multimeter, I was only getting 10.43V on the 12V powering the bed. I timed it today, and from ambient temperature (21C) it took 1 hour to get to 82C. Hoping the power supply is the only thing I need to address.Still haven't had the time to print the new Z stop, as I really just want to redesign it instead of reprint the two parts into one. Just note that it is very finicky to adjust the z stop, and is generally a 5-10 minute process to get perfect calibration.Finally, I highly highly recommend getting a 1/4"-3/8" of glass cut for this bed, as well as applying a PEI surface. This will help you stop using ABS slurry or tape to get your prints to adhere.I designed and printed several different tips for the fan, but I have yet to print the perfect fan tip to replace the one it came with. When I do find a perfect fit, I will post a link in my review for the replacement tip.1 YEAR+ REVIEW:Ok, so I noticed several issues that needed to be addressed before I could consider this a good printer.1) the acrylic bed may not be perfectly lined up with the screw holes on the bed. I ordered a replacement y carriage for the MK2 printbed off of reprapchampion.com and because of the design, I needed to print spacers to use the new bed. (spacers on thingiverse under mwinzer)2) the print surface is incredibly slick, and is very hard to stick abs... you might get lucky with PLA... I recommend getting a piece of fitted glass and gator clamp it down. Use blue tape, or if you're feeling fancy, get a PEI build surface for your glass along with the 3M tape necessary to adhere it.3) the Z stop mechanism is a sliding mechanism that resides directly behind one of the linear z rods/threaded rods. I redesigned a z-stop modification and uploaded it to thingiverse. (mwinzer is the name on thingiverse)4) I needed to upgrade the power supply to get the bed to heat beyond 82C, then I noticed the temp jumps to 95C. The temperature table is off in the firmware, and the ANET customer service did not offer an update for firmware, but instead offered the suggestion to "lower the temperature"... long story short: ZERO customer service.It was an amazing journey getting this thing printing like I like it... actually still have a friend that is planning on purchasing this for the same journey... as far as being 100% print ready? You'll have a lot to do. :)
G**.
Decent printer overall - great print quality but with some minor issues.
This is a decent little printer kit with some minor issues.First off, I'd give the instructions and included video 2.5 stars. The two together are serviceable, but some minor improvements would make the experience much better. For example, the printed instructions contain key details regarding which fasteners to use, but not quite enough detail to see how things go together. The video does a better job of showing how things go together (mostly), but doesn't have any of the info about which fasteners to use. So you really have to use both together. It would have been very easy to add the fastener details as text on the bottom of the screen (where they already put some crucial information). And I swear they hired a magician to do the assembly - there is some serious slight of hand happening. On more than one occasion after studying, pausing, rewinding, and replaying the video (which looks like it was shot on a crappy smartphone), I'd assemble the parts in the orientation I *thought* he used, only to find I had the parts oriented incorrectly in the next step. If they say "pay attention to the orientation of this part", then for god sake, show it clearly and for more than 200 milliseconds.As for the kit, most of the major components seems to be of decent build quality, with two exceptions.1. The controller board appears to have no non-volatile memory. This means that settings changes (like jerk and acceleration, which are way too high by default) cannot be saved and must be re-entered whenever the printer is turned on. Now there are some ways around this (ie, set them in the slicer instead, or rebuild and re-flash the firmware), but this goes a little beyond the beginner-ish buyer the price suggests this is intended for.2. The build-plate is very thin and sub support is not rigid (it's acrylic). What this means is the printer does a poor job of maintaining level. Temperature changes are the biggie here, but seems like anything - like the wind changing direction - and the printer loses level. This means you're either leveling every print, or having a lot of failed prints - your choice. I understand at this price point you're not going to get primo parts, but ironically using something stiff but cheap like OSB for this ONE PART (the bed support) would make a huge difference.There are some other minor quibbles, like the dial is so sensitive it's almost impossible to accurately set some parameters, and the hot end temp wanders more than I'd like, but these are minor.Now for the good parts. Like I said, overall the build quality is pretty decent. The steppers, rods, bearings, and lead screws were all good and straight in my kit. The acrylic frame could use some stiffening, but the parts look nice. There were plenty of fasteners, cable wrap, zip ties, and extra screws. If you take your time to figure out the magicians instructions, this is a great way to learn how 3d printers are put together and work.And finally - the print quality. Once you get the bed level and a print to stick, this thing does a damn nice job. It banged out one of the cleanest Benchys I've seen right off the bat. Nice bridges, smooth curves, nicely filled top layers, minimal axis wobble, good heat control. Damn nice. Pics below. (Settings: Cura 2.3 slicer, 3dxTech PLA, .2mm layer height, 220 hot end, 55 bed, 60mm/sprint, 120mm/s travel, 2000 accel, 200 jerk, on painters tape included with kit.)Pros:- Price- Print Quality- Relatively quietCons:- Bed constantly needs leveling- Firmware/controller could use NV ram and some usability improvementsOne quick tip - mount this printer on a stiff board like a piece of plywood. It really helps stiffen up the whole frame.(Disclaimer: I also own a heavily modified Wanhao Duplicator 6 printer)
N**A
buon prodotto
Arrivato puntuale,piccolo difetto nel supporto asse x che ho corretto spessorando la vite dell'asse z. Che comunque voglio rifare in alluminio .Funziona perfettamente e ha già dato ottimi risultati. Nel complesso buon prodotto e poco costoso,consigliabile
A**R
Very solid machine
This printer was a pleasure to put together. The first print was perfect.
D**N
Ok product
Hope hubby likes it, xmas gift
A**E
Five Stars
EXCELLENT PRODUCT!!!! VERY PLEASED!
Trustpilot
2 months ago
2 weeks ago