
DOWNLOAD THE APP


Customer Services
Copyright © 2025 Desertcart Holdings Limited
DOWNLOAD THE APP

📼 Preserve your past, share your story—digitize with ease!
The Diamond Multimedia VC500 is a USB 2.0 video capture device designed for effortless conversion of VHS, Hi8, and V8 tapes into digital MP4 files or DVDs. Compatible with Windows XP through Windows 11, it supports composite RCA and S-Video inputs, delivering up to 720x480 resolution at 30FPS (NTSC). With one-touch capture, included Arcsoft Show Biz software, and social media sharing capabilities, it’s the perfect tool for millennials eager to preserve and share nostalgic home videos before they fade away.


| ASIN | B000VM60I8 |
| Best Sellers Rank | #41 in Internal TV Tuner & Video Capture Cards |
| Customer Reviews | 3.9 3.9 out of 5 stars (6,940) |
| Date First Available | September 1, 2007 |
| Is Discontinued By Manufacturer | No |
| Item Weight | 7.2 ounces |
| Item model number | VC500 |
| Language | English |
| Manufacturer | Diamond |
| Product Dimensions | 4 x 1 x 1 inches |
J**T
This was exactly what I needed to copy VHS to DVD
I came across this product while searching the internet for video capture software/equipment. This was the highest rated AND cheapest product on the market. I was skeptical that it was NOT available locally and that all the stores are pushing the comparable Roxio product for nearly 3x the price (with less favorable product reviews). I took a chance and ordered the VC500, and I'm quite pleased! I had, what appeared to be, a rather unique need for this item. I own a few movies on VHS that were never released on DVD. I attempted to copy these movies on a friend's VHS-to-DVD recorder but discovered that the movies were copy protected and were rejected by the recorder. The VC500 is NOT affected by "copy guard" and I was able to capture the video to my PC then burn to DVD. Although it was quite a time consuming process, it worked well and resulted in a pretty good quality DVD copy of a VHS movie. Please note: This device does not work miracles! Video tape recording were not in HD. They were low rez and sometimes grainy. If there is wear or damage to the tape, or tracking issues with the VCR, these blemishes will be present in the captured video. However, if you have a good clean VHS tape, and a high quality VCR, with clean heads and adjustable tracking, then capture your video, burn to DVD, when you playback the DVD in an up-converting BluRay player, you may be shocked at the quality of the final product. You just can't have unreasonable expectations. Pros - This product is dirt cheap! It works with any device that uses Red/White/Yellow RCA cables, or S-Video. It can capture still images from video. The capture software is ridiculously simple to use. It comes with a 30 inch Red/White/Yellow RCA cable. It also comes with broadcast software (I have NOT used it, but I understand that it allows you to stream live video and upload directly to your You Tube account.) Cons - The instruction manual is in poorly translated Chinese, and ONLY explains how to hook up the device and install the software. There are no instructions for how to use the software. You just have to play around with it til you figure it out. The video editing and movie making software that comes with the VC500 is junk. (I did try to use it and after 4 hours of burning I ended up with a DVD that wouldn't play.) During installation I receive a message that this was not Windows Logo approved software and to basically continue at my own risk. (It didn't seem to cause any problems with my computer.) Tips - Use your normal "New Software Wizard" to get started. Depending on your version of Windows the drivers may load automatically. Make sure you have lots of RAM and plenty of free hard disk space. Video capture is very sensitive, so I found it is best to reboot before starting and don't open any other programs. Avoid using the editing and burning software that comes with this device. I used Nero and ended up with very professional looking results. Other uses for this product include: transferring home video, capturing video clips for presentations, capturing still images from video, recording or broadcasting from gaming consoles, capturing stereo audio from analogue devices (that play cassette tape, reel-to-reel, vinyl, etc.).
E**S
Simple, Reliable Way to Digitize Old VHS Memories
Simple, Reliable Way to Digitize Old VHS Memories I’ve been looking for a straightforward way to transfer old family VHS tapes into a digital format, and the Diamond Multimedia VC500 delivered exactly what I needed. Setup was painless: plug the USB device into my PC, connect the VCR with the included cables, and install the software. Within minutes I was previewing the footage. The software isn’t flashy, but it’s easy to use and gets the job done. I especially like that I can capture straight to my hard drive or create files ready for burning to DVD. The editing features are basic but useful for trimming out dead space or rewinding past static. The video quality is about as good as VHS gets—grainy in places, but that’s just the source. Audio stayed in sync, which is important. One thing to note: the device works best if your tapes and VCR are in decent condition. If the source material has a lot of tracking issues or damage, no converter will make it perfect. Also, the included cables are a bit short, so you may want to have longer ones on hand depending on your setup. Bottom line: A solid, user-friendly tool for anyone who wants to preserve VHS tapes before they degrade further. It’s not professional studio gear, but for personal archiving and family memories, it works beautifully.
R**D
works with windows 8, read for an unbiased review
this was my first ever capture card purchase and as with anything when you buy something for the first time, you have to rely on other people's opinions, with so many different opinions it can be dicey, this review is based off recording gameplay in sd, i did not try the vcr hook ups, i want to say that to me this product works great, all you need is av cables from your system { wii, xbox, ps3 ect}. a double sides composite cables { red, white yellow} and 3 female to male audio splitters, super cheap on here, and of course obv a pc. i was worried as i saw many people say this would not work with windows 8, and i could not downgrade, so i had to hope it would work, i popped in the cd, just focus on the first 2 options, install drivers and install software, despite what the book tells you put the cd in first, plugging in a usb device then hitting cancel is just stupid with no logic. there are many useful videos on how to connect the device to you're system, i did it in 5 minuts, via you tube, so in closing i just wanted to add that this DOES work with windows 8, with no problems, i got no error messages, i think that the majority of the people that say * this product is sh....t it's broke * have sub par computers, or are trying to do it via a laptop which unless you have a powerful laptop you may run into many issues, and for the record my pc is pretty crappy, it's an all in - one hp touch smart, so my rig isn't blowing anyone away with specs, heck i only have 4gb of ram, it's a poor computer, and loud, but i had no ISSUES at all, i recorded my gameplay video, and quite frankly i expected the quality to be far worse after gaming in hd for years now it can takea while to get used to that again, uploaded video, checked it out and i am pleased for the price, for the money this is the best product on amazon imo, no green lines, no lagging at all, you can be up and recording walkthroughs and whatnot in a matter of minuts, 2 cons i would say i uploaded a 4 minute video of halo, and it was 5.43 gb of hard dive space, and it takes a whle to publish the video, so make sure you have possibly a couple hundred of gbs of hd space, and unless you have a really good laptop, with at least 4 gb of ram, you may have issues, but as for me it does as advertised, hope this review helps you decide if you want this or not
T**O
Buon prodotto, buon rapporto qualità prezzo, confezionato correttamente, esegue la funzione senza problemi, si istalla facilmente . . . .
A**A
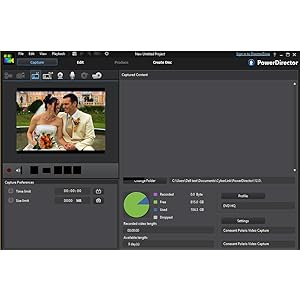
Works fine and is easy to use. Latest version requires Windows 10, and once you install the drivers, you can install Cyberlink PowerDirector and capture there with ease. You need to select quality of recording (MPEG2 is best for interlaced material and can be set to be near lossless at 15000kbps, plus AC3 at max bitrate) and the source (play around with the few choices until you see and hear the signal, defaults rarely work). Button on product is useless. PowerDirector is a bad program for this however because every time there is a non-recorded part in a video, it complains of copyright abuse and deletes the video recorded thus far. This is the same for all commercial programs, since the snow effect of a blank VHS has been used for copyright protection at some point. Work around that (check the end of videos and be sure to program the end of recording at that mark or manually interrupt recording), and it is a simple way to save your videos. It is not worth going for free programs, as they complicate other matters. Just know that the hardware and drivers of the current version are for Windows 10, and you need a previous version for older Windows. The VCR needs also a TBC no matter what version of the product you use (either integrated or separate). SVHS PAL to MPEG2/AC3 on Windows 10 x64 works fine here. Quality is excellent (I used a DVDR previously), but not comparable to old TV or DVD quality. The finest of my SVHS has 450 lines of definition, VHS 250 lines on PAL (576 full SD resolution), and it is not even NTSC (480). But that is not the fault of the product. Don't use MPEG4/H264 as it works poorly with interlaced materials, and don't increase resolution above SD (no 720/1080).
G**Z
Nu har 11 band blivit digitala och det gick alldeles utmärkt! Bästa produkten!
A**R
Just streamed live. Working good
C**K
Exactly as described along with quick delivery. Excellent Amazon experience and seller is responsive. 5 Stars * * * * *
Trustpilot
2 days ago
5 days ago