🏡 Upgrade Your Floors, Upgrade Your Life!
The WORKPRO Laminate Wood Flooring Installation Kit is a comprehensive solution for both domestic and professional flooring projects. It includes a reinforced double-faced mallet, a heavy-duty pull bar, a solid tapping block, and 30 non-slip spacers, all designed to ensure a seamless and efficient installation process for laminate, LVP, LVT, vinyl plank, and hardwood flooring.
A**D
Great flooring tool kit
Really nice complete set of tools for laminate flooring. Sturdy tools and works great. Highly recommended!
P**C
Better than expected, Poor reviews are due to inexperience
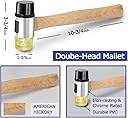
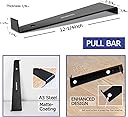
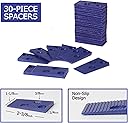
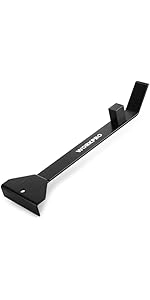
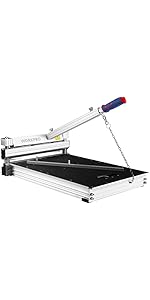
I purchased this for a 600 square foot, 1/2" thick engineered flooring installation in my home. For $22 my expectations for quality weren't that high. I'm originally from the electrical trades and rarely buy low quality tools. I've installed 3/4" hardwood flooring before but this was my first engineered flooring project. I figured for $22 bucks a lower quality kit will get me started and if it doesn't last, then lesson learned and I'll purchase a better one if needed. I have to say the quality exceeded my expectations. The pull bar is heavy gauge and has felt pads so it doesn't scratch the floor as you use it. I also was expecting a fisher-price type hammer but the hammer is a decent quality FOR WHAT IT'S DESIGNED TO DO.The spacers (actually shims) came in handy as well. Those complaining that they are shims as opposed to spacers do not understand the intent. Walls are often not perfectly plumb, so you sometimes do not want equal-sized spacers against the wall - you want variable sized shims to put pressure on the first course to keep it straight, based on the assumption you snapped a square line for the first course. If you use equal sized spacers, the first course will now be aligned with the more than likely out of plumb wall, making the remaining rows out of square. Inexperienced users should not leave reviews.Keep in mind....the pull bar, hammer and tapping block are not meant to endure heavy blows - they're meant to "tap" pieces and ensure a snug fit. Realistically, you use a little more force than tapping, but you're doing something wrong if you need to whale on the hammer, block or pull bar. That means you're forcing pieces to fit together, indicating something is wrong with your installation. I can only imagine those that said the bar bent or the tapping block or hammer fell apart are subjecting them to forces they're not designed for and that shouldn't be needed if you're installing the floor correctly. Anyone busting these tools is clearly not using them properly. So that being said....I wouldn't buy this for professional use and I'd recommend it ONLY for installing laminates, vinyl and engineered flooring - NOT for 3/4" hardwood flooring - you'd need a heavier-duty set for that. But for a few DIY laminate/engineered wood floor projects, I think it's a good buy. This kit will be around for my next engineered flooring job upstairs.Update Jan 2021: I just completed another engineered flooring project upstairs (720 sq ft) using the same kit. It's still good enough to keep, even though my flooring is all done. See the pictures of the tools AFTER installing over 1300 square feet of engineered hardwood flooring. I seriously don't know what people are doing to break them. Obviously inexperienced at installing floors.NOTE: I purchased this item on Amazon for full price and have no affiliation to the seller. I try to write helpful, unbiased and insightful reviews because I also read reviews prior to making my own buying decisions. I notice many reviews lack helpful information, are not well written or give poor reviews based on not reading directions, inexperience or failing to read the product details prior to purchasing. Writing valuable reviews helps pay it forward.
C**.
decent entry level LVT/LVP toolset
This toolset is not bad for a beginner like me to use for putting down LVT. The rubber mallet feels great in your hand and works excellent to pop the floor into the joint.The metal pull bar works great but is a little on the thicker side if you're in a super tight spot it can be hard to fit but leaving a gap it works fantastic.The spacers are handy but i opted to not use them with my setup since I needed to adjust the floors course so it would be even on both sides of my room (OCD kicked in with this one haha) so I needed to have a 1.5" width on my course at both sides of the room to make it completely even with the room.My only slight complaint and I only am taking 1 star out of it because it might work better for thicker flooring than the 20mil flooring I installed, but the tapping block was impossible for me to use. I ended up just locking most courses in by hand or using a slight tap with a scrap piece on the end inside the tongue/groove and the rubber mallet to tap the course in and get it to lock in place. The tapping block is too light and lacks a handle to help you slide it on the tile. What I did get the tapping block to help with was to use a scrap piece of floor inside the groove and tap the block on the flat cut end of the flooring to tap it in.
K**7
Must have for Vinyl Flooring
I used this to install our luxury vinyl flooring and I couldn't have done it without these. Buy the kit, its worth it.With that said let's dive a bit deeper:Ok so the little blue wedges are almost useless, however I got stuck in a spot where I couldn't move my fridge onto the new vinyl planks without breaking the click lock connectors, so I used those wedges, lined them up against the planks and pushed the fridge right onto the new floor, it was a blessing. But for actually getting that 1/4in from the wall that they are used for, I would buy other spacers for that.Next up the tapping block, I actually got another type of tapping block, more expensive and it was useless, I literally tore my flooring with it and broke the click lock connection in multiple places. So I threw it out and went back to the one in this kit. This tapping block was my best friend throughout the installation, its a must-have 100%.The black metal bar you use for the edges I have mixed reviews on, when it doesn't slip its great, however when it does slip it may cause you to hit your hand with a hammer... which sucks. So pro tip, once you put one side of the bar onto the edge, use one of your scrap vinyl pieces or even the tapping block under the other side that you hit with the hammer. this elevates the end that you hit and keeps the side that is connected to the edge from sliding around, you still have to hold it in place while you hit but its a LOT less slippery! I hope this helps :)
E**E
Flooring installation kit
Perfect tools for flooring installation.
B**L
Great Kit!
Does exactly what it is supposed to do! I had to double up on the spacers to get the required 1/4 inch expansion allowance for my flooring, but there are plenty of spacers in the kit.
C**H
Descent set for the money.
This set works pretty well, but the pull bar bent on me and I had to straighten it out a couple of times. (You're right - I shouldn't have been hitting it that hard, but I had a couple of tough spots in the floor.) The bar has a couple of felt pads but IMHO not enough. I put the two pads under the end that catches the plank, and added another big one at the hammer end. MAKE SURE YOU ADD ENOUGH to protect your planks. The other parts are decent. The plastic tapping block is hard enough to damage the wood if you get too aggressive. (Better to use pull straps for the problem planks and resist hitting them.) I found the shims almost worthless as they are too thin for most applications. I needed a 1/4" perimeter gap, so I bought other, adjustable spacers that worked great. The hammer is a nice touch, and the two head give you some choices. I used the rubber side exclusively.
Trustpilot
5 days ago
2 weeks ago