🔌 Charge Ahead with Confidence!
The 4pcs 2A 5V Charge Discharge Integrated Module is a versatile PCB board designed for 18650 lithium batteries, offering a comprehensive solution for charging, discharging, and protection. With advanced safety features and user-friendly controls, it's ideal for both hobbyists and professionals looking to enhance their electronic projects.
D**L
Charges a 3.7V Lithium battery with a 5V input, and Boosts the 3.7V to a 5V output.
This is a nice little board. With 5V in, the board charges a 3.7V Lithium battery. When you remove the 5V input, the board boosts the 3.7V from the battery to a 5V output. Its a charger and a booster in one board. There is not a lot of info for this board, but it appears to be a clone of a IP5306, which I have included in the photos. The picture that is included on Amazon shows a 200mAh battery but I used it to charge my 5000mAh battery, which I also purchased on Amazon, awsome battery. It took 24hrs to fully charge my 5000mAh battery. The description says that you can charge and discharge at the same time, but I have not been able to get this to work. When I have 5V to the input pin, the output pin is low, or 0V. When I remove the 5V from the input, the output pin goes high, 5V. The only thing I can get the KEY pin to do is to shut the board down, whether charging or discharging, by holding it low, 0V, for 20 seconds. Also the push button on the board does the same thing, provides 0V to the KEY pin. My plan is to solder onto the LEDs and tie them into an Arduino and write a sketch to charge the battery if its below 25% and not in use.
T**S
Great Lithium Ion Charger
I use these to charge old batteries from Switch controllers for hobby projects. Make sure you install the battery last so you will be less likely to fry the circuit. I have fried a few. Use tape to cover the solder leads if you need to. The power plane pieces are very close and slightly difficult to solder. But with patience, you can do it!They also work with bigger batteries like this!https://www.amazon.com/gp/aw/d/B0B4DRZBWX?psc=1&ref=ppx_pop_mob_b_asin_title
J**E
Well buit.
This was just right for my use, i hooked up a battery pack to it and the out to a bluetooth board amp, and a usb c female connector on the in to charge battery when ever i need to. Its very small so i can stuff it out of the way as long as i can get to the on button.100% recomend.
J**R
I'm Not Sure?
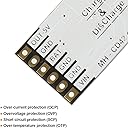
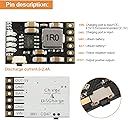
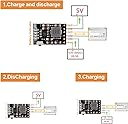
I'm building a temperature monitor for my freezer, and one reason i'm doing that is because it's on a circuit with a flaky GFCI along with whatever electrical devices get used in the bathroom. Every random once in a while the freezer loses power. I want to be notified if the temperature rises, for whatever reason, so i require a battery backup on my project.There's no instructions for this module, i can't find an equivalent module that does have instructions, and the vendor's notes on the listing are somewhat... ambiguous. So i can only report my observations.First thing i did was hook up a battery. It did absolutely nothing. No lights, no power. So i pushed the button and it lit up with charge indicators and it output a boosted 5.1xx volts.Next i supplied 5V power and it seemed to be simultaneously charging the battery and outputting power for my project. I say "seemed" because my battery was slightly low and the 4th charge indicator was blinking. It's still outputting 5V, so does seem to do both. But then if i turn off the supply voltage, it only continues supplying battery power for a bit more than 30 seconds and it shuts down. No lights, no power. Pushing the button or shorting the "key" pad to ground brings it back to life. Alternately, pulling it low every 20 seconds (or any time before that 30-something second timeout) prevents it shutting down. This is what i gather the vendor is trying to get across in the description.Here's the code i used to test it:// Define output pin for controlling the "key" padconst int keyPin = D5;void setup() {// Initialize digital output pinpinMode(keyPin, OUTPUT);}void loop() {// Short the "key" paddigitalWrite(keyPin, LOW);// Delay for 1 second to ensure a stable shortdelay(1000);// Release the "key" paddigitalWrite(keyPin, HIGH);// Delay for 19 secondsdelay(19000);}This kept it going for the half hour i bothered testing it, so it appears it will work to my purposes. I'm just not sure why it's built like this.Please treat my observations with an understanding of my limited understanding.The 3 stars isn't because of my uncertainty, it's because my displeasure at lack of documentation, specs, or even articulate guidance on how to use. Also i had to pull my real-time clock from the project because it wouldn't work right on battery power, even a fully charged high capacity one. No info on current rating for battery power, but an RTC really isn't much of a load. OTOH i have a long run of wire on the temperature sensor...?I'm just not sure.
B**S
Great 5V backup source for projects from 3.7V Lithium cell
I use these as a backup for Arduino/ESP and RPi projects where i want battery backup from a single cell Lithium 3.7V battery. If you're doing a cold start then you do have to press the key, but once you're project is live that isn't required and you don't need to access it again.I have fried one board by messing up with reversed polarity on the Vin side, but otherwise no issues.
J**M
Doubtful
I just got these boards and after hooking them up I already had 2 start smoking from the circuit board after I double checked everything the output shorted out on the first one and the battery terminals shorted out on the second one... So update I tried adding a voltage regulator to the last one and it fried too I'm trying to make a simple charger waste of money for me
M**.
Love these
Bought for one reason, yet these solved a completely different problem. Love that I can connect these to a battery, then connect to a device, and keep it topped up unattended. Saved me so much headache
C**N
Charges
Great little chip does what it's supposed to and it's cheap
Trustpilot
1 month ago
2 weeks ago