🎯 Power up your space with sleek, wire-free style!
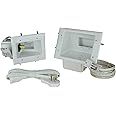
The DATA COMM Electronics In Wall Cable Management Kit combines an 8 ft low voltage cable concealer with a duplex power outlet, enabling a clean, professional home theater look. Designed for easy DIY installation without electrician help, it supports multiple HDMI and A/V cables while meeting ETL, UL, and RoHS safety standards.
B**N
If you are going to run anything in the wall behind a flat panel TV, this is the way to do it.
I recently built a house and it has a loft. It's a really big space, and it needed a really big TV to fit the wall space. So I got a LG UR8000 Series 86" 4K UHD LED TV. It's big. But it fits the space beautifully. But in order to dignify such a beautiful device, I simply couldn't have any of the cables dangling down the wall behind it. I had to bury the cables in the wall. And I had to deliver power to an outlet behind the TV *safely*.This kit does just that for you.It includes two wall plates with pre-installed outlet fixtures (one female and one male -- we'll get to why that's important in a minute) and slots to run cables. You simply cut out the shape of the old work boxes you will be installing, run *all* of the cables at the same time (the cables you want in the wall, plus the included 14/2 Romex), and then install in this order:- cut the holes- run all the cables plus a pull string (we'll talk about that in a second too) between both rough openings- install both old work boxes, pulling the Romex through the electrical box, and dropping the rest of the cables out of the big openings- wire up the outlets on the top and the bottom- pull the rest of the cables and the pull string through the cable run holes and install the wall plates- plug in the extension cord- ProfitThe extension cord is the part which makes this solution electrically safe. Included at the bottom is a male plug instead of an outlet (think of it as an inverted outlet). This means that the system is NEVER POWERED until you plug an extension cord (included) into that male plug at the bottom, and then the other end into a standard wall outlet. This is literally the safest way to supply power to the back of the TV.I also mentioned putting a "pull string" in the wall along with any connectivity cables (i.e. HDMI, SPDIF, etc). The pull string allows you to add future cables with ease. PRO TIP: Cut two equal lengths of pull string; put one in the wall, and leave the other one nearby. If you want to run another cable, simply attach it to one end of the pull string, *along with the other length of pull string*. Then go to the other end of the pull string and pull it out, pulling the new cable plus the new pull string into place. Detach the new cable from the old and new pull strings, and you're done. The new pull string stays in the wall along with the new cable, ready for the next time you need to pull a cable through. Put the old pull string away for that next time. Rinse and repeat.It really couldn't be easier, and it looks totally professional. If you are going to run anything in the wall behind a flat panel TV, this is the way to do it.
I**
Great product. Need a little know how in order to install.
Any electrician will tell you not buy these. But if you have the know how to wallfish and don't want to pay an electrician to run a new outlet and have to deal with drywall repair, these are the choice. Ive bought and used two in my home now and they work great. They have grounded plug, and transfer full power. I still have 4 more tvs to hang in my house and will continue to use these to install the rest.
J**A
Easy to use as long as u have a little experience
As long as I have a little experience with basic wiring it's easy to install I used a multi tool ( oscillating tool) to cut the holes but a job saw would work just fine only other tool you need is a level and a screwdriver...I used thumb tacks to hold the template on the wall used a level to make sure it's straight and level on the wall outlined with a pencil and cut it out with my multi tool then repeated the process on the bottom of the wall then used glow rod to fish the cable down the wall put in the j box's screwed the dog ears in to attach them to the wall used a screwdriver to connect the wires and used the included wire nuts on the other end screws everything down and was done in less then 20 mins just make sure the top and bottom hole are in the with in the same stud and check for fireblocks in the wall before you start or your gonna need long drill bits and possibly some drywall patch if you don't know what I'm talking about might want to have someone with experience do this or watch a bunch of YouTube videos til you do
N**Y
Works well and Easy to Install
After never doing an in-wall installation before, I was just a little intimidated by this kit. But, I was working in my gym and really didn't care about screwing things up, so I went ahead and took the shot.This kit worked out really well. The instructions were pretty simple, perhaps requiring a bit of assumption to fully comprehend, but I was able to work out what they meant well enough. Note that when it says "designed to be installed between studs," it means that there are no stud mounting points for the in-wall electrical boxes, so you want to keep a bit of distance between them and the studs.Based on some reviews, I cut out the provided template just a tad small and really used it just to establish the corners. Wanting things level, I used a large level to draw the final square on the drywall where I wanted the plates to go. Then, I drilled some initial guide holes in the corners and used my drywall saw to cut out the wall. Once I had the holes, I roughed in the plates to check fit and level, and then refined the cut a bit to get everything right. Note, though, that the plates use little "flappers" that tighten against the inside of the wall when you screw the plate in to hold it in place. The top flapper extends just a bit outside of the square when set in the initial vertical direction, so I had to notch the wall a bit on the upper right-hand corner of the square to set the plate on the wall.Next, I installed the electrical boxes. Easy enough using the same "flapper" hold system as the plate. The instructions are not really explicit that the boxes are for covering up the left-hand side of the plate that holds the power, plate only has screw holes on that side for mounting the plate to the box. The boxes secured to the wall easily. I then checked for plate fit one more time and filed the wall a bit more in the necessary places. Another thing not explicitly stated in the instructions is that you need to punch out holes in the back of the box to allow the wire through. Easy enough to do, but I suggest doing it before you install the box.When it came to the wiring, it was fairly easy to manage if you have a good wire cutter. The outer sheath is very strong and the wire seems to be good quality. I ran the wire through the wall first with a wire pull rod, put it through the punched out holes of the electrical boxes, and then did the stripping. The instructions were then perfect for matching the wires and wiring up the power sockets. Then, I ran an in-wall rated HDMI cable through the wall and then through the plates. After that, I secured the plates. Everything is tight and level.A couple of notes that cut a star off of the rating. First, I was disappointed that the low-voltage ports on both plates are pointed in the "down" direction. I would have preferred the lower plate (the one you generally put power to) were pointed in the "up" direction to more easily facilitate future cable runs. You could always flip the plate, but then the power would be upside-down. More cosmetic than anything. Also, the power cable sticks a good bit out of the wall. I would have preferred the end to be a bit smaller to put the bend a little more flush with the plate.
Trustpilot
1 month ago
5 days ago