
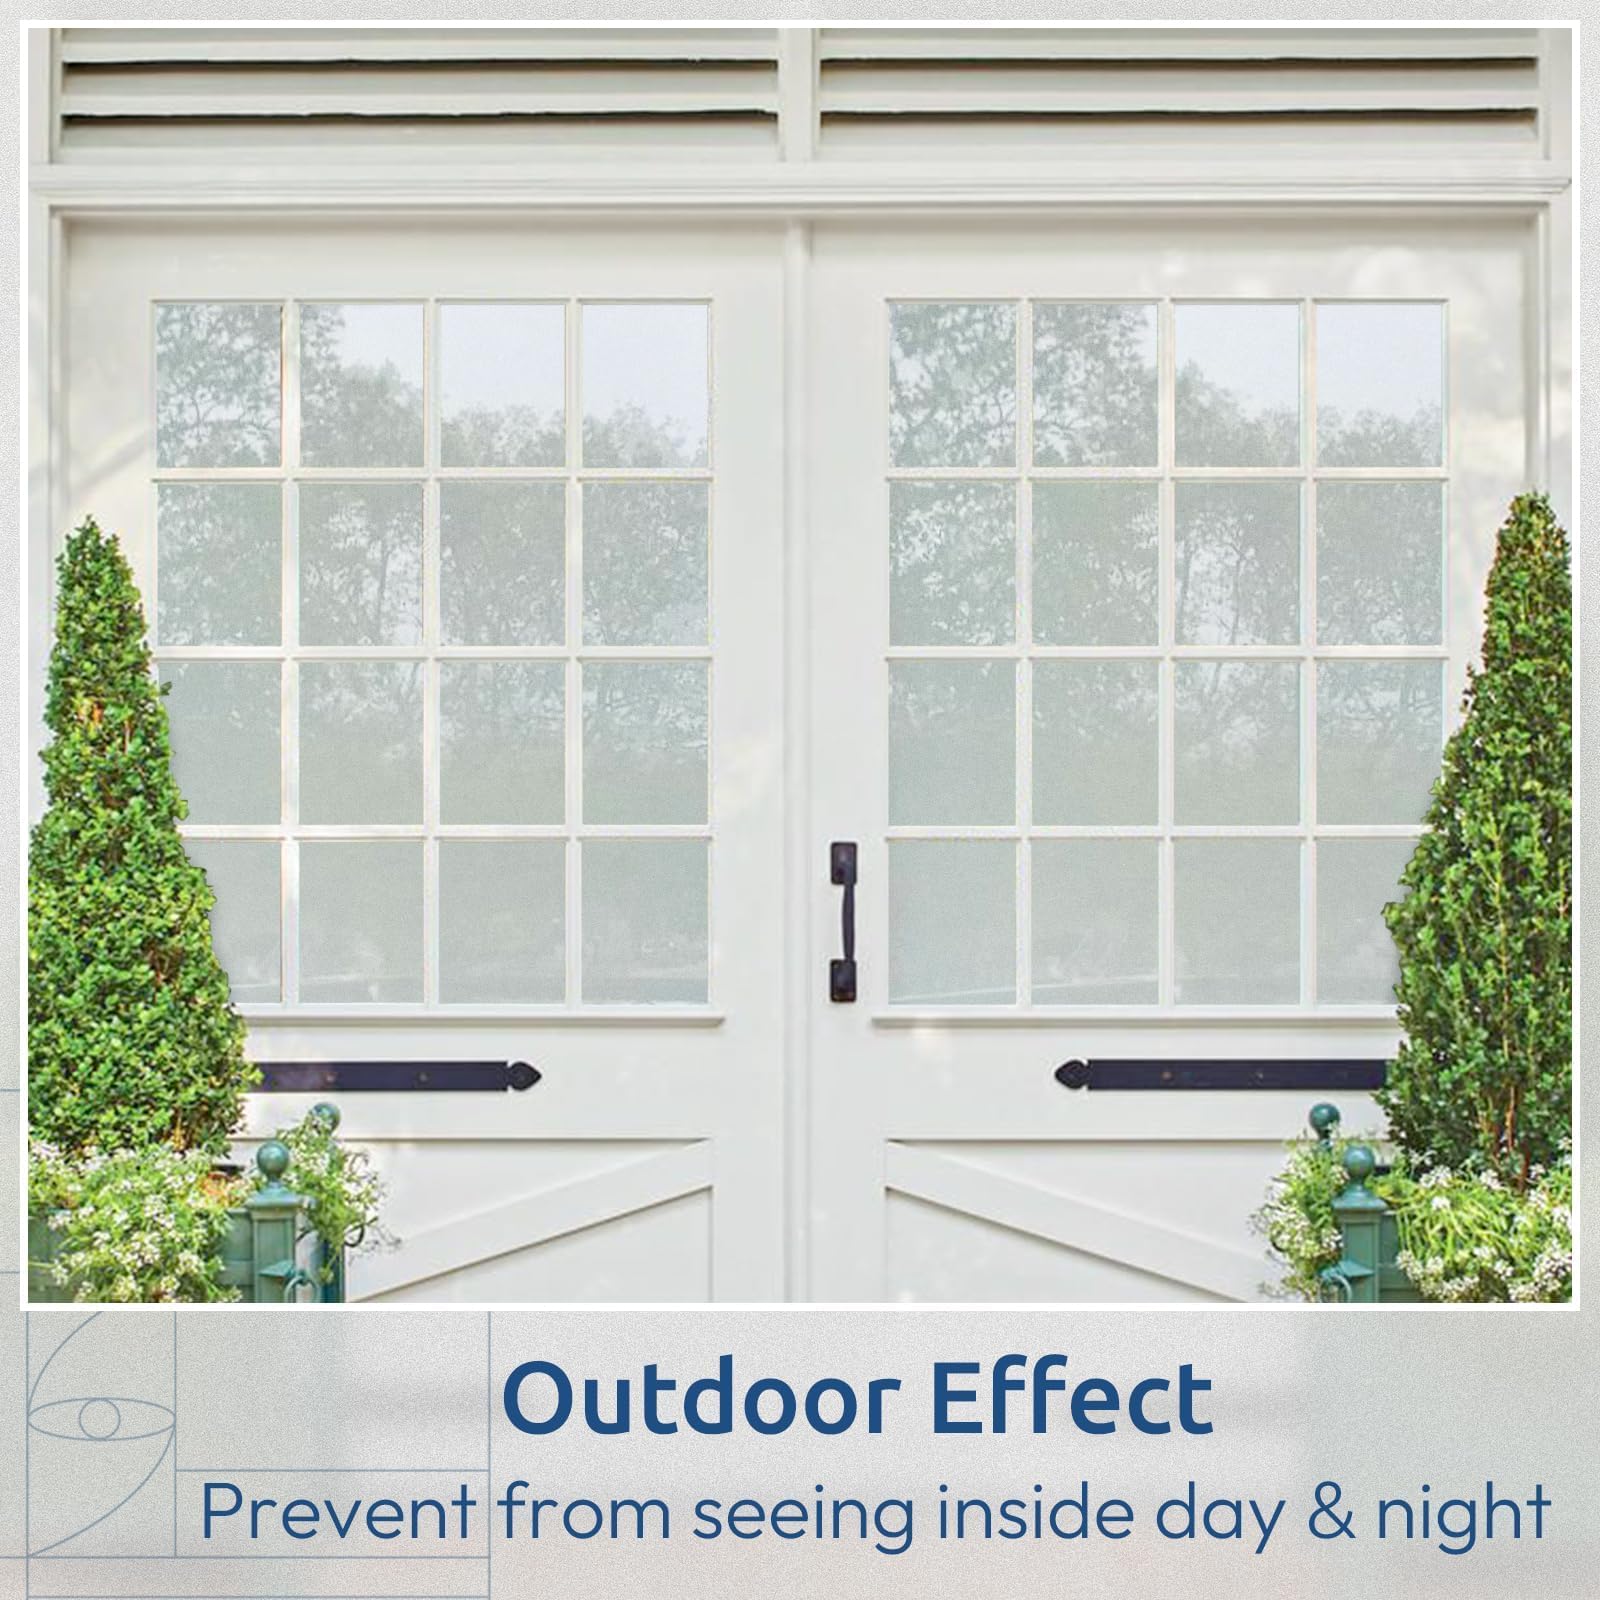
🔒 Elevate your space with privacy that shines through!
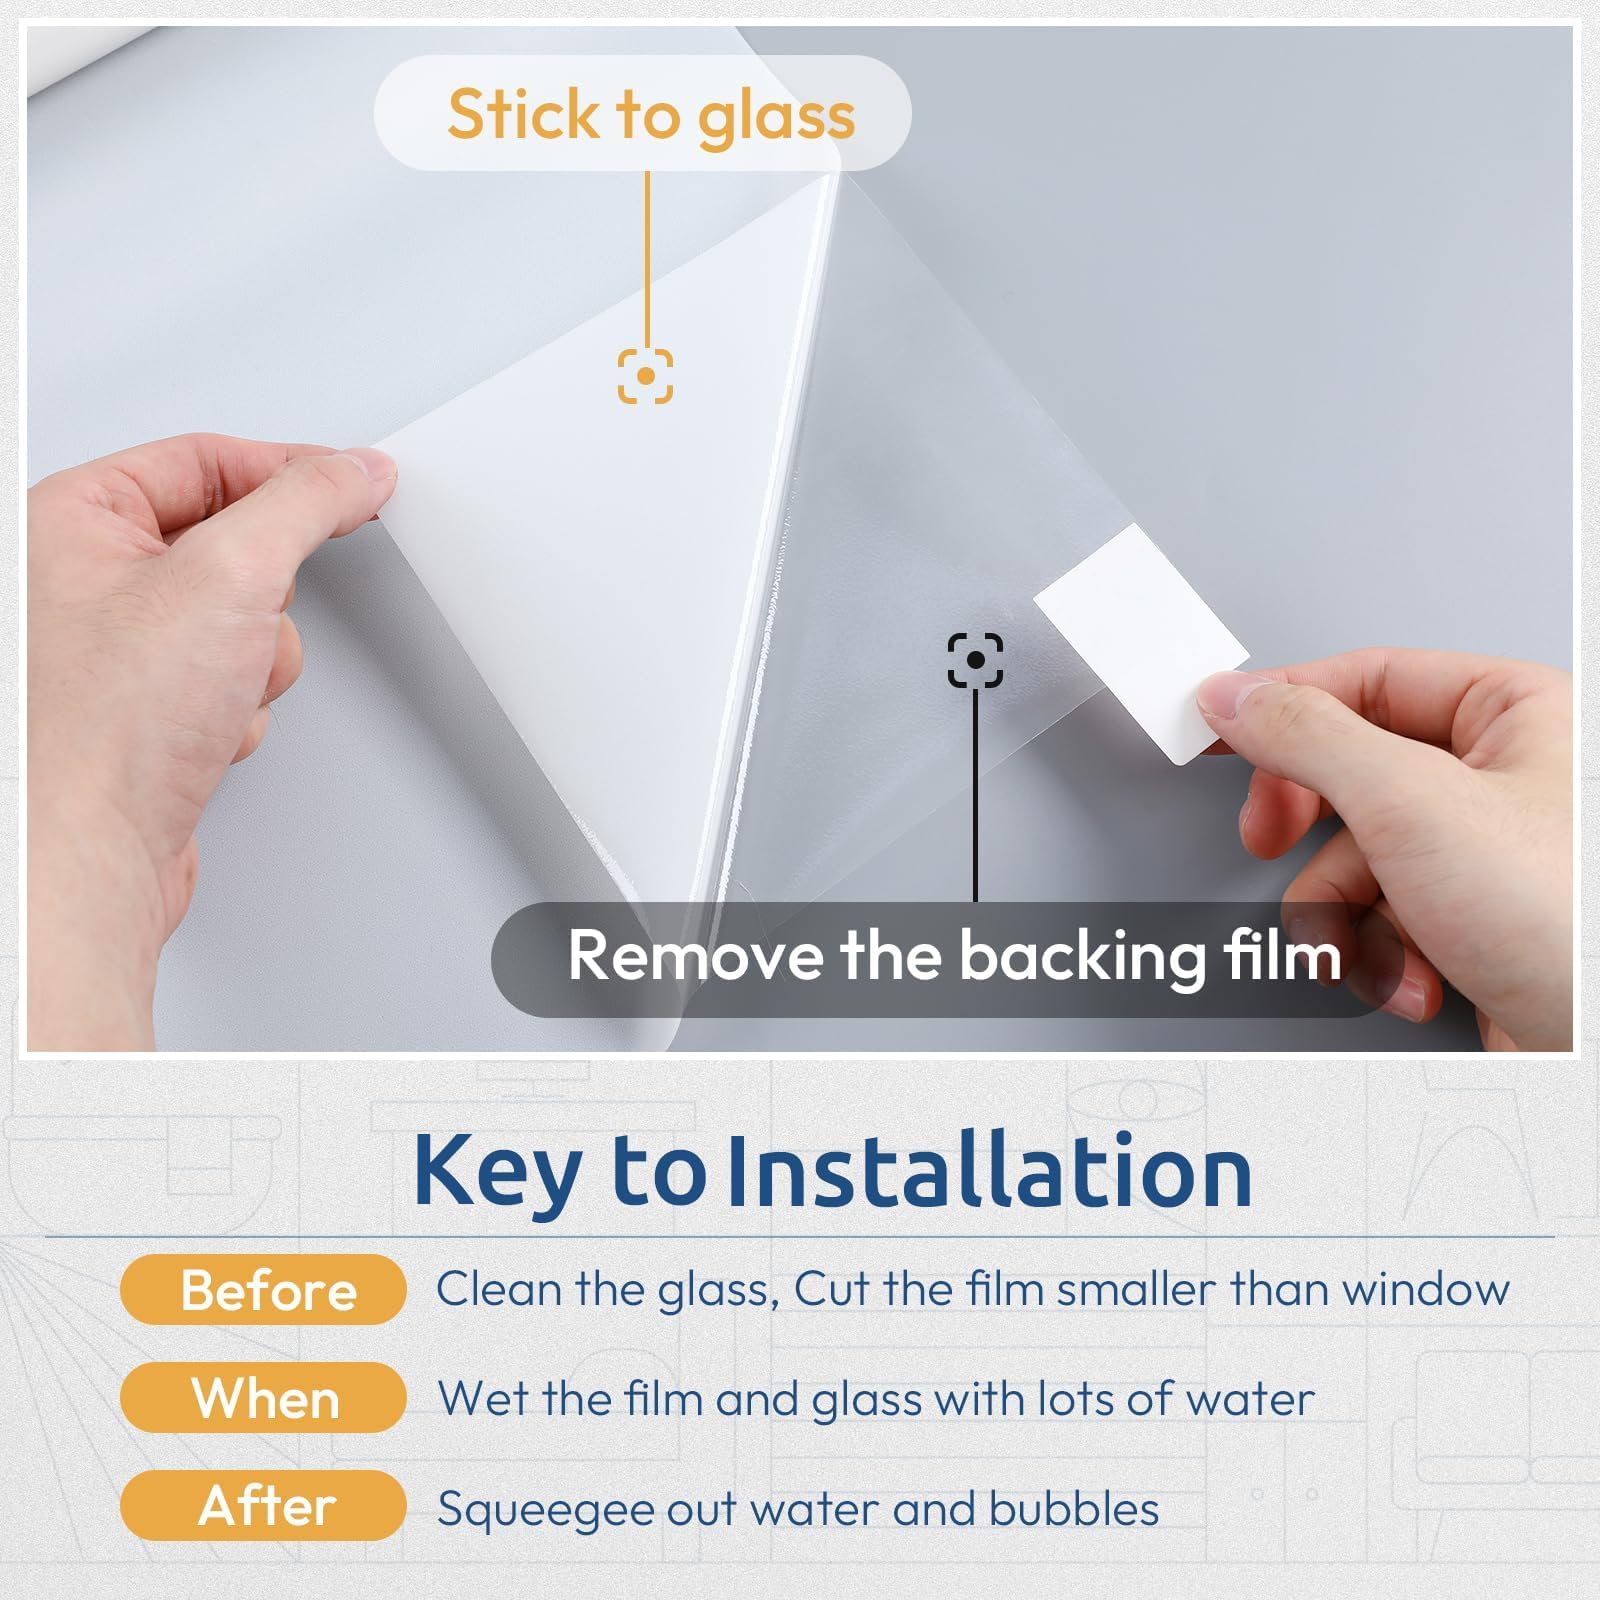
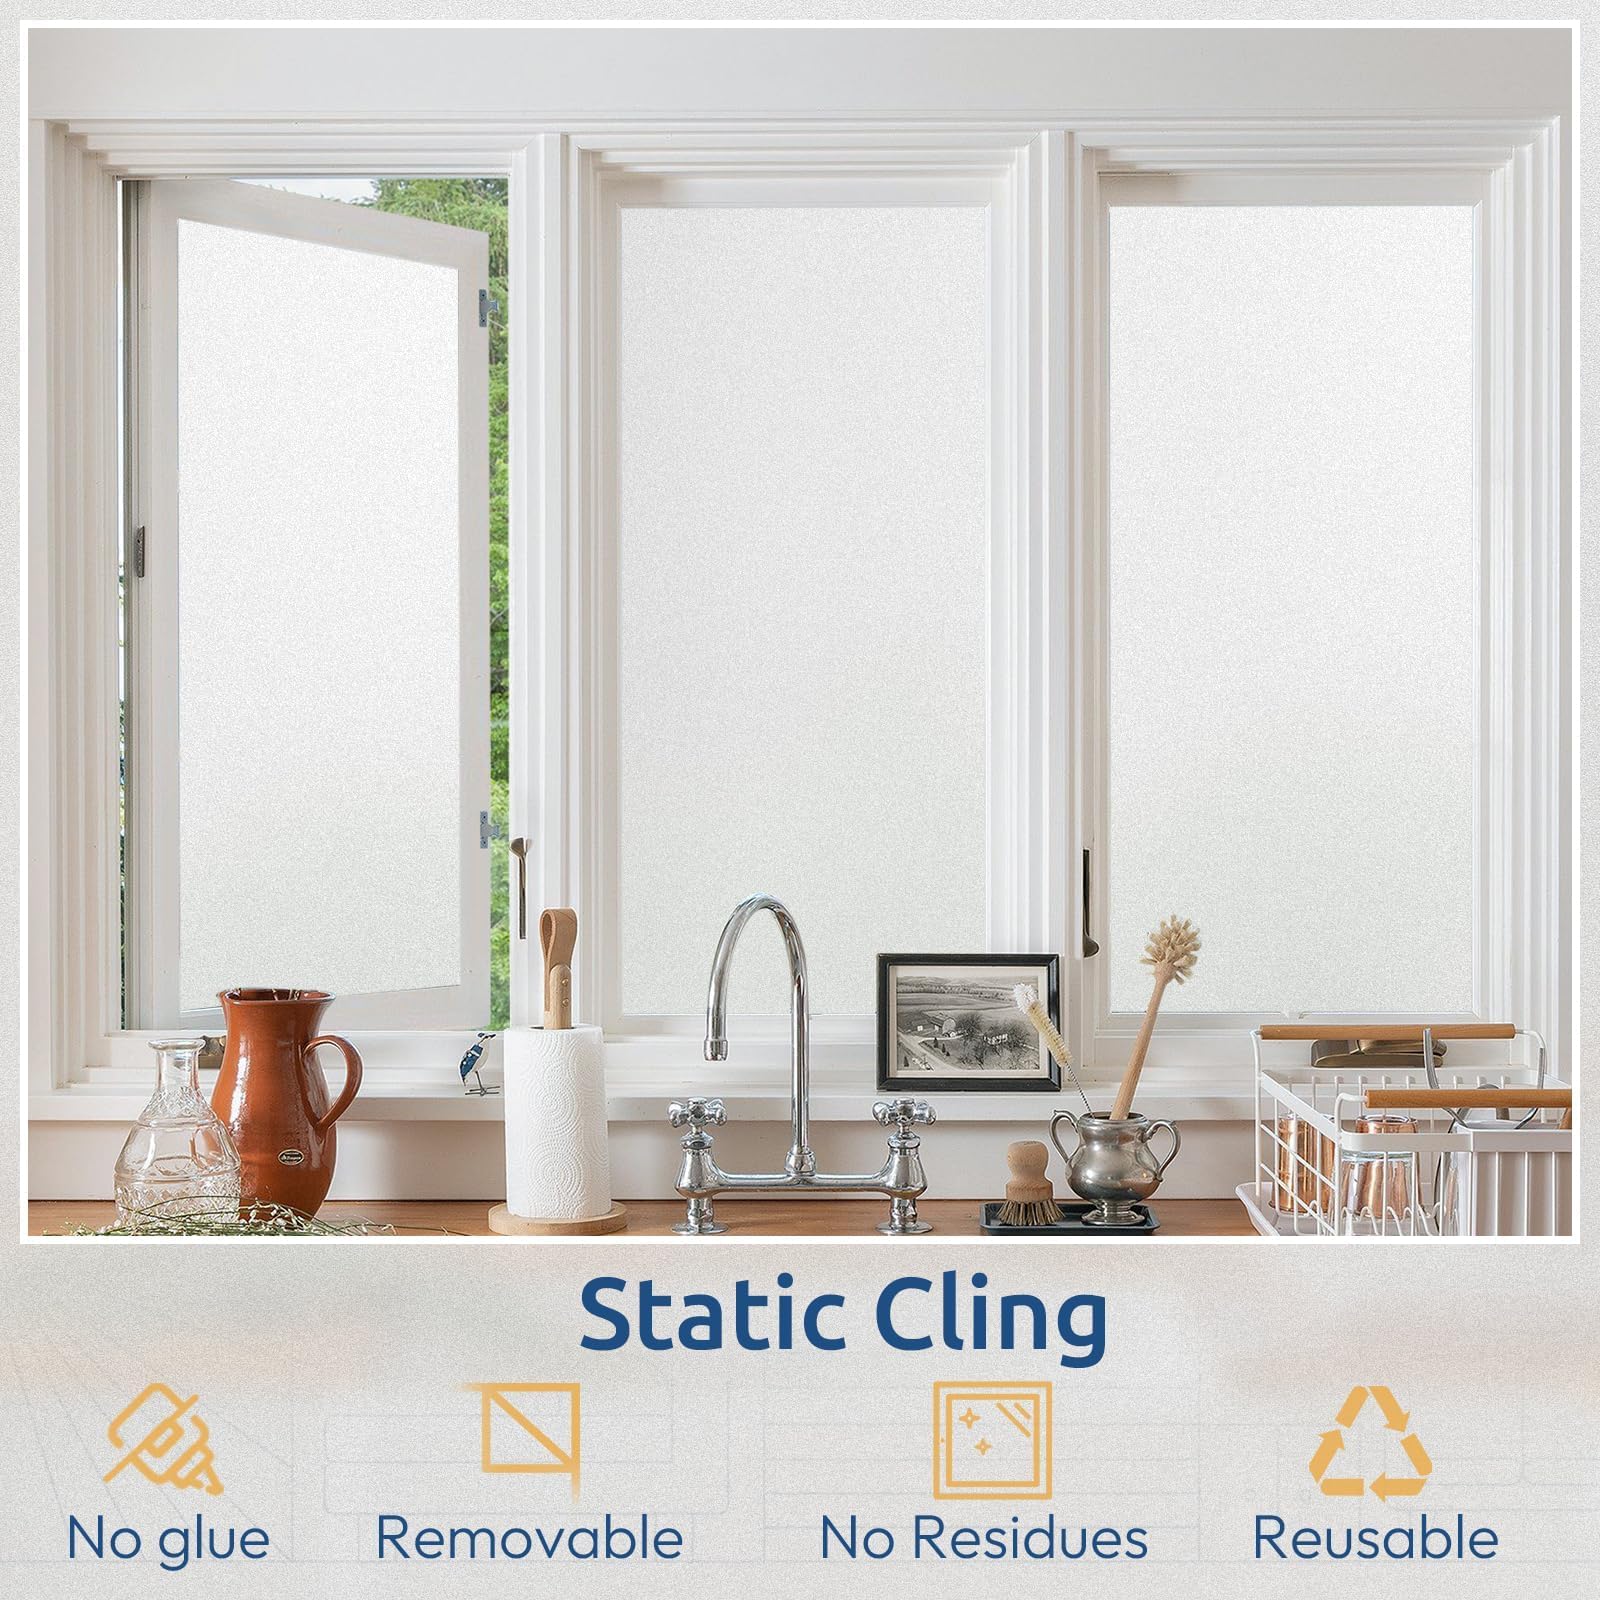
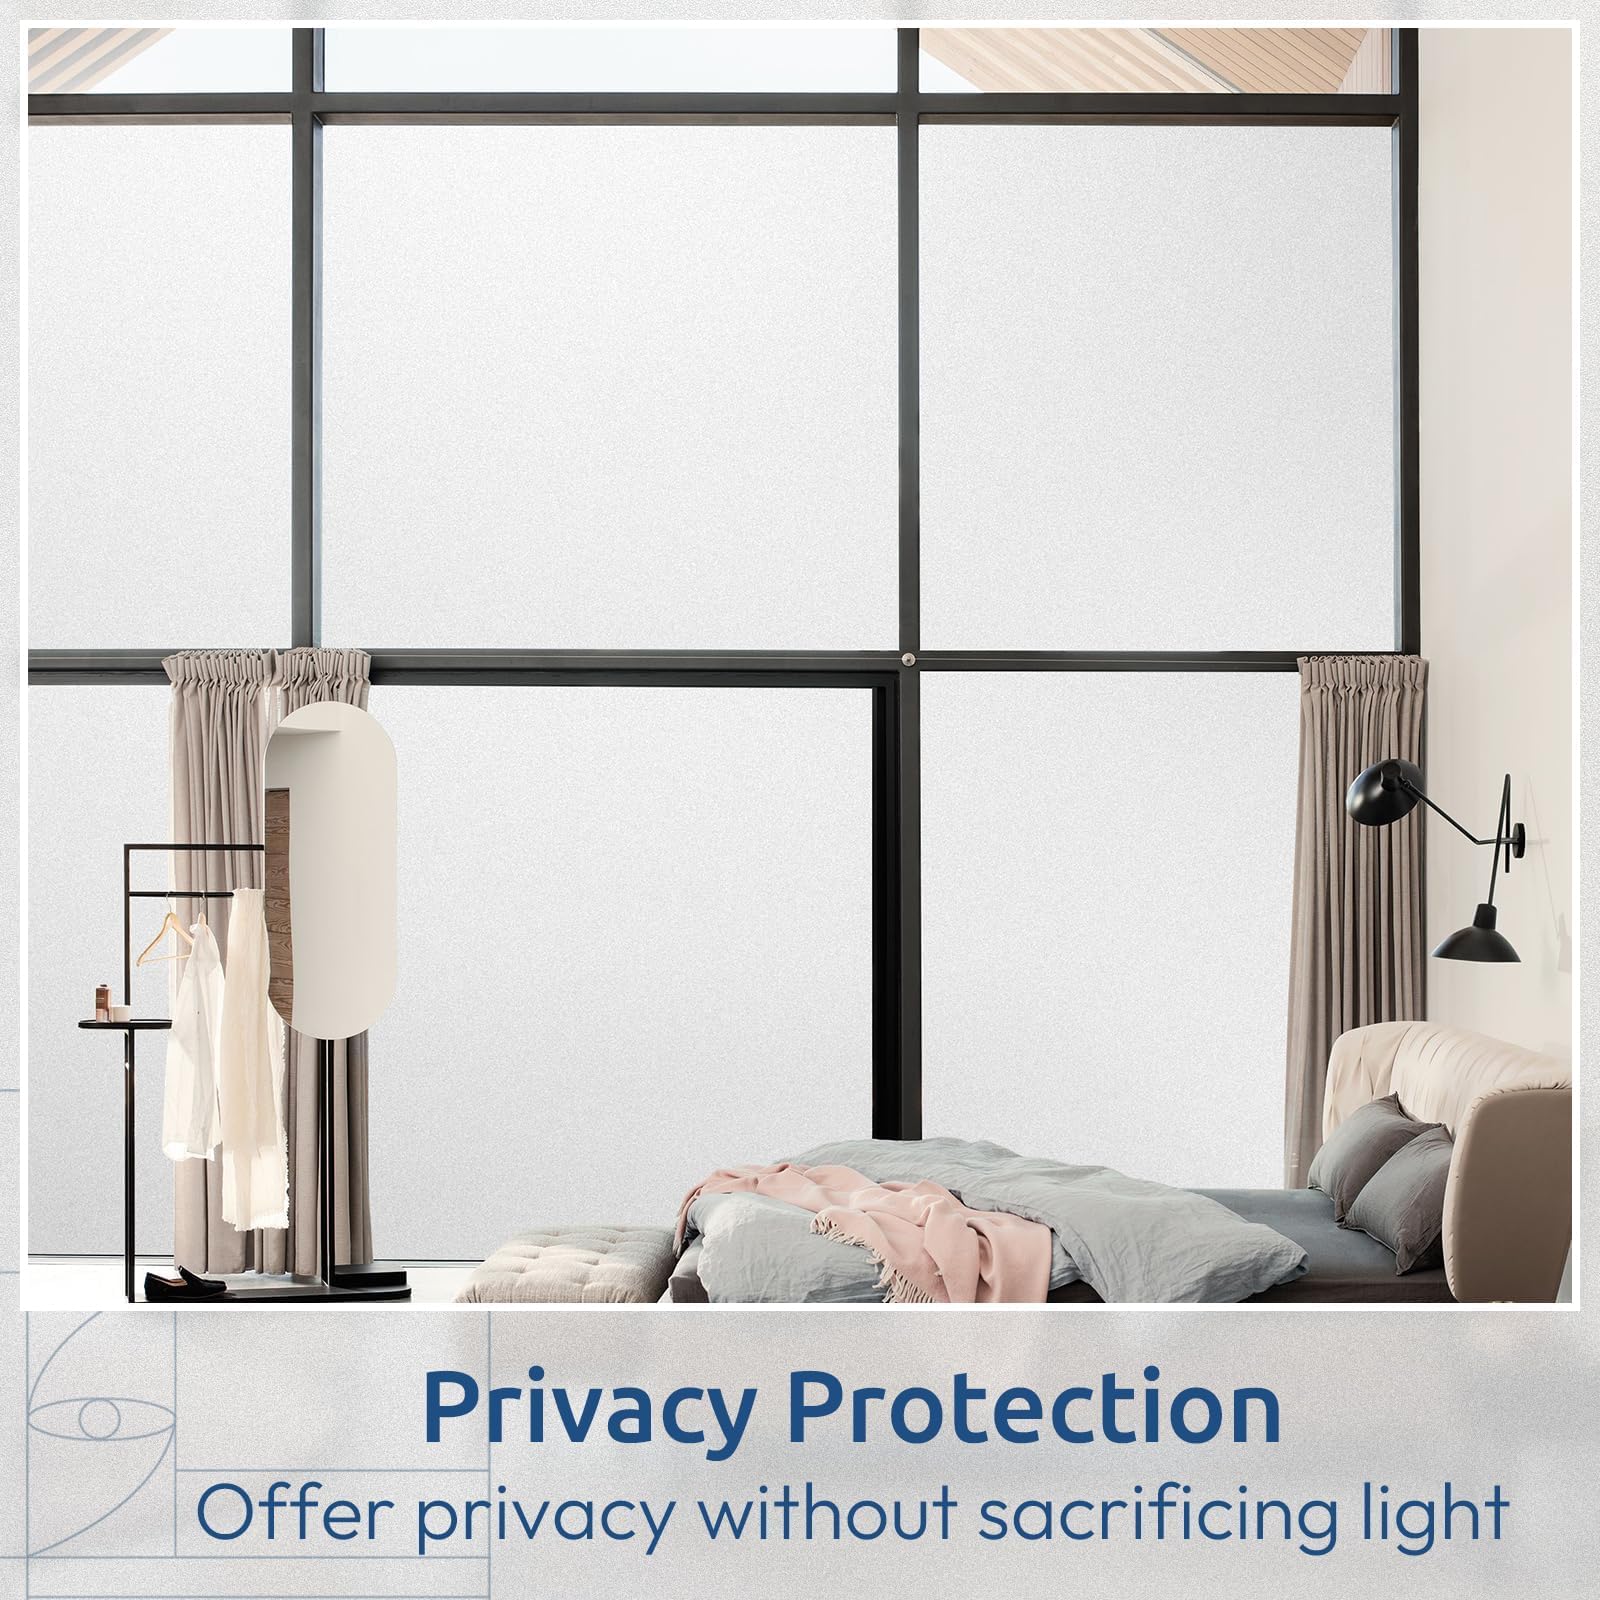
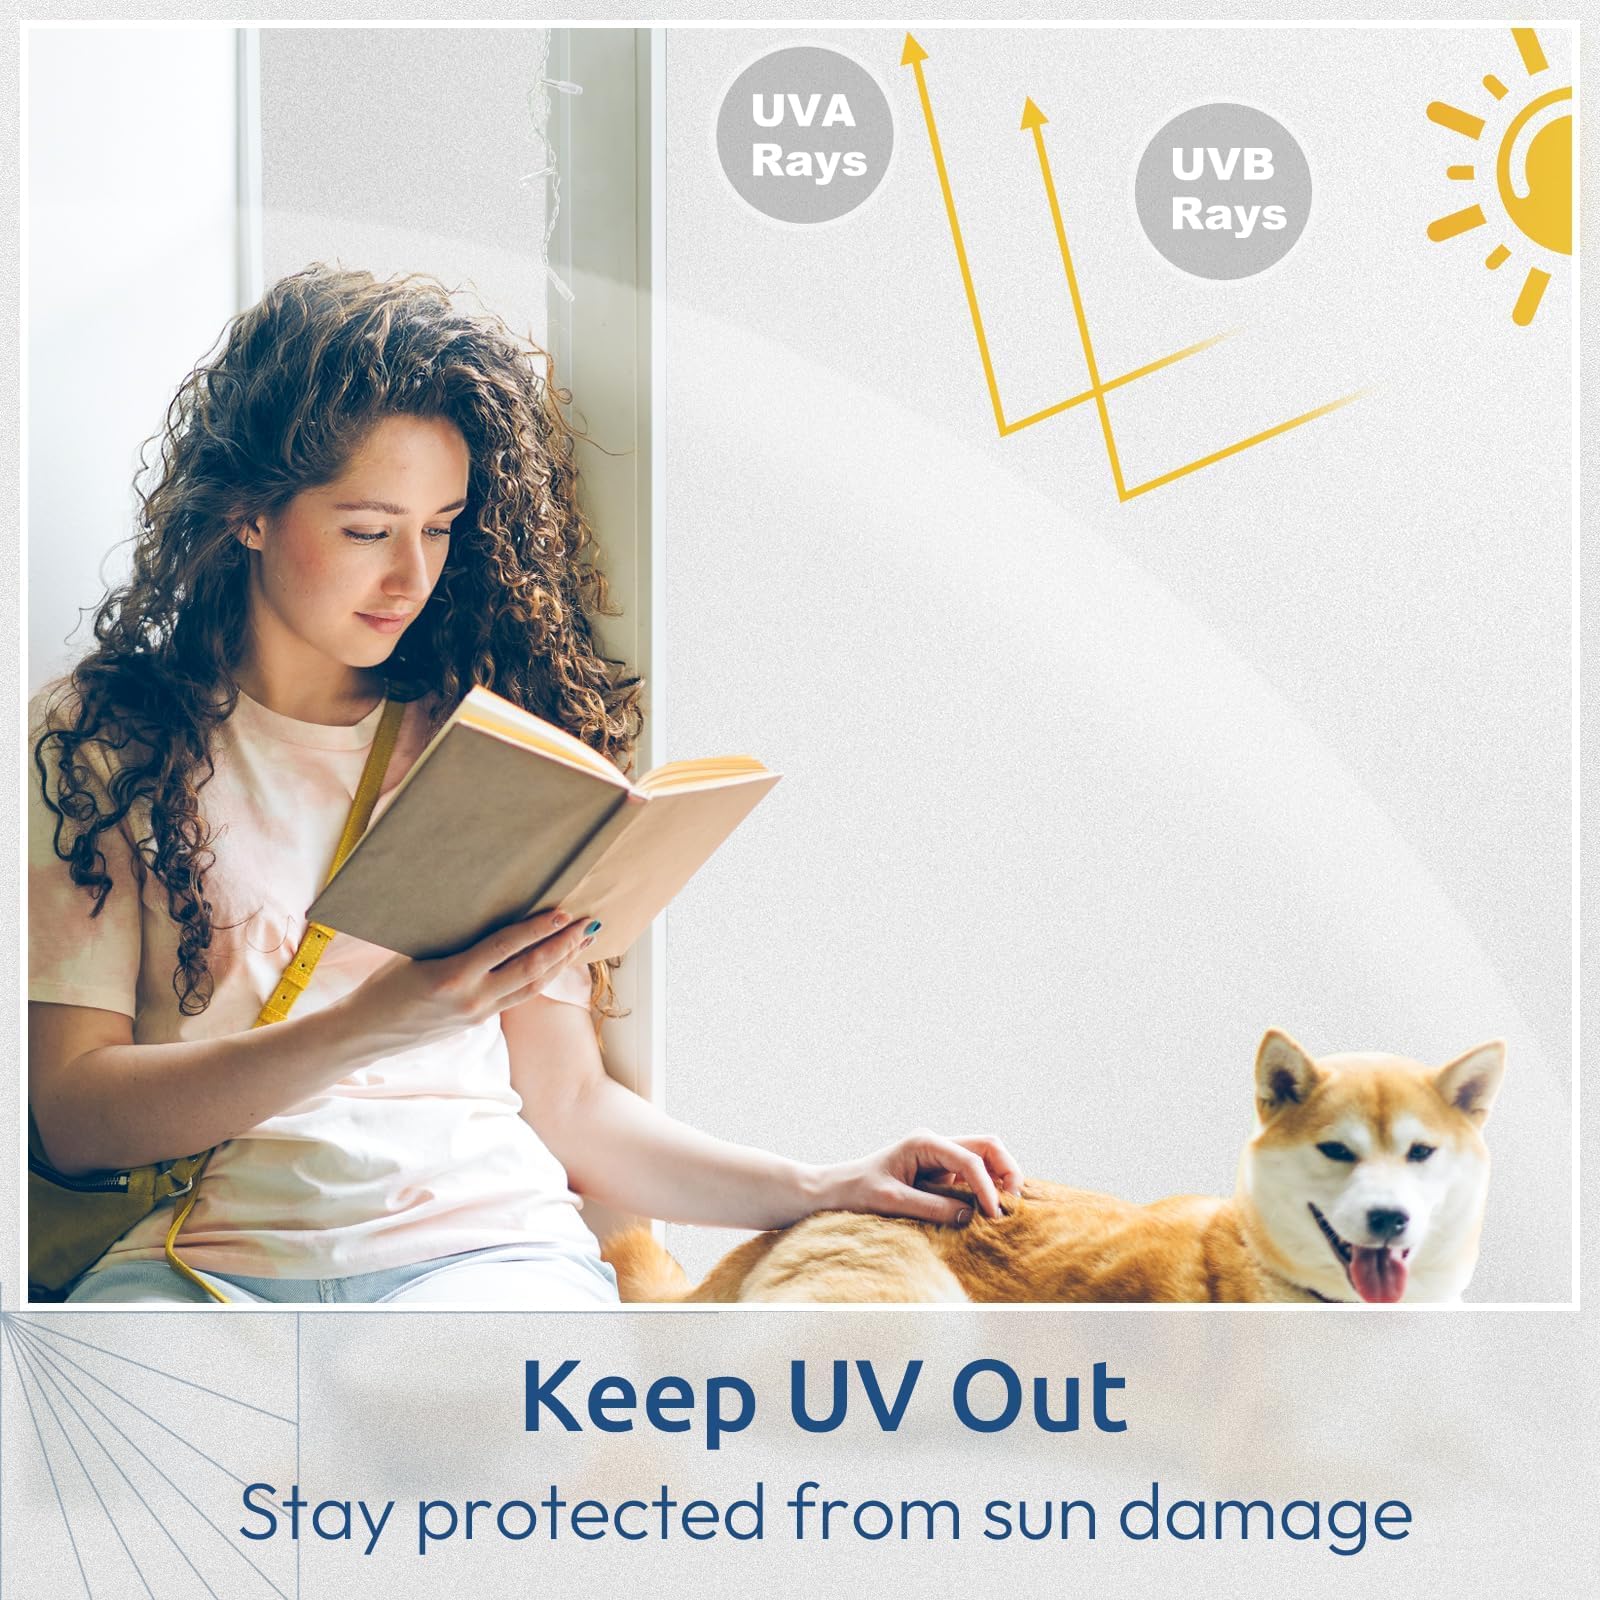
The rabbitgoo Window Privacy Film is a 23.6" x 157" matte white, non-adhesive static cling vinyl film that offers 98% privacy while allowing natural light to filter through. It blocks 99% of UV rays, protecting your skin and furnishings, and installs easily without glue or residue. Perfect for bathrooms, bedrooms, and any indoor glass surface, it provides a sleek, modern frosted look that upgrades your home’s style and comfort effortlessly.


| Best Sellers Rank | #880 in Home & Kitchen ( See Top 100 in Home & Kitchen ) #3 in Window Films |
| Brand | rabbitgoo |
| Color | Matte White |
| Customer Reviews | 4.3 out of 5 stars 43,481 Reviews |
| Installation Type | Static Cling |
| Material | Vinyl |
| Product Dimensions | 157"L x 23.6"W |
| Size | 23.6" x 157" |
J**Y
Easy privacy!
I used this on a window near a baby bed for safety. It was very easy to install! Water in a spray bottle, credit card and sharp blade was all that I needed. You can only see a slight shadow from outside at night. It gives almost complete privacy. During the day it allows sun to shine through. From inside/out it looks nice and looks like the window came that way.
E**Y
Completely blackout!!
This is exactly what I was looking for and I’m so happy I took the risk and bought it. In the photos I attached, you’ll see the before and after or the window I wanted to cover. Let me explain the second image. The glass on my window is frosted and I initially put the film on the inside of the window. You can see in the photo how it didn’t adhere well and left a ton of air bubbles and ripples no matter how much I tried to smooth it out. It fell off in less than a hour. The third photo is of the film on the other side of the window and you can see it worked perfectly. It adhered and was very easy to work the air bubbles out of and left it completely smooth and flawless. All this to say, if you have a frosted glass window, I recommend putting it on the smoothest side which might sound obvious at first but it depends on which side you wanted it to be on (indoor v outdoor for example). Let me tell you about the installation process now. It’s pretty simple but you definitely need to take your time. It’s going to look ugly and imperfect if you rush at all because the film is delicate and cuts like butter. I followed the instructions that were included and attempted to leave a little excess on all sides to trim it perfectly after it stuck on the window. This method was very difficult for me personally since I was doing it alone so it slipped around quite a bit if I needed to hold it firmly to make a cut. I ended up ruining one section just trying to trim it to fit the window. After that, I measured the window precisely, I’m talking down to the sixteenth of an inch and cut it exactly to the measurement of my window. It made it so much easier to put it on for me and it looks great. If you use this method, take your time. Measure twice and cut once as they say. Use something straight to trace the lines all the way down the material so you can make a clean cut. I recommend using an exacto knife or razor blade for the best cut although scissors did cut it with no problem. The most important thing for the entire process it to take your time and go slowly. Aside from cutting it out, the installation is easy. Just clean your window thoroughly, spray it with water, spray the adherent side of the film with water, and apply it. The only thing I wish was different is that it came with a squeegee. I didn’t have one small enough to fit the corners so I used a credit card which worked fine but I like the idea of them including a tiny squeegee with it in case you really don’t have anything to use. You get a good amount on the roll and could use it for several windows depending on the size. Overall, this is exactly what I was looking for and I’d recommend it to anyone. It’s easy to install, looks sleek, and sticks on well!!
B**.
Nice filtered light w privacy
Great for privacy & without sacrificing daylight, also works at night. I like when the sun reflects thru the rainbow circles. My cats aren’t too happy I’ve covered up the windows tho! Easy to install & remove / reuse.
S**B
True “cling;” actually easy to install!; beautiful privacy
We just moved into a new house with lots of windows. The front door (shown) was an issue for glare watching tv and the house is all LED lights so basically at night with any lights on it’s like you could land an airplane in the living room - and probably see what we are watching on tv from space. So getting some privacy filters that didn’t destroy the look of the room was priority! My fiancé suggested curtains for the doors but i was opposed. I’ve used window contact paper before for privacy in our old home. It was a pain (which is why he didn’t want me bothering.) It took forever for me to install. I could not get corners down, air bubbles, left residue when moved, etc. NONE OF THOSE PROBLEMS with this product!!!! Because it’s truly attaching by static cling, you can realign several times without losing the adhesive ability of the cling. This means you can rotate to get better angles, lift up areas where an air bubble has occurred and reapply it, etc. The thing I found difficult with installation was sizing the cling. I don’t know if this was all user error, but I just could not get a straight line. I used a ruler, I use a permanent marker (use only on the non textured sized which has the plastic you will pull off.) I have one of those cutting things (name of it escapes me but I usually use it to cut down cardstock) and finally used that to try to get some straighter edges and it was a success!! Unfortunately the one I was able to locate in the move the only cuts up to 11 in width so I have to precut before which results in a lot of waste. I did try using a utility knife to cut once in the window but the cling slid. I think the textured aspect made more difficult too. The ones I applied in the kitchen are appearing to come off and roll at the corners, but it’s like 100° and pure humidity outside and I’m thinking that applying them with that weather on the other side of the door may be affecting its ability to stick. With 1 roll I was able to do the bottom half of the bathroom window, the 6 small front door squares and the bottom of the living room side door. I didn’t order a new roll for the kitchen. I may also end up fixing some of the others that were more uneven depending on how much is left. Again, I’m having cutting issues so it’s been a bit wasteful. At the price I have no problem spending the money for 2 but I’d just rather not have to purchase a third! When I purchase more, I’d like to be trying a new design... Lastly the light diffusion and privacy - why I bought these. 1. Look: they are beautiful when the light is on them. Inside, outside, they have a gorgeous sparkle and refract little rainbows. It’s very pretty, particularly in the sun. Inside when in direct sun they can create rainbow lights on floors/furniture in the house. I’m fine with this, but did try to clean up what I assumed was juice on my new white carpet. It was a small pink light. Also, some dogs are super uncool with this. 2. Privacy: They absolutely obscure the vision of anyone trying to look through either side of the cling. Because my lines were perfect there are small areas where someone could see in around the cling, but you’d basically have to have your face next to the window. You can still see if we have lights on in the house, but you can’t tell at all what is going on in there. Personally - didn’t consider this with the front door, which doesn’t have a peep hole. For now I have to pull curtains aside to see whose there (usually amazon delivery) 3) Light: it does block a decent amount of direct light coming front the windows. As mentioned in #1 however, it does cast refracted light into the house. For us, this is still better than before because the light is not directly hitting anyone’s eyes as they look at the tv, or the tv screen directly. The film definitely breaks down enough of the light to generally take care of the “sun is coming from everywhere in here, I can’t see, trip face first into box” Issues. It still lets a good amount of light in, and because it’s not solid white, it just feels like a textured glass, not like the windows have been removed. As you can see, I’m pretty thrilled. I would buy again, and I have recommended to friends! (Attaches pictures are front door day and night, pls forgive any boxes. Literally moved last week. If I Think abt it I’ll try to take a picture of the door from the outside.)
A**R
Easy to install and great privacy coverage!
Easy to install and great coverage. This privacy film is perfect for complete privacy coverage yet still lets light in. It also looks good.
I**S
Mid
Only the film, doesn’t not include any of the needed tools. Film was easy to install but it had a yellow/brown stain that won’t come off. Double checked to make sure it wasn’t on my window. I contacted their customer support and waiting to hear back.
M**T
Fantastic instant easy!
Fantastic product Super easy to install Instant privacy
#**E
Comes off despite effort
Update less than 12 hours after application to one window according to directions ... 1/3 of product is no longer stuck to the window. Resulting in removing two stars. Less I can figure out another way to get the product to stick since following the directions hasn’t worked 100%. Wondering if it’s due to having an older 1900’s house. I’m going to try with the replacement windows. Had SO much hope in the product concept. Wish I had a five star experience as other users have! ——— While searching for potential products to obscure views besides frosted paint I searched products such as this. Sometimes I add stuff to my cart. Then, either save for later, stash on a list, delete, or order. Having decided to make space to do the project. Welp, ooopppps! Accidentally pushed the wrong button. Wouldn’t allow me to cancel. Soooo, a couple days later ‘Viola’ two rolls show up. Was gonna wait due to finding out I’d be getting new windows the day I was shopping for something to help with a few windows. Decided there’s ample opportunities to use this is why I kept it. Anyhow, today, upon hanging one panel in a window am posting a review. Pros, Cons, and why the star count. Loss of stars for messy installment necessity. Tips and edges don’t easily remain stuck. Sparse instructions. Support of other reviewers who relate to the struggle with the product and no way to fix it. This review is in your honor and to assist future users. Pros: Obviously, obscures viewing while allowing light into the space desired. Ability to cover multiple standard window sizes. Price comprarable or slightly better than big box stores. Cons: instructions are void details. Instructions with multiple languages is helpful to confusing a lot of nations. If you’re not savvy about the nuances you’ll deal with attempting to install this product you’re gonna get pissed, frustrated, and offer a crappy review if you even bother. Already feeling as though this product has robbed you of your valuable hard earned money, time, and sanity. TIPS: to assist IF the seller adds details to the few current steps. To buyers whom desire the benefit of this product for the ease of receipt from amazon. Recommendations: although most people don’t having Dr Bonner’s soap. My chosen brand for this project. Dawn dish soap would be a better choice. It’s sticker. I’m using it on further installation on other windows. Have a plastic putty knive. It’ll give the best spread. Also, having a 10 inch really does the trick. While spreading the soapy water inside. Having the handle makes for a nice even smooth push, spread, even wider movement then a credit card which frankly is a pain in the butt for the width of this installation. Wider edge = happy user. Have a flat surface to lay the precut product on. Spread the soapy water on the product. Rather than the window. Use a modest amount. You’re gonna need it. Make sure to apply to the textured side. Have paper or regular towel spread along the bottom of the windows. Have extra ready to clean up the mess you will make. A wash cloth works great for this part. Having a clean dry rag to use over the application once you’ve applied, used putty knife, and wipe up the corners will help gently continue to apply pressure to the product. You may, depending on your windows, have edges of the film that simply won’t stay down. I’d suggest, when everything’s dries, adding a little water to some Elmer’s and rub it on the edge with your finger. Then, use the putty knife to push from inside toward out. Use your finger, the clean one, and have a wet rag to wipe your finger of the glue. Plus, you’ll wanna clean away any spill over on the window. Or, it’ll leave that Matt Elmer film. Now, about the putty knife motion. When you apply the product you’ll see lots of inconsistencies between it and the window. Here’s a method for even spreading of the stuff on the product between the window ***Oh yeah, special note, reminder again, use the bumpy side on the product toward the window. Not the slick side.*** While holding the product in place, at the top, start in the middle. Lay the putty knife on the product. Push toward the window edge side down. Then up. The product will move if you need to realign it slightly. Then, putty knife middle to other side.Continue this until you’ve oozed the soap and water out. As though your squeeging water off your windshield. Basically move from middle to edge. Ensure edges still line up. Keep moving soap and water out of the sides. This will also help seal the product to the window. If you did a great job precleaning the window, the now cloud cover should be spotless. If not, quickly peel away. Remove the hair or debris that may be trapped. I’d recommend res-soaping and redoing the process to ensure sticking. By now you’re a pro so no fear you’re screwing up! Just do it! If you have older windows, like me, that haven’t been replaced yet. Razor blade any paint around the edges. Prior to install. If there’s ANY debris, paint, dirt this product won’t stick. Then, use the Elmer’s trick. If you forgot, or don’t care about how you get the edge to stick. I’m not certain how this product holds up in all weather. If it falls off or becomes a problem I’ll update. Four stars ease of use. As far as it obscures the view from people outside. Currently four stars for durability to to edges coming off window refusing to install. Requiring some other means of application. If not updated within the four seasons from now, July 2018 and next year, July 2019 you know it’s working okay for how I need it to. One star for ease of install. Honestly, worst product install due to the instructions I’ve ever had. Given I’ve got decades of tooling and DIY experience this says something. The everyday shopper should have a simple ease of installation. Currently, this is limited. It’s a very helpful product overall for what it’s meant for. No reason we shouldn’t have 4 and 5 stars across the board with a few updates on how to anyone can understand. Sincerely hope this inspires others to make this work for you!
Trustpilot
2 months ago
3 weeks ago


