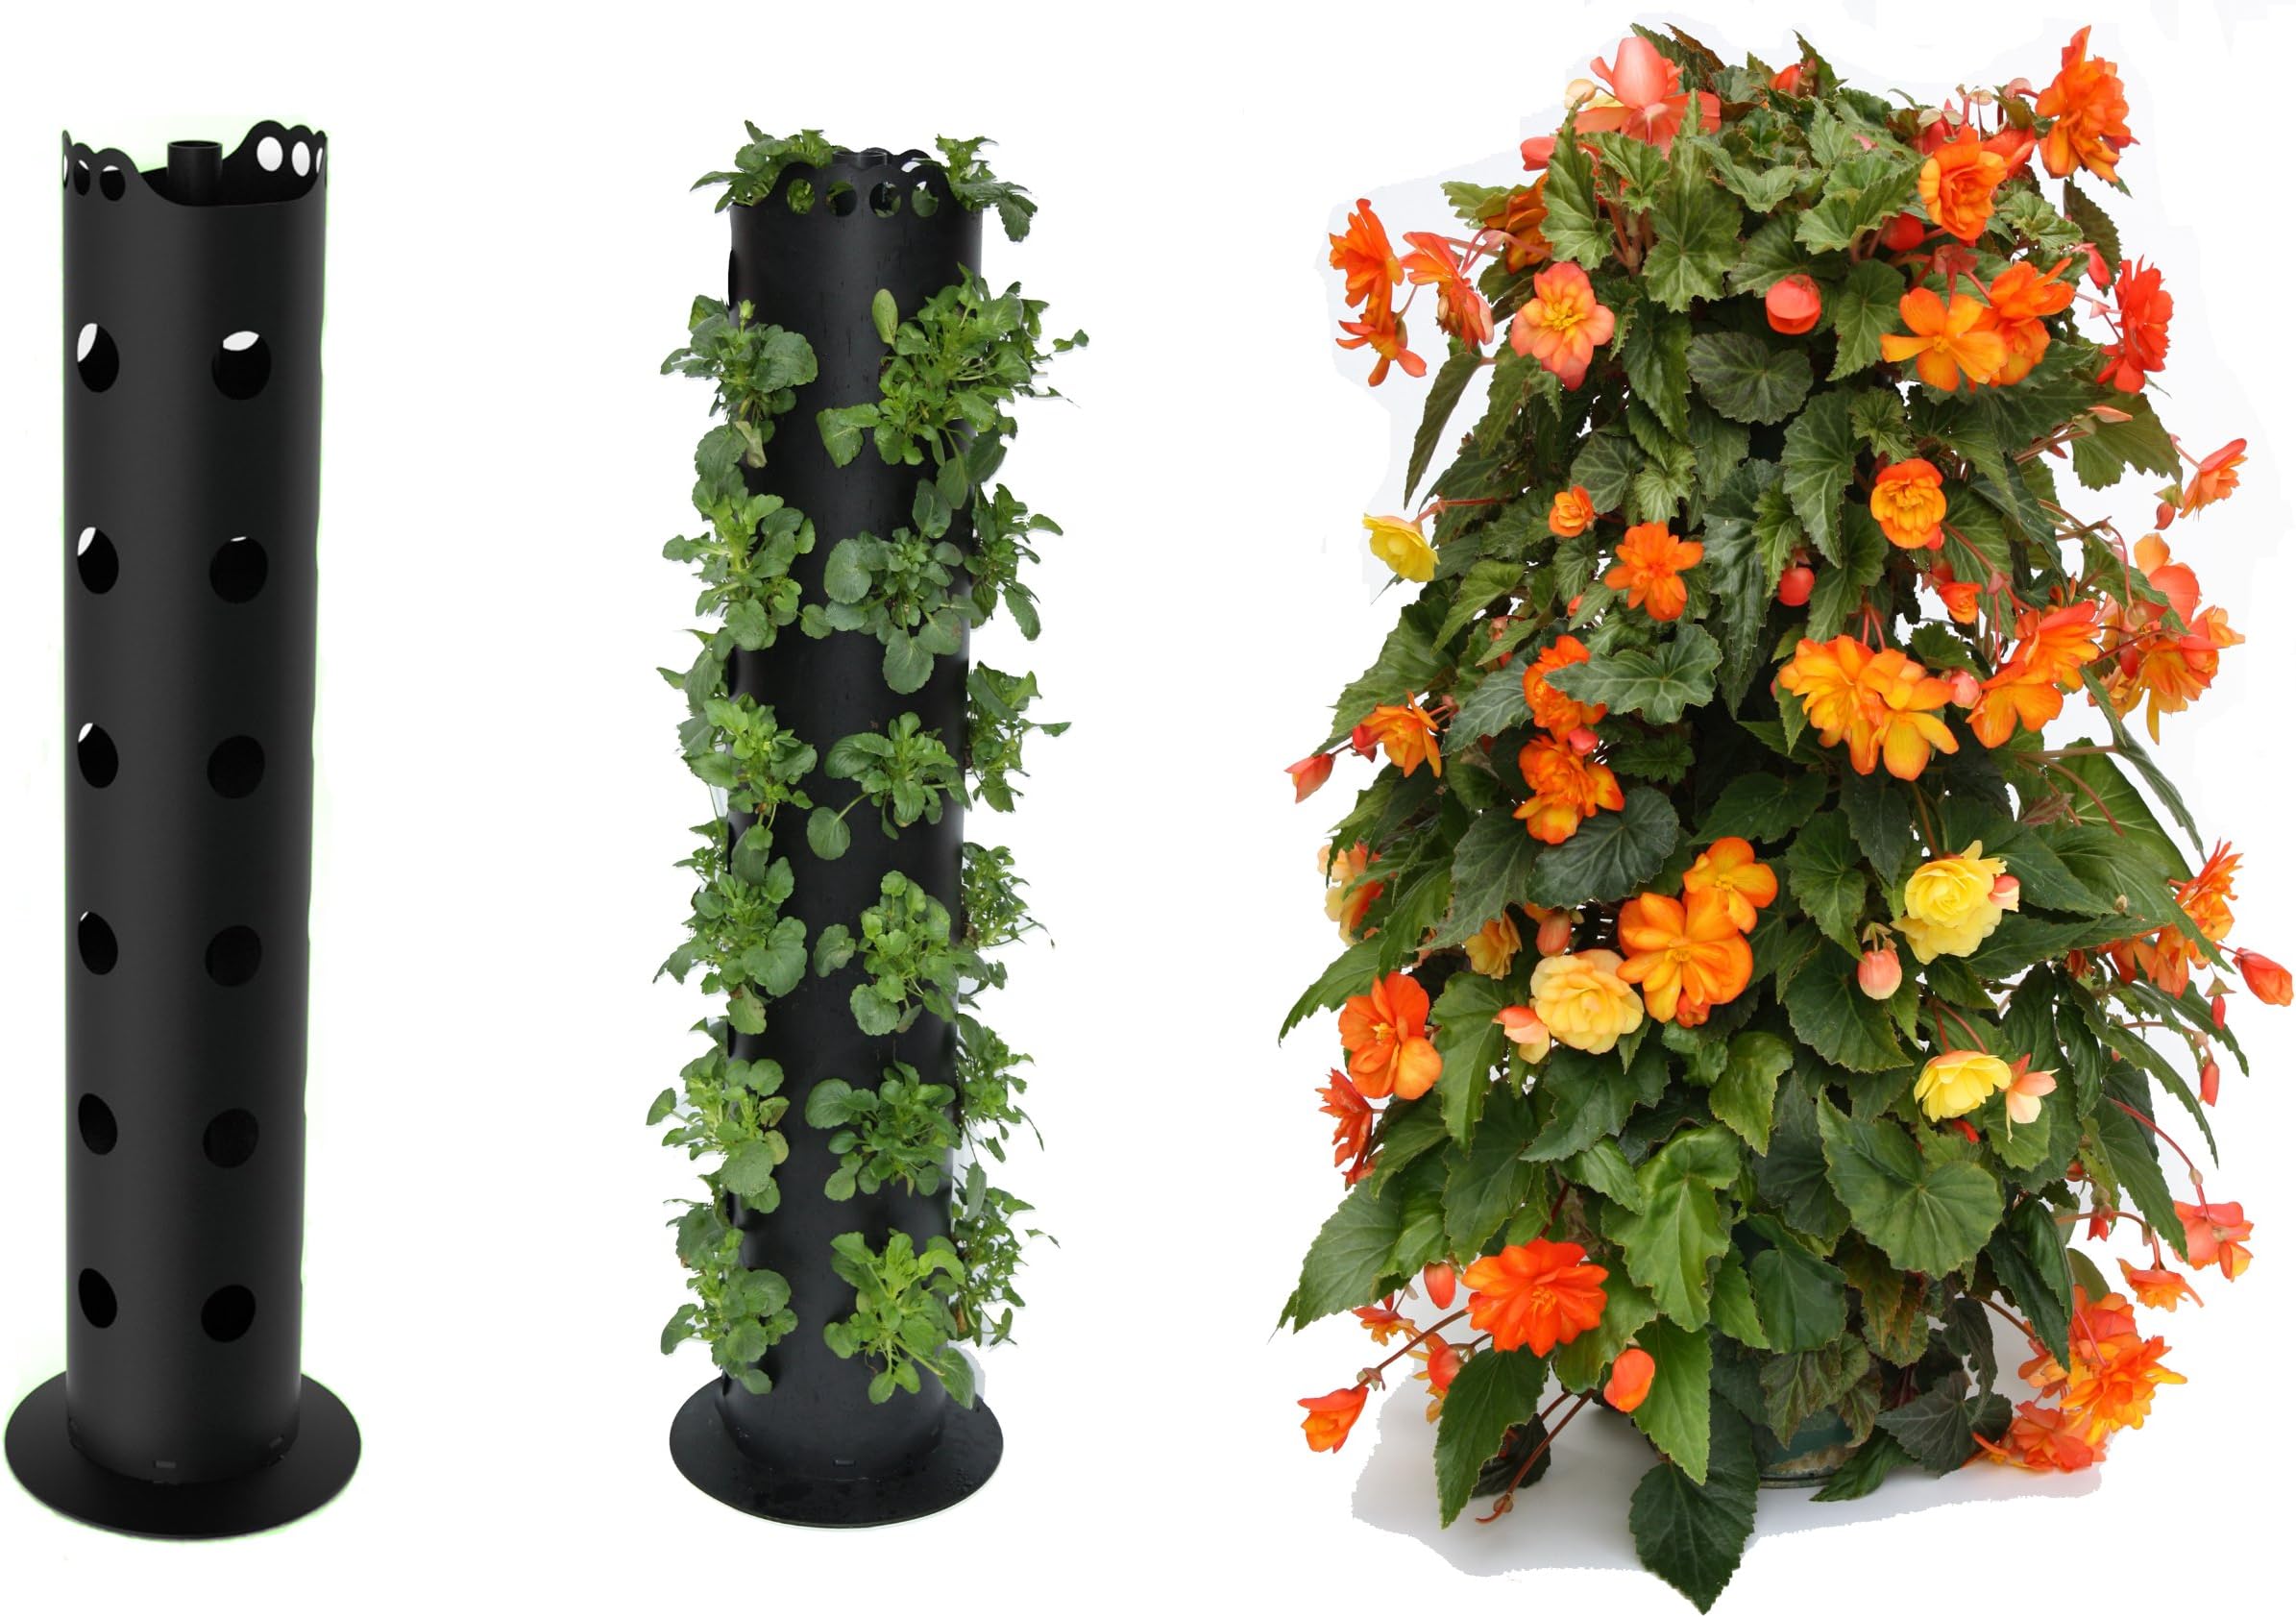


The Flower Tower FT001 Floor Standing Flower Tower - Black
Product ID: 50853101
Details
- ColourBlack
- MaterialPlastic
- Planter formVertical
- Special featureDurable
- StyleModern
🌱3-gallon capacity
♻️Maximizes water usage
🏙️Perfect for city living
Buy anything from 5,000+ international stores. One checkout price. No surprise fees. Join 2M+ shoppers on Desertcart.
Desertcart purchases this item on your behalf and handles shipping, customs, and support to Vanuatu.
🌼 Grow Up, Not Out! - Your Urban Garden Awaits!
The Flower Tower FT001 is a sleek, black, floor-standing planter designed for urban living. With a capacity of 3 gallons and a durable plastic construction, it maximizes water usage while providing a stylish solution for balconies, patios, and verandas. Weighing only 590 g, it’s easy to move even when fully planted, making it the perfect addition to any city dweller's green space.
| ASIN | B004X5X8UM |
| Best Sellers Rank | 164,696 in Garden ( See Top 100 in Garden ) 6,292 in Flower Pots 54,686 in Gardening (Garden) |
| Brand Name | BALDUR Garten |
| Capacity | 3 gallons |
| Colour | Black |
| Customer Reviews | 3.8 3.8 out of 5 stars (536) |
| Finish Type | Smooth and Glossy |
| Global Trade Identification Number | 00870519000057 |
| Included Components | 1 x Base, 1 x Sleeve, 5 x Short Black Tube, 1 x Long Black Tube, 1 x Black Collar, 1 x Red Collar, 1 x Green Collar, 1 x Blue Collar, 1 x White Collar. Instruction Sheet. |
| Indoor Outdoor Usage | Outdoor |
| Item Dimensions | 6 x 6 x 34 centimetres |
| Item Dimensions D x W x H | 6D x 6W x 34H centimetres |
| Item Shape | Round |
| Item Type Name | Flower Tower |
| Item Weight | 590 g |
| Manufacturer | UPI Ltd |
| Manufacturer Part Number | AP-FT002 |
| Material Type | Plastic |
| Model Number | AP-FT002 |
| Mounting Type | Floor Standing |
| Number of Levels | 1 |
| Number of Pieces | 1 |
| Other Special Features of the Product | Durable |
| Pattern | Solid |
| Plant or Animal Product Type | flower |
| Planter Form | Vertical |
| Product Style | Modern |
| Size | Freestanding, 3-feet |
| Theme | Flowers & Plants |
| UPC | 870519000057 |
| Unit Count | 1.0 Count |
S**R
Great product which gives a magnificent display for my Busy ...
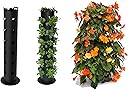
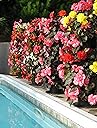
Great product which gives a magnificent display for my Busy Lizzies. There are 30 holes (6 rows of 5) for plants and some space at the top of tower. It takes 30 plug plants (plus two extra for the top) and half a bag of moisture retaining compost to fill the tower. I watered the plug plants before I started and filled the tower up to the first lot of holes and then put the bottom row of plants in before adding next lot of compost up to the second row from bottom. I continued with this process until all holes had been filled. (I also ensured compost was packed down firmly inside so that roots were well covered after watering).I planted two in the top between the finger holes. Watering done through central tube, although I let it overflow a bit to ensure the top of the tower had adequate water. It was a bit fiddly to do but well worth it and after a couple of weeks plants started to grow at a good rate and soon looked just as the illustration. Absolutely thrilled with the finished effect!
T**G
It was easy to put together
It was easy to put together, i made the mistake of filling it with peat 1st then adding my labelia, should have done it in layers, ie, fill a layer of peat to the holes add your plants then add another layer of peat, i bought 1 for my son who did it the same way as me but he has put his peppers in his & being a keen gardener he agree with me on the planting, be careful when filling the stack that you cover the tube as this is your watering hole, try not to move it too much once its filled as the bottom came off & it was easy to clip back on but i ended up with peat everywhere. i am sure with a bit of thought on the type of flowers you want in there it will be as effective as the pictures, my labelia is just starting to bush out now after being pushed through the hole & peat, as i said layer it 1st,
T**.
A great addition to my patio
Great product and flowers look stunning when in full bloom. A little fiddly filling the tower with soil and the plant plugs, but the end result was worth it!
H**3
Flower tower
Looks beautiful when stacked with flowers
D**D
Terrible
Not value for money, packaged in a way it makes it impossible to assemble. Returning mine very disappointed.
A**D
Disappointing
Not sturdy enough and doesn't hold water so my plants dried out all the time. Shame, it looked so good online
A**R
Love these! Have purchased two and planted them up ...
Love these! Have purchased two and planted them up with petunias. They look good even although the plant plugs are still small so I can't wait to see them once the plants grow a little bigger. The most difficult bit of the process was actually figuring out how to build these up as the butterfly fastening was a bit fiddly, but they were worth the effort and now seem sturdy and secure. They were easy to plant and look fab
M**Y
not too sturdy
Bought a similar tube 4 years ago, I cannot recall the maker/seller, but with a much sturdier mane tube. This one is a tad sloppy and tends to deform.
R**V
I have a small apartment balcony, and wanted to try growing some vegetables vertically to save space, but can't permanently attach anything to the walls. Nor do I have an electrical outlet outside to set up any sort of aeroponic or aquaponic system, so thought I'd try 2 of these flower towers. Gotta say, I'm pretty pleased with how everything's turned out so far. These towers are an amazing space saver, and all my friends are impressed with how much I'm able to grow. The towers are sturdy, and pretty easy to set up *if* you follow the directions. To get my towers going, I purchased seed varieties recommended for containers, and started them indoors 6-8 weeks before the last frost date. You can do this with flowers, too, to save $$, since these towers require a lot of plants. I wanted each vertical row of the tower to be a different variety (i.e. 1 row of 6 collard greens), with 3 strawberries on top, so overall I've got 66 veggie and herb plants growing, and about 12 different types. I tried collard greens, mustard greens, spinach, arugula, pak choi, strawberries, nasturtiums, alyssum, parsley, cilantro, dill, and chamomile. On the West Coast, I started my seeds inside in Feb, then set up and planted the cooler weather crops in the towers outside on April 1st, and the others towards the end of the month as it warmed up. It's now May 9, almost everything has shot up nicely, and I'm ready for my first harvest. Nothing has died, although some things (like the arugula and spinach) seem a little slower, whereas the pak choi and mustard greens clearly love this type of environment. Some suggestions and things I've learned to help plant and maintain these towers: 1) As others have suggested (and the instructions tell you), put some rocks in the bottom before adding soil to stabilize the tower and provide drainage 2) Use masking tape to cover the holes and drainage pipe when adding soil. I started planting from the bottom up (see not 6 for why) 3) Use small plugs. No bigger than 2.5" pots (I used small plus from my seedling tray, and a couple of 6packs of 2-2.5" plants from the garden centre) 4) Water often and deeply, through the hole and on top, until water runs out the holes and bottom. This thing is pretty heavy when full and wet. I honestly don't see how it could blow away or fall over if kept moist, as others have claimed. My suspicion is that they're underestimating how much water is required and are not keeping it fully soaked. Therefore, the soil dries, the plants die, and the tower topples over in the wind. 5) To prevent water leaking everywhere, use a plastic tray underneath. A 12" one is a good fit. 6) The soil will compact a little when wet, so I filled mine completely with soil before planting, then soaked the soil, then added more soil before planting. It might still compact further, so you'll want to start planting from the bottom up, and put your plants in closer to the top of the hole, in case they get pushed down some. 7) Fertilize every couple of weeks. Planting and maintaining these vertical towers can be a little bit of a learning curve, even for a reasonably experienced gardener, but I think it's worth it! I'm sure flowers would be beautiful, but I'm loving my veggie towers.
A**.
Muy fácil de montar. Me está dando muy buen resultado con las fresas que planté en el. Es una pena que el producto esté agotado, porque hubiera comprado mas.
H**P
I do not write reviews but I decided to do this for this product because I really relied and used many of the reviews posted to make my final decision in buying this and I’m very happy with it. Assembly was very easy and there is a review included that explained very well how to fill it using masking tape over all the holes and it was EXTREMELY helpful. It was still messy but not nearly what it would have been without the tape. I included pictures of what it looked like initially when I planted the inpatients and then what it looked like a little over a month later. The only thing that I wish was different is that it took a month to fill in like that so if I use it again next year I would plant the flowers a little earlier then the start of June. It’s a great project and something I always wanted to try. I’m thinking of getting another one for next year to put on the other side of my porch! I’m really happy with it!
B**B
Super Teil, man muss mit der richtige Erde füllen z. b kokosfaseren Erde dazu ein Langzeit Dünger regelmäßig Gießen
C**N
Gain de place
Trustpilot
3 weeks ago
2 weeks ago