
Desert Online General Trading LLC
Dubai, United Arab Emirates
Desert Online General Trading LLC
Dubai, United Arab Emirates


🔥 Drive in style, feel the heat, own the road.
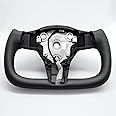
The ZIMABLUE Personalized Yoke Steering Wheel is a vehicle-specific upgrade for Tesla Model 3 (2017-2023) and Model Y (2019-2024), featuring a 14-inch grip wrapped in soft, durable Nappa leather with an optional heating function. Designed for ergonomic comfort and easy installation, it combines premium materials with a sporty, fashionable look to transform your driving experience.


| Color | Model 3/Y Black Nappa With Heating |
| Material | Nappa Leather, Stainless Steel Skeleton |
| Brand | ZIMABLUE |
| Fit Type | Vehicle Specific Fit |
| Grip Size | 14 inches |
| Number of Spokes | 3 |
| Vehicle Service Type | Tesla Model 3 Y |
| Manufacturer | ZIMABLUE |
| Item Weight | 5.99 pounds |
| Product Dimensions | 15.75 x 11.81 x 5.91 inches |
| Item model number | TS-YKBH-LP-001-ZM |
| Manufacturer Part Number | TS-YKBH-LP-001-ZM |
J**I
Makes the driving more fun and it looks OEM.
Just installed this myself a few days ago and I love it. Surprisingly, getting use to the yoke wasn't a huge learning curve. I have a 2022 M3 performance. I've been wanting to do this mod years ago. It's a little easier now bc you don't have to unhook the battery and the price has gone down a lot. If I were to do the install again, it would probably take 30 min but realistically as a first timer it will take more like 2 hours. It took me this long bc of 2 things, breaking the bolt loose and having to assemble a re-assemble a few times (explain later).My wheel came with tools and the internal wiring harness (wires and harness with the 3 plastic rings). The tools are great but the key they give you to pop the air bag off is too big for the hole. You'll need to have a small (tiny) flat head screw driver to fit threw the hole. The instruction manual they provide is useless. Not detailed and doesn't show you all the steps. I suggest you watch a few youtube videos as you will pick up different tips in each video.TIPS: You first should power off the car (safety, scroll to bottom, power off). Then pop air bag loose on both sides. Use pliers to help you release the wire from socket. Use pliers to pull down on both tabs at same time (top & bottom) but don't use it to pull it out (use your other hand). It will come out easily once the tabs are down. First hard part is breaking the bolt loose. It comes factory super tight with loctite on it. The tool they give you is good but I needed more leverage to break it loose. You need one hand to hold the steering wheel and pulling in the opposite direction as your pulling in the other direction with the wrench to screw off the bolt. I used a metal pipe to add more leverage to the end of the wrench to finally break it loose. Once you take the wheel off, you have to pop off the 3 plastic circles, unscrew 4 bolts, and then unhook the heater connection at the bottom of wheel. This will release the middle console with all the internal wires connected to it. Most of the youtube videos will tell you to put all this into the yoke wheel (which I did too). I did this but realized once I assemble it all that the OEM plastic circles wouldn't click into the circles in the yoke wheel. So you have to use the internal harness that it comes with. You have to switch out the OEM wires and connect it to the middle console. You have to disconnect a few things and reconnect it with theirs. But its easy and pretty straight forward as the wiring harnesses are identical. Taking apart the connection for the heater is at the bottom of the console. You have to unscrew 4 little T10 screws (tool not provided) to access them. Once you connect all the wires, just follow all the steps backwards and you're good to go. It's honestly not that hard. I didn't find a video that shows all these steps together but you'll be able to find them in piecemeal.
M**L
better than expected.
i was skeptical because of the price. I figured when it came in if it was bad, I would just send it back for a refund… But I was pleasantly surprised and I’m very picky. It’s great. It takes a little bit of skill to install, but I was able to figure it out by watching YouTube videos. I was also very happy that the heating works on the entire yoke.
M**K
Very cool, stylish, and futuristic!
Very cool, stylish, and futuristic! This product was great to see such an amazing deal on Prime Day.If you're brave & savvy enough to work with the provided tools and navigate the small parts within the steering wheel, you should have no problem with the installation. In the end, I love it! :)
M**H
You can do it
Extra tools neededTorque wrench10 mm socketLocktite in you’re ocd like meTook about an hourBest advise is take your time
P**O
Fancy
Fits on my model Y and on my model 3. it's tricky to get the original to come off, but with patience you will get the job done in only a few minutes, the heated feature works perfect on low, medium and high. It comes with the installation kit. You will get used to it in just a couple of days. I would by it again.
J**T
Great quality
It wasn’t as easy as some of the short videos make it look like but step by step video instructions are very helpful. Was able to get it installed under 1hr.
M**E
Tilts left and carbon sticking up.
Cons: Carbon on Right Side was sticking up compared to left side(see pictures). Very noticeable and you can feel it when turning. Alignment seems to be tilts to the left, even on auto pilot it is tilted to the left on a straight road. Just got new tired and an alignment done so it’s the Yoke Centering Alignment. Strong odor when first installing in car, NOT the good new car smell.Pros: Looks and feels great. Easy install. Better view forward. I have the Yoke raised slightly higher than usual circle wheel for better arm resting on bottom of yoke and for turning so it would not hit my thighs.Requested a new one sent to me. *Will update upon install of second yoke.
J**Z
Easy install great leather.
Great product all you need for install is there. It took me 30 to install.
Trustpilot
2 days ago
2 months ago
1 month ago
4 days ago
![Spigen Tempered Glass Screen Protector [GlasTR EZ FIT] Designed for Tesla Model 3 (2023-2017), Tesla Model Y (2024-2020) 15 inch Dashboard Touchscreen - Matte/Anti Fingerprint](https://images-na.ssl-images-amazon.com/images/I/61jxfhqxNzL._AC_UL116_SR116,116_.jpg)
