🛠️ Build it your way, sit your way!
The 2x4basics 90134ONLMI Hopkins allows you to easily construct a custom chair or bench using any type of 2x4 lumber up to 6 feet long. Designed for durability and comfort, this product is proudly manufactured in the USA, making it a smart and economical choice for DIY enthusiasts.
O**A
Sturdy, weatherproof, heavy, durable fairly easy to assemble
My first reason for choosing this product was because I wanted an inexpensive yet durable bench for an undeveloped wooded property on Lake Michigan where there is no structure of any kind for shelter. That means this will be outdoors ALL the time. I thought this plastic/composite material along with treated lumber would be just the right thing for longevity in the woods.Well, upon completion I'd say it seems this was the right choice. It seems very sturdy but it was not as inexpensive or as easy as I thought. I'm not a builder so I don't know any of the tricks of the trade, therefore, my projects often come out as something less than professional looking. However, I think this project came out just fine.As for expense...have you seen the price of lumber these days!!!??? (ref. May 5, 2021) Holy Toledo! I paid $48 for the bench brackets and $91 for wood. Plus about $14 for better screws. So, not as cheap as I'd hoped but still not bad for the what I ended up with. It's a nice, sturdy, comfortable, heavy, weatherproof bench and that's exactly what I wanted. But let me share a couple of points that might be helpful to others.As other reviewers have said, it isn't super easy to build all by yourself. Especially the "seat boards" for which you need to turn the bench over to access the screw slots. Soooo, since I was working alone, I heeded the advice to have a couple of large clamps at the ready and they were a life saver! I clamped the boards to the frame, measured, made adjustments as necessary, drilled pilot holes and screwed them on. Without clamps or a helper, I don't think I could have done it...at least not without it looking like a Jr, High shop project.Another thing that I think helps is to cut your boards an inch too long (or, if you bought 6' 2X4s, bring the brackets inward a total of one inch). That gives you a half an inch of overhang on each end. The reason for this is that many of the screw slots are on the outermost edges of the brackets which means that the screws go in very close to the ends of the lumber if you don't give it the extra space. The problem with that is splitting. Might even be an issue with longevity if too much movement on the bench causes stresses on the screws, thereby splitting the wood that way too. So leave a little extra room and DO drill pilot holes.Some genius builder also suggested using 8ft 2X4s in the bottom slots of the brackets, thereby leaving an extension sticking out on each side upon which to place boards, creating "end tables". I did this but made one modification: The slots for the front of the braces are about 3/4" lower than the ones for the rear of the braces. If you put boards across for a table, it will end up being slanted forward and anything that CAN roll WILL. Since I used 1X4s for my "table tops" (2X4s seemed too heavy and chunky to me) I simply "ripped" a short piece down the middle to and cut it to the length of the extensions to make a nice shim. That made the table level. (I used exterior deck screws for the table tops and the shim pieces.)As another reviewer offered, I DID pay for screws that were heavier (#12s instead of #10s) and half an inch longer for a better grip (1-1/2" instead of 1"). I used square drive because I dislike phillips or slotted screws. And I bought stainless steel because this bench will always be out in the elements. (I'll probably use something like "Thompson's" sealer on it too.)One other thing that was a "life saver" (credit going to another reviewer) was to have a rubber mallet on hand. I actually picked one up at Dollar Tree for a buck and it worked like a charm. The two bottom brace 2X4s went in hard. I could not force them in by hand and I am not weak. So, I pounded on the brackets to force them onto the 2X4s and I'm happy to report that the brackets showed no sign of abusewhatsoever.I'm quite pleased with the end result (see photo). This bench is heavy (probably around 100 lbs.) It seems very sturdy, steady and durable so I hope it lasts a long time. And it seems pretty comfortable to sit on, considering it's wood.
K**R
Great and easy build
These frames are solid, have cup holders and super easy to build. A must buy for cheap benches
B**N
Bench ends review
The product is light weight but vey strong. I assembled a 4 foot long bench to be used outside in our backyard. Perfect fit for treated 2x4 lumber. Very comfortable after assembly.
B**E
Went together fairly easily
The reviews from other buyers was very helpful - read them! I used 5ft pieces of premium Fir lumber and painted it with a water-based solid stain. Provided screws are not weather-tolerant, and I'm not sure why the manufacturer bothered to include them. I bought #10 x 1.25" truss head stainless screws. Some of the screws can't be driven straight-on, due to interference from the frame itself. Using a long screwdriver or extension will help. I would've preferred holes rather than slots for the screws. Cup holders are too shallow to be useful.
V**I
DIY Bench Ends
This is the 4th time I have bought 2x4basics to add to my vacation home benches in PA. I have 2 of those that I bought in 2013 and 2014, they still hold and look like new. Very durable. All you need is 2x4 pressure-treated wood that you cut to your desired length up to 6ft. Price got up over the years but this is worth it.
K**.
From A Beginner's Point of View
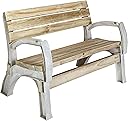
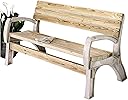
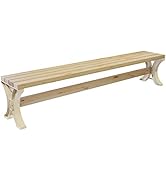
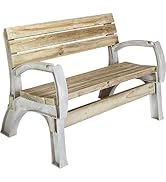
This was my first time building something other than assembling Ikea furniture and was completely lost at first but felt like a pro at the end. Overall, I am so happy with the bench; although, I must say reading previous reviews helped tremendously! It took me some days to finish this, since I had to wait for the stain to dry and settle, and it ended up being more expensive than I planned but way more rewarding than just buying an assembled bench.For those who are also newbies to building things, below are the suggestions I used. Maybe it'll help you out too.1. Purchased redwood for my wood. It's more expensive but I wanted this bench to last so I went with a higher quality wood. Also, when looking for wood, try to find the best pieces you can, without any sap leaking from it or chipped pieces. Seriously, I felt like I went swimming into the pile of wood at Home Depot (literally, all people could see were my legs sticking out) to find 5 decent pieces because most of them were pretty bad off, but it was worth it. :)2. Bought 5 pieces of 8' and had Home Depot cut them in half. I wanted the finished bench to be around 3-4' so this worked great. Also, remember to subtract about 5.5" to the board length you are getting, to compensate for the width of the chair arms. My finished bench was about 3.5'.3. Used a wood stain/sealer. I went with Behr Atlantic Semi-Transparent Waterproofing Exterior Wood Stain and Sealer. I only needed a quart, and that worked great for two coats. I also chose semi-transparent over solid, since I wanted some texture from the wood to come through.4. Sanded the wood before staining it and rounded the edges. This took longer than anticipated, but it was so worth it to have those beautiful round edges and a smooth surface to paint on.5. Used a plain ol' foam brush. I tried a different brush (and more expensive) but honestly, the foam brush had a more even coat in the end.6. Bought #10 x 1-1/2" Stainless Steel Fence & Deck Screws to use instead of the ones that came in the box. Here's a link to the ones I got on Amazon: https://www.amazon.com/gp/product/B07PRXM53R/ref=ppx_yo_dt_b_asin_title_o06_s00?ie=UTF8&psc=17. Left about 1/2" off the edges, instead of putting the wood perfectly aligned with the chair arms, to prevent the wood from splitting. I didn't mind seeing a little extra wood on both sides of the bench.8. Used clamps. I assembled this on my own and using clamps helped to keep the wood in place while I screwed in the screws. Also, I put the clamp on while I was adjusting the wood, which helped me get a precise measurement for the spacing. The clamp would hold the wood in place, and I could move the piece slightly to the right or left to get it just right.9. Assembled the bottom pieces of the bench by going under it, instead of turning it upside-down. Also, I assembled the pieces in the front and back first, then I just moved the middle two pieces forward or backward slightly to get the right spacing. While using clamps, this process ended up being really simple.10. Used a power drill and a regular screw-driver. I found that the power drill worked great, but to really tighten the screws at the end, I preferred to use a screw-driver.Well, I hope those tips help someone else and that the bench turns out fabulously. :) Thank you to everyone else for all of your suggestions and tips!
S**S
Excellent! For best results, read on.
Okay so this is the best park bench you will ever find, period. Not only does it go together in under an hour easily. But it’s actually fun and oddly satisfying to put together. A few things… leave a 1/4 inch or so overhang on the outside to avoid cracking the wood. I used “cedar” and I am not treating it with anything. Plus I drilled skinny little pilot holes first to insure no cracking. And… if you look at my picture you will notice I put one extra 2X4 piece, below the three back pieces and screwed it in just under the armrest. I think it looks better, it’s more sturdy, although it was plenty sturdy to begin with, and now my dog doesn’t slip through the back of it when he sits beside me.
J**A
Bonita, pero inestable.
Se ve muy bonita. Pero es inestable. Tiene algo de movimiento hacia los costados. Es un defecto de diseño. Recomiendo mas como algo estetico, que de uso.Aun con sus 9 maderas de 1.5 pulgadas, resulta inestable.
D**Y
Excellent design.
This was designed for imperial wood sizes (USA). Getting a match to the UK's "metricated" sizes can be a bit of a trial if you don't have access to woodworking equipment. My advice is to get the timber from someone who can actually cut/plane to the sizes required and all will be well.I now have three of these and they are in a very exposed location close to the sea. They are coping well with the sea the sun and the rain. I expect the frames to outlast the timber.
D**A
Muy caro para lo que es
La calidad es promedio. no soportan demasiado peso pues las tablas (y puse tablas de buena calidad) causan que se doblen un poco los extremos cuando hay bastante peso. En realidad sale más barato hacerte tus propios recargabrazos.
A**R
Great DIY Bench!
The bench was super easy to put together. It took me less than an hour and it looks great once finished. The package comes with the plastic end pieces as well as 40 screws and easy to follow indicators where you must drill. You need to buy the wood. I went with western cedar which looks absolutely stunning and does not require treatment. Suggest you pre-drill holes slightly to avoid cracking. The bench can be up to 6 feet long and as narrow as you wish. I went with 4 feet as I simply cut 8 foot pieces in half. Plenty of room for 3 people to sit down and it even has place holders for your coffee cup! The cost of this bench including the bench ends plus the cedar I purchased is far cheaper than buying a commercial bench and the quality is far better. Looks great and it requires virtually no treatment.
Trustpilot
1 week ago
5 days ago