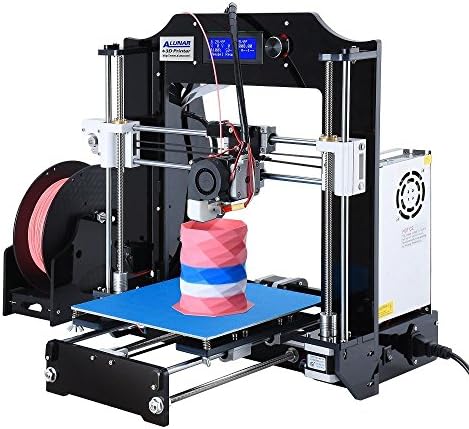


ALUNAR 3D Printer DIY Prusa I3 Kit Self-Assembly Desktop FDM 1.75mm PLA 3D Pen Filament Heated Bed
Product ID: 69758257
Full description not available
D**D
Well I'll be damned... this is awesome!
After reading the other reviews, and seeing that they were all still highly rated despite a few "issues", I decided "oh why not, you know you want to..."ONE WEEK REVIEW:Let's start with the cons... as there are not many:1) The Videos to describe how to put them together were low quality videos. Had to do a lot of rewinding and reviewing to see which part they were talking about.2) The power supply provided was bigger than the one in the video, took some electrical common sense to figure out that I wired the power into 2 grounds, thus providing no power.3) Also, since the power supply was bigger, for some reason it would not mount, so I had to drill an additional hole in the acrylic on the side of the printer to mount it.4) Not sure if it was my filament, or a dirty clog (seemed like the latter), but the first time I tried to put filament through it instantly clogged. Had to dismantle the extruder, and blowtorch the tip to unclog. Also, seemed a lot more difficult to remove than normal filament clogs, had to get feisty with a needle to get the gunk out. After reassembling, it was perfect.5) The Z-Stop is a pain in the butt. Generally if you need to adjust the Z stop, it's a fraction of a millimeter, but this is a weird "slider" kind of mount that is very hard to make miniscule adjustments. I just tighten it really good, and gently force it into calibration after a few Z-Home clicks and minor adjustments through brute force. Will probably redesign the z-stop.6) For some reason (maybe it's the way I assembled it?) the little fan that connects to the extruder blower for "tip-cooling" was long enough to touch the heating element on the extruder, and immediately melted. I will have to design and print a better one.PROS:Everything freakin works great! My biggest frustration, aside from rewinding the video dozens of times, was adjusting the Z stop. The first print you can see on the left, at the bottom the Z was too high, but it eventually corrected itself and made a very clean print. The print on the right was actually done through a smart phone Repetier connection with a better Z-stop calibration.You may be able to see the quality on the sides of the prints being a little spacey between the layers. The side that is showing is the only side that did this and I believe it's simply a bed leveling issue.All-in-all I love this printer. I will be doing some advanced prints here in the next few weeks and I will be giving a one-month review with any additional experiences I acquire during that time.6 MONTH REVIEW: Ok, so it has been a champ! I have had a few clogs in the extruder from switching between filaments and not purging the tip properly. Disassembled, torched, and reassembled.Things to make careful note of: First off, the power supply is, in fact, underrated for the package. I received a 200W power supply, which is just shy of the requirements of perfect functionality. I ordered a 350W power supply for 3D printers, and hopefully it will resolve my issue. The only issue right now is how long it takes to heat the bed. When I tested with a multimeter, I was only getting 10.43V on the 12V powering the bed. I timed it today, and from ambient temperature (21C) it took 1 hour to get to 82C. Hoping the power supply is the only thing I need to address.Still haven't had the time to print the new Z stop, as I really just want to redesign it instead of reprint the two parts into one. Just note that it is very finicky to adjust the z stop, and is generally a 5-10 minute process to get perfect calibration.Finally, I highly highly recommend getting a 1/4"-3/8" of glass cut for this bed, as well as applying a PEI surface. This will help you stop using ABS slurry or tape to get your prints to adhere.I designed and printed several different tips for the fan, but I have yet to print the perfect fan tip to replace the one it came with. When I do find a perfect fit, I will post a link in my review for the replacement tip.1 YEAR+ REVIEW:Ok, so I noticed several issues that needed to be addressed before I could consider this a good printer.1) the acrylic bed may not be perfectly lined up with the screw holes on the bed. I ordered a replacement y carriage for the MK2 printbed off of reprapchampion.com and because of the design, I needed to print spacers to use the new bed. (spacers on thingiverse under mwinzer)2) the print surface is incredibly slick, and is very hard to stick abs... you might get lucky with PLA... I recommend getting a piece of fitted glass and gator clamp it down. Use blue tape, or if you're feeling fancy, get a PEI build surface for your glass along with the 3M tape necessary to adhere it.3) the Z stop mechanism is a sliding mechanism that resides directly behind one of the linear z rods/threaded rods. I redesigned a z-stop modification and uploaded it to thingiverse. (mwinzer is the name on thingiverse)4) I needed to upgrade the power supply to get the bed to heat beyond 82C, then I noticed the temp jumps to 95C. The temperature table is off in the firmware, and the ANET customer service did not offer an update for firmware, but instead offered the suggestion to "lower the temperature"... long story short: ZERO customer service.It was an amazing journey getting this thing printing like I like it... actually still have a friend that is planning on purchasing this for the same journey... as far as being 100% print ready? You'll have a lot to do. :)
H**T
Worked - No Thanks to Them!
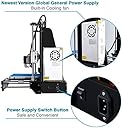
Except for what I have read on the Internet, I cannot tell you anything about the quality of the printer. This rating is for the kit only.I had a very difficult time assessing a rating. Some aspects of the rating should get a 5-star plus other aspects should get negative ratings. I finally decided to present the facts and let you decide for yourself.There are some things you need to do immediately if you buy this product. First, of all, buy some filament. This kit has a nice holder - but not one mm of filament. Secondly, as soon as you can get your hands on the card - make a copy of its contents. If anything happens to the card - there is no way to replace its contents. If you got to their website - the message you will receive is "on SD card".The first picture shows how you get the package - it appears to be upside down. But, they are rather ingenious here, just flip the box over and as you see from the second picture, it is ready to go. Right on the top you will see a set of assembly link videos to You Tube, a website and a little information. The website is a useless blank forum and not a single one of the links will get you anything but a message saying "removed by user" The is a website alunardirect.net that lists video links but like the links on the paper - they get you nothing. There is no email address, no videos on the SD card - no DVD - no CD - no way to contact anybody. There is no instruction manual in the kit and no instruction manual on the SD card. I did find a file labelled "installation instructions" that is a set of JPG files that give you a photographic journey through the assembly of the printer. Also, most of the files on the SD are old versions of Word and Excel that you will need to convert to a usable format. I was surprised they did not use PDF files that are more universally used.I wrote an angry letter to the seller via the Amazon Buyer/Seller Message system and I got a response that included a set of QRT links to You Tube Videos and a hotmail address. The video links are for a different model of printer and do not follow the same steps as the JPG set does, but the videos are close enough to be useful.You also get a parts list but there is no pictorial reference. Some parts I could figure out and others I had no idea what they were until I found a JPG that had the part on it. The good news - you get extra parts - more extra parts than I have ever seen in a kit before! The parts are packaged so well that you had no trouble getting to the part once you figure out what you need. There was a great deal of thought and effort that went into the packaging and it shows. You also get all the basic tools you need to put the printer together.I had very little trouble putting the printer together. Notice the frame is held together with screws in a "t" slot. I did have some difficultly getting the nuts into the cross slot cut - I use a set of clamping jewelry tweezers to sold this problem. The end stops are attached to the acrylic by two self-threading screws. These screws would not bite into the acrylic - I used a small jewelry hammer which I use for attaching gemstones to a bevel setting and hammered the screws into the acrylic like nails.When I finished the assembly I tried to print - it made all the right moves - but there was nothing on the table. I discovered the stepper motor was not advancing the filament into the extruder. The motor was not moving - it only made a clicking sound. I thought the motor might be bad so I hooked it up to the y-axis motor and found it moved. I sent the photos and video to the hotmail address and waited and waited and got no response.I sent another message via Amazon - and their response was "What photos and videos?"I went back to the Amazon Buyer/Seller system and told them what had happened asked for procedures to test and adjust the stepper motor and a email address that worked.They gave me a skype address, how to adjust the x and y axis - but nothing about the motherboard and nothing about the extruders.I knew all I needed was a small adjustment in the motor control circuit - I had located the pots, however I could not be certain which circuit controlled the extruder motor. I got no response from the skype address, I even used the service link message box on their website and got no response there either.I do not know if their communications system has completely broken down or they are just ignoring me. Perhaps they did not know what to do.I still have not gotten any response from any of their people. The only way I can get any response at all is via the Amazon Buyer/Seller Messages. All I can say is I have spent three weeks on this project and I am still waiting for the first response.There is absolutely no documentation on the motherboard or the LCD board anywhere on their site. I did identify the LCD board using other sites - still have no documentation there, either.I decided to take three steps - one at a time and see what happens.Step One: Change out the stepper motors between the y-axis and the extruder. Perhaps, there is just enough difference in motor characteristics to make a difference - they are electrically identical.Step Two: make a best guess blind adjustment. This runs he risk of damaging components.Step Three: Get a motherboard from another company.I did step One---IT WORKED!!!!In Summary, the product, itself, is great! I am getting prints that look really good - to me at least. It is very well packaged and presented. However, it does not come with any service. The parts are good quality parts and I would get the kit just to have a complete set of parts to make a printer - who knows - just maybe you will get a working printer as well! I would not buy the kit unless you are prepared to work without any help from the company---beginners beware!
N**E
Great first 3d printer with excellent customer support
Thsi is my first 3d printer ever and it took me around 8 hours of patient assembly to get this setup, following the included video, as well as the one up on YouTube. While there were slight differences in the video on screws needed and what was in the kit, it wasn't hard to figure out, if you have any kind of technical savvy. I did have one tiny screw missing from one of the bearings on the Z motor but I contacted Alunar and they shipped me a replacement, no questions asked, and did it promptly. They have excellent customer support.This isn't a kit for the impatient, but once it's all setup, the entire rig has been very easy to use and I've printed dozens of items. Make sure to not remove the tape from the heated bed when you first get it. I did and then realized it needed to be on there. I now use painter's tape and it works a champ for adhesion of the first layer. Working with Cura for the slicing and using the included (or purchased) SD card is smooth and I've been able to use different PLA filament colors without a problem.For the price, this is a solid kit that is fun to tinker with and will help you learn a lot about 3D printing. Highly recommended.
Trustpilot
2 days ago
2 weeks ago