

Weevil Eyes-Beginner Welding kit(Suitable for Student Experiments. Parent-Child Interaction. Handmade Gift
Product ID: 89028629
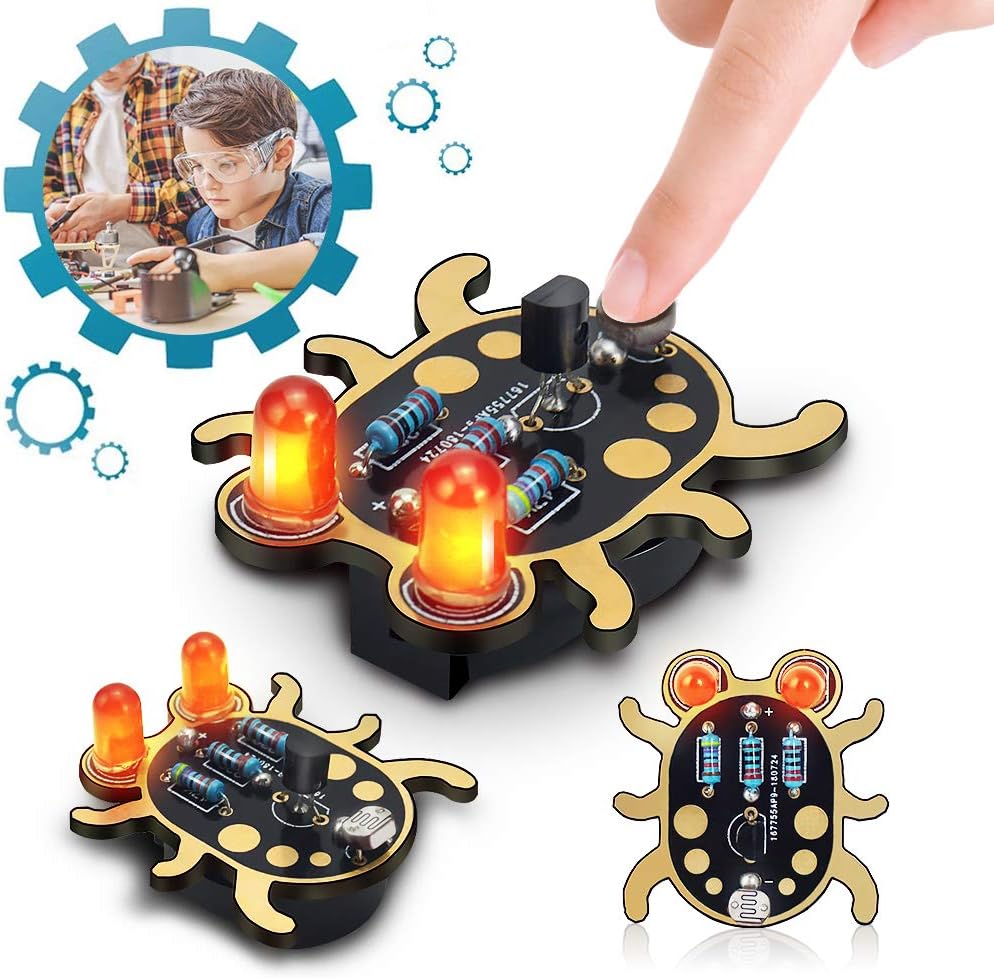
The Weevil Eye kit is an introductory electronics kit designed to help the novice electronics enthusiast learn about things like soldering and resistance.The Weevil Eye is designed to look like a little beetle whose eyes glow in accordance with the ambient light level – the less light detected, the brighter the friendly weevil’s eyes will glow. There is no programming involved and all soldering is beginner friendly, so this kit is perfect for the embedded electronics novice.
G**Y
Fun, but some hard solder spots for the very beginner.
I had fun with my child making this, so it is definitely something fun to build as long as you have the correct fine-tipped soldering iron and decent solder. There are a few uncertainties in the directions and some soldering pads closer than ideal. Lastly. the photo resister is a little tricky.Soldering starts with three resisters. The direction just shows two, but there is a clear place for the third, which is a different value and which is clearly noted on the circuit board as such. The pads are small and the tin/silver/copper solder (I didn't want to use lead with my child) had a little bit of a hard time wetting the pads easily. I used some paste flux to help.The transistor is next. One of the transistor pads is very close to the center resister and so you have to be careful not to bridge these. My iron has a medium tip and it worked out OK, but not trivial. The photo resistor went in next, and was also easy, as were the two LEDs. Polarity is well marked on the circuit board and directions so there wasn't much worry with the transistor and LEDs being in the wrong way.The last item was the batter holder, which comes in through the bottom. To solder those you have to get your iron and solder into a tight spot, one side near the LEDs and center resistor, the other between the transistor and photo resistor. It was a very tight fit and we melted some of the plastic on the components.When assembled we put our finger on the photo resister and nothing happened. It was hard to troubleshoot given the battery holder covered up many of the solder joints (resistors and transistor.) I had to desolder the battery holder and went through each joint. Instead of soldering (and I wish I did this the first time) I just held the battery holder, with batter in it, to the pads to see if it worked. It seemed to, so I soldered it in for the second time.It still didn't work. I checked voltages and resistances and everything seemed to work (although a circuit diagram would have been nice.) It turns out that in a bright room you can't just put a finger on the phototransistor, as it says in the directions. Light can leak in through the sides. Instead, you have to cover the entire lower portion of the weevil to get the eyes to light. In a darker room, you can just use your finger, but I think I spent a lot of work because we were doing this in a room with a large window and just used our fingers. In the same room, when covering with our hand, the eyes lit up to be easily seen.The battery is not easy to get in and out, so the device is always on. No switch. I don't know how long the coin battery will last, but it is a shame you can't turn it off easily to preserve the batter. I'm going to make an adapter to use larger batteries so this can be on my child's desk and work for an extended time, like a nightlight.Fun kit, just not perfect. Great for beginners if you have some skill yourself and a soldering iron with a fine tip.
P**L
Barely there
This kit is sad. The components are all there, but they come in a ziplock-type bag. And that's it. The kit does not come with instructions, it only comes with a poorly translated sheet of random words. They don't happen in any sequence, they don't have all the instructions to assemble the unit, they must be from something like a PDF of a Chinese assembly sheet run through Google Translate. You can even see this in the description - currently the Amazon description is a "welding" kit. This isn't welding (joining two pieces of metal), this is soldering (making electrical connections).Luckily if you know how to solder and you can guide a child through it. There is a picture of all the components laid out on the board with markers like "440K" over the resistors so you have just enough info to solder this kit. But throw the instruction book in the recycling as soon as you can figure out the component layout, it's useless.Looking at a direct competitor, SparkFun has a WeevilEye which seems to be the exact same unit - maybe with a different color of board. They list that kit with the same MSRP, but they are currently selling their version for 20% cheaper. I can't ding this kit on price since the MSRP is the same as SparkFun, so I'll give half points for at least being what it claims to be.
R**H
Difficult for beginner
I wanted to try this since it said for beginners. I found the instructions were not complete. one resistor wasn't even mentioned. The holes are very tiny and close together. I only have a medium soldering tip and it proved very difficult to not cross solder connections. If you leave too much solder on the resistor connections you can't fit the battery connection tight enough to the board to make good contact. No way to remove the battery once it is put in the battery holder. Interesting kit just not for a noice beginner.
S**T
Such a fun project
This was such a fun project to do with the kids. My husband is always soldering so this was a really good intro project for him to do with them. It took about 15-20 minutes after dinner one night. My youngest carried the little light up bug with him everywhere after. It came with an extra piece which had us confused for a bit, that was really the only drawback. It was great, came with everything we needed, good fun little project to help the kids learn. My oldest, 11, was able to do most of it himself! We just wish it had an on/off switch instead of the photocell because the batteries die really quickly that way.
K**S
Fun science soldering project
This does lack a few parts to be able to put it together, but if you are used to soldering and have several supplies that go with it, this can be a great learning kit. My oldest son loves to help his dad out, and this kit helped him feel important and he loved how the led eyes lit up on this beetle once it was done. This took about 30 mins for him and my husband to put together. They really enjoyed it, and were pleased how it turned out.
A**5
Great little training tool
Great little training tool for those with interest in electronics or basic building skills. I got this to give to a coworker that lacked in skills of circuit design, soldering skills and basic construction skills. He did find it interesting and was able to accomplish. Appeared proud afterwards that this was something he had built from scratch and it actually worked. Would be great for younger minds just starting out. Cool little trainer.
M**Y
Umm No
It came in a small ziploc bag. No real explanation or tools. Just that turtle thing in a bag. Definitely you need to have the welding tools yourself. This is a very simple piece with not much to it. Guess it's good for a first time use and learning. However if you want something more teachable I suggest to look elsewhere.
R**Y
Fun project, works.
My 12 year old watched his big brother soldering a new keyboard from parts and wanted to try soldering. This was the perfect kit. The pads are big, and the kit is simple enough for a first time beginner. This would make a nice school kit for an entry level electronics class.
Trustpilot
4 days ago
2 days ago